Prerequisites
- EMR Version: 5.28.1
- AWS Account ID of the customer to be whitelisted for accessing the Infoworks edge node.
Infoworks provides an Amazon Machine Image (AMI) of the edge node and Infoworks server software in a private marketplace library.
To obtain access to this AMI prior to proceeding with further steps, email the AWS Account ID of the account which will be used to access the Infoworks edge node image, to the Infoworks support team.
(Your Account ID will be displayed in the Amazon console My Account section.)
Infoworks support will enable access to AMI from the provided AWS Account ID. Once this is completed, you can proceed with further steps.
Procedure
- Login to AWS Console.
- Search for EC2 in Find Services in the AWS Console dashboard.
NOTE: Infoworks Secured AMI works only on Kerberos type EMR Cluster. Before starting the installation procedure, the user must set up the Kerberos configuration.
To create the security configurations on EMR, see Secured EMR Cluster Deployment .
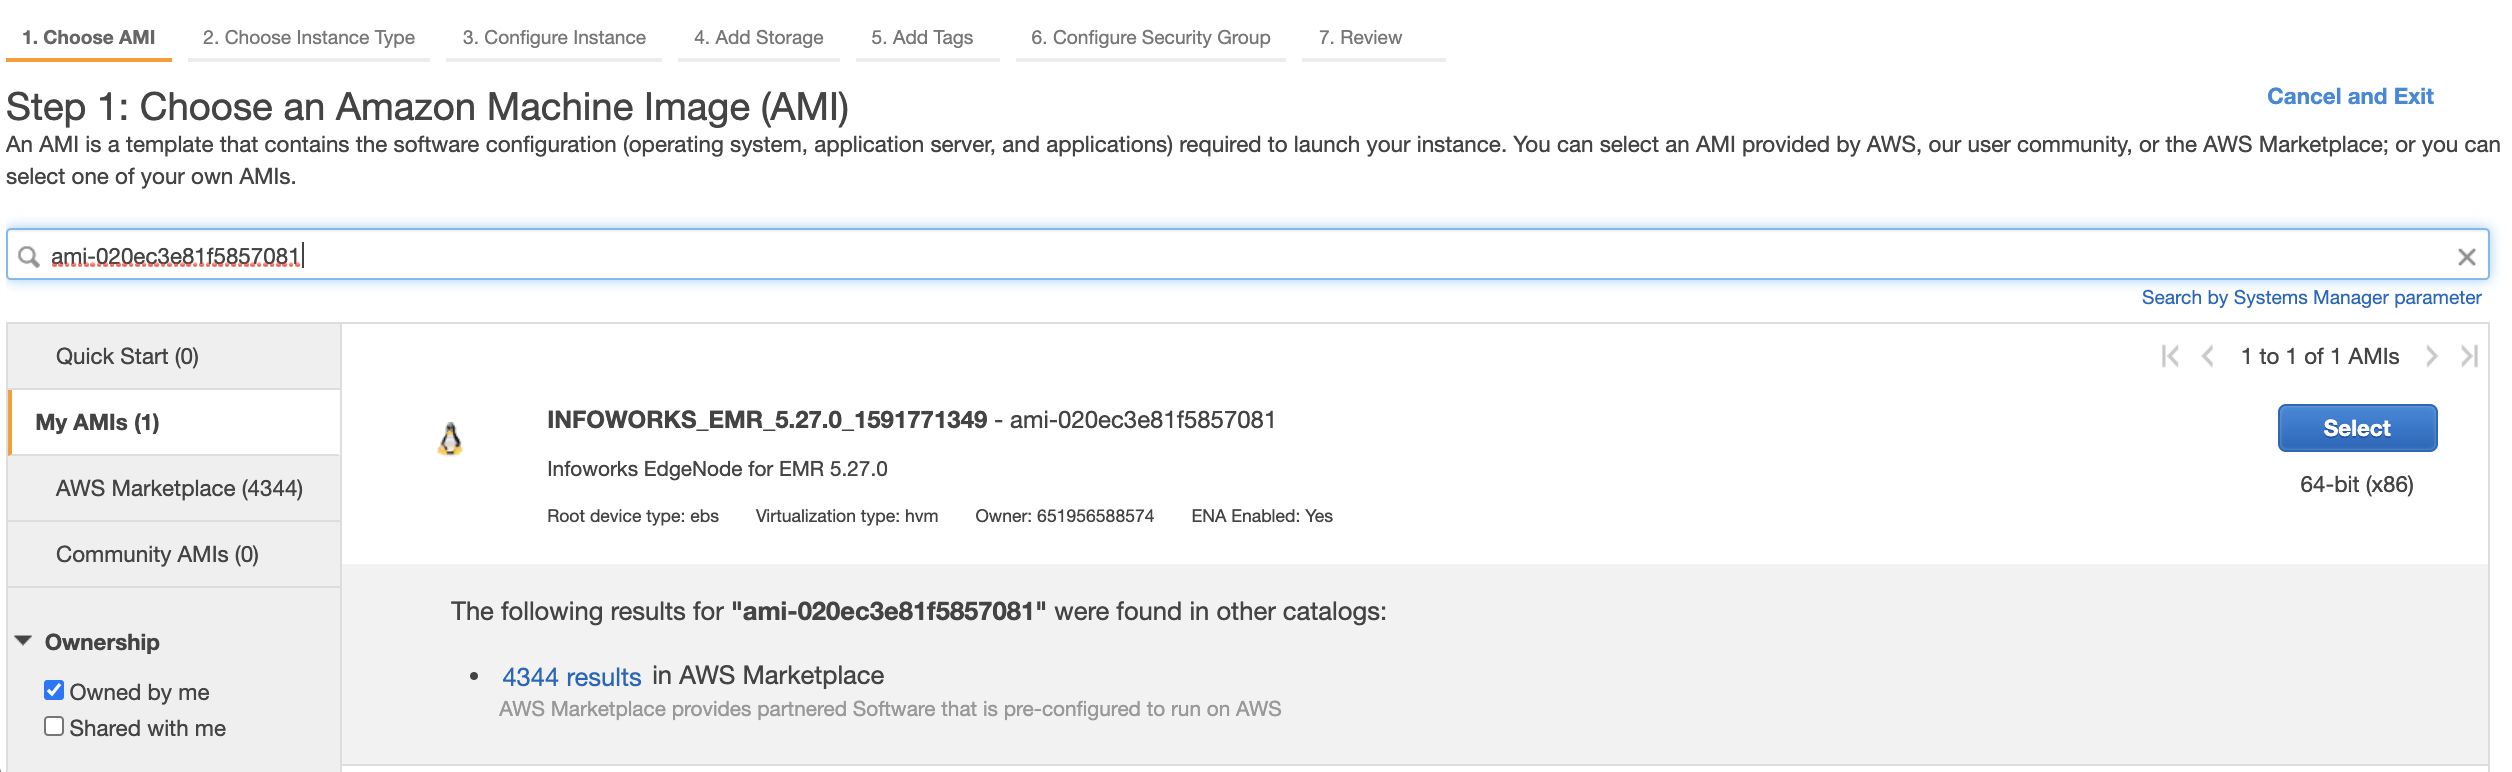
Choose AMI
- Select Launch Instance from the EC2 Dashboard. Select the image from My AMI Section.
NOTE: The AMI ID for secured edgenode is ami-0a867d67c3d1f9f2e
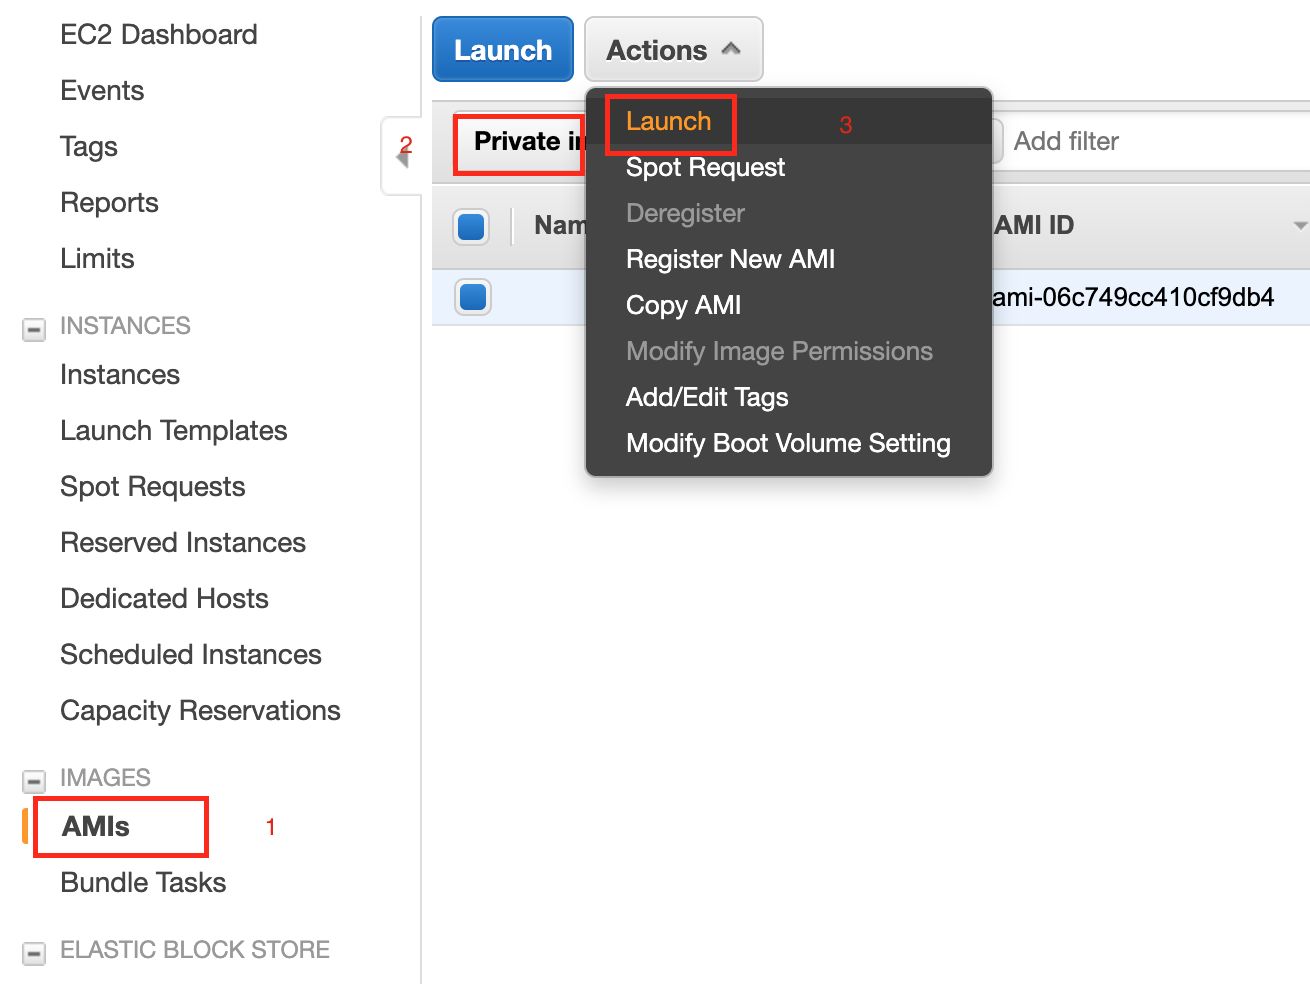
If the AMIs are not available in the above screen, following is the alternate option to launch the AMI:
- Open the EC2 dashboard.
- Navigate to AMIs > Private Images.
- Select Infoworks EMR AMI.
- Click the Actions option and select Launch.
Choose Instance Type
- Select the machine type for the Infoworks Edge node. Minimum and recommended is m4.4xlarge.
Configure Instance
- Number of Instance is 1.
- Select the VPC and Subnet ID, similar to EMR Cluster.
Add Storage
- Add Root volume Storage in GB. For example, 300 GB
Add Tags
- Add naming convention or environment tags for the resource.
Configure Security Group
- Create a new security group and allow IW Ports and SSH.
Review
- In this section review the configurations and select existing key pair or create a new key pair and proceed with creation of Instance.
Pre-Installation Procedure
- Login to the Infoworks DataFoundry edge node as hadoop or ec2-user.
- Copy the ssl-client.xml and ssl-server.xml files from master node to S3 using the following commands:
aws s3 cp /etc/hadoop/conf/ssl-client.xml s3://bucket_name/ssl-xmls/ssl-client.xml
aws s3 cp /etc/hadoop/conf/ssl-server.xml s3://bucket_name/ssl-xmls/ssl-server.xml
- Download the ssl-client.xml and ssl-server.xml files to the Edge node using the following commands:
wget https://bucket_name.s3.amazonaws.com/ssl-xmls/ssl-client.xml -O /etc/hadoop/conf/ssl-client.xml
wget https://bucket_name.s3.amazonaws.com/ssl-xmls/ssl-server.xml -O /etc/hadoop/conf/ssl-server.xml
- Copy JKS certificates from master node to S3 using the following command:
aws s3 cp /usr/share/aws/emr/security/conf/ s3://bucket_name/jks_certs/ --recursive
- Download the certificate files to the Edgenode using the following commands:
wget https://bucket_name.s3.amazonaws.com/jks_certs/keystore.jks -O /usr/share/aws/emr/security/conf/keystore.jks
wget https://bucket_name.s3.amazonaws.com/jks_certs/truststore.jks -O /usr/share/aws/emr/security/conf/truststore.jks
Installation Procedure
The default user is ec2-user.
Perform the following steps:
- Switch to root user.
- Download the installation script using the following command: wget https://infoworks-setup.s3.amazonaws.com/emr-configurations/emr-5.28.1/emr-bootstrap.sh
- Add the execution permission using the following command: chmod +x emr-bootstrap.sh
- Run installation script, entering your corresponding required information using the following command: ./emr -bootstrap.sh
NOTE: Kerberos tickets are renewed before running all the Infoworks DataFoundry jobs. Infoworks DataFoundry platform supports single Kerberos principal for a Kerberized cluster. Hence, all Infoworks DataFoundry jobs work using the same Kerberos principal, which must have access to all the artifacts in Hive, Spark, and HDFS.
Post Installation
- Copy Keystore passwords from /etc/hadoop/conf/ssl-client.xml to $IW_HOME/conf/dt_spark_defaults.conf file.
Set the password mapping as follows:
ssl.client.keystore.keypassword ⇒ spark.ssl.keyPassword
ssl.client.truststore.password ⇒ spark.ssl.trustStorePassword
ssl.client.keystore.password ⇒ spark.ssl.keyStorePassword
- If spark.dynamicAllocation.enabled is true, replace the spark.dynamicAllocation.minExecutors,spark.dynamicAllocation.initialExecutors property value from 50 to 1.
- Copy userData.json file from Master node to S3 using the following command:
aws s3 cp /var/aws/emr/userData.json s3://bucket_name/userdata/userData.json
- Download userData.json file to the Edge node using the following command:
wget https://bucket_name.s3.amazonaws.com/userdata/userData.json -O /var/aws/emr/userData.json
- Change the ownership of the file to Infoworks-user and run the following command:
sudo chown infoworks-user:infoworks-user /var/aws/emr/userData.json
- Copy the Keytabs to S3 using the following commands:
aws s3 cp /etc/hdfs.keytab s3://bucket_name/keytabs/hdfs.keytab
aws s3 cp /etc/infoworks-user.keytab s3://bucket_name/keytabs/infoworks-user.keytab
- In the Infoworks DataFoundry landing page, navigate to Admin > Configuration > Add Configuration Entry. Add property modified_time_as_cksum to True, and save it.

- In the Infoworks DataFoundry landing page, navigate to Admin > Configuration. Change value of CSV_PARSER_LIB property from COMMONS to UNIVOCITY.

Perform sanity check by running the HDFS commands and Hive shell in the edge Node.
IMPORTANT: Ensure that you add the EdgeNode Security Group ID to allow all inbound traffic to EMR Security Group.