Following are the steps to design a cube:
- In the Cubes page, click the newly added cube. A blank Design page is displayed.
- Click Open Cube Editor to design the cube.
Use the sources listed under the Datalake Tables section to the left of the Cubes page to create a cube.
NOTE: The Datalake Tables section lists the sources accessible in the Domain for the logged in user. Any of the ingested tables or a pipeline target output can be used as a source table and in turn used as fact or dimension tables for the cube design.
Adding and Configuring Fact and Dimension Tables
- Locate, analyze, and drag the fact and dimension tables onto the cube editor page. The first table must be always the root fact table. For details on Fact and Dimension tables, see Fact and Dimension Tables topics in the Fact and Dimension Tables section.
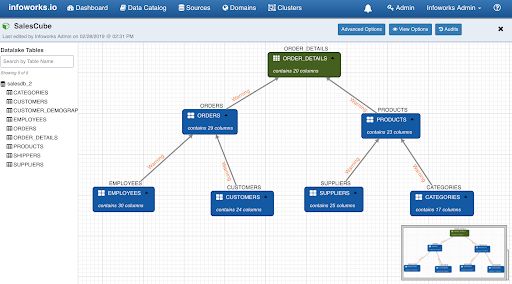
NOTE: The first table added to the cube editor page becomes the root/main fact table. The alias for this table will be same as the table name. In this document, we are using Sales data (sales_db) for modelling the snowflake cube. In sales_db, we can use order_details as the fact table and other tables like orders, products, employees, customers, supplier and categories can be made as dimension tables. The fact tables are represented by green and the dimension tables are represented by blue in designer.
- Dimension tables are generally small in size. However, using large dimension directly in cube might cause build errors due to memory space shortages. To overcome this, you can use large dimension table as a fact table. To convert a dimension table to fact table, select the required table and click the Convert to Fact Table button. On converting dimension to fact, the table will have properties similar to the main fact table.
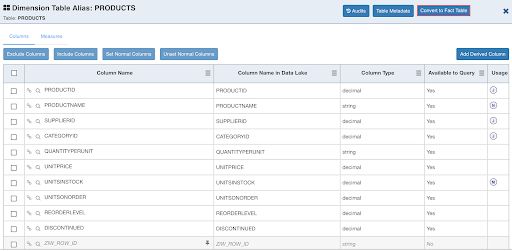
In the current design, the following page displays the cube after converting PRODUCTS table to fact table.** **

NOTE: Root/Main fact table cannot be converted to dimension table.
- To specify the join conditions between the tables, connect nodes by drawing an edge between them. Following is an example of joins among sales tables:
NOTE: Root fact table cannot have outgoing edge. Other nodes can only have one outgoing edge. If you need more than one join condition from a table, then drag and drop another instance of the table with a different alias name.
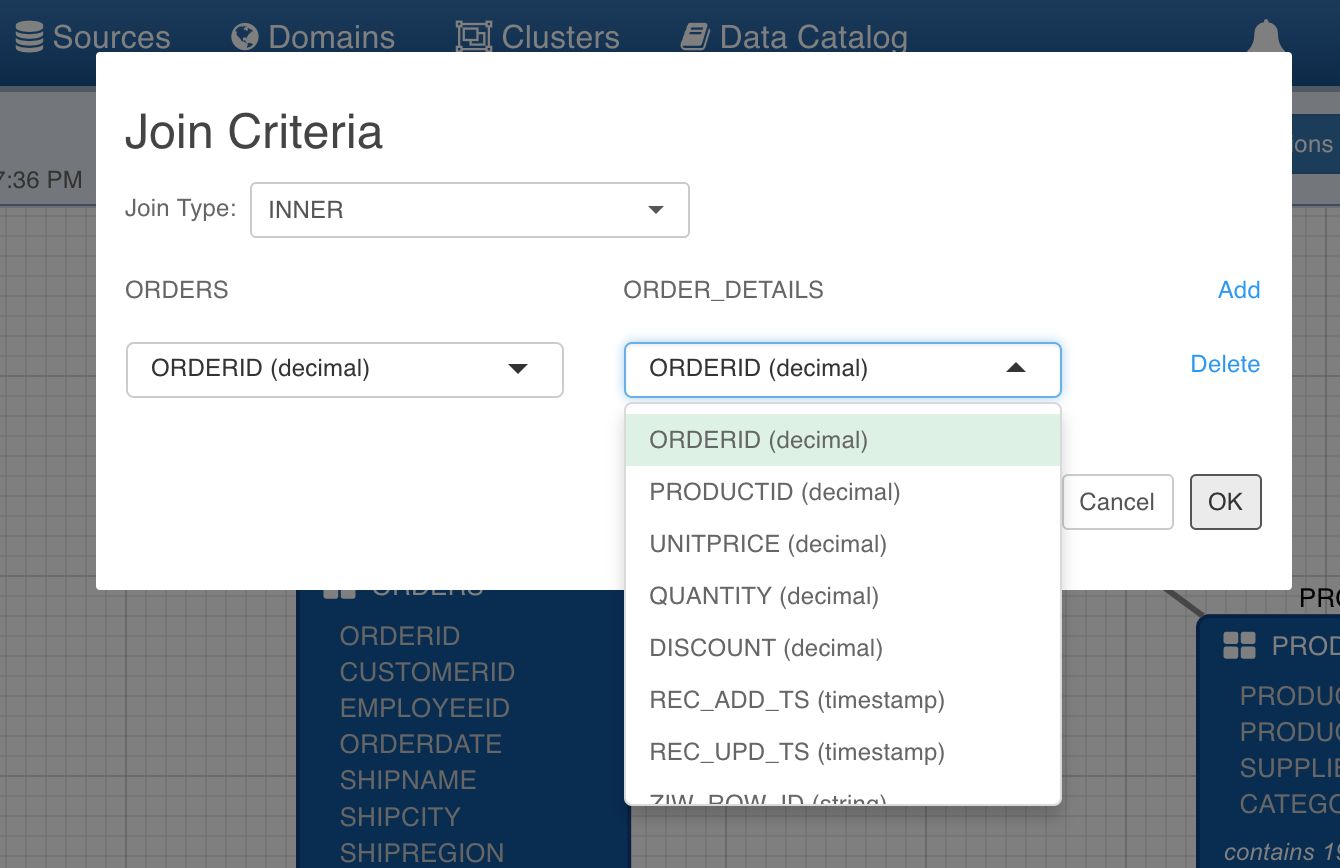
- To specify join criteria, double-click on the edge between nodes. For ORDERS and ORDER_DETAILS edge, the join criteria is on ORDERID in both the tables. Hence, select the options as shown below. You can also select the type of join between the tables.
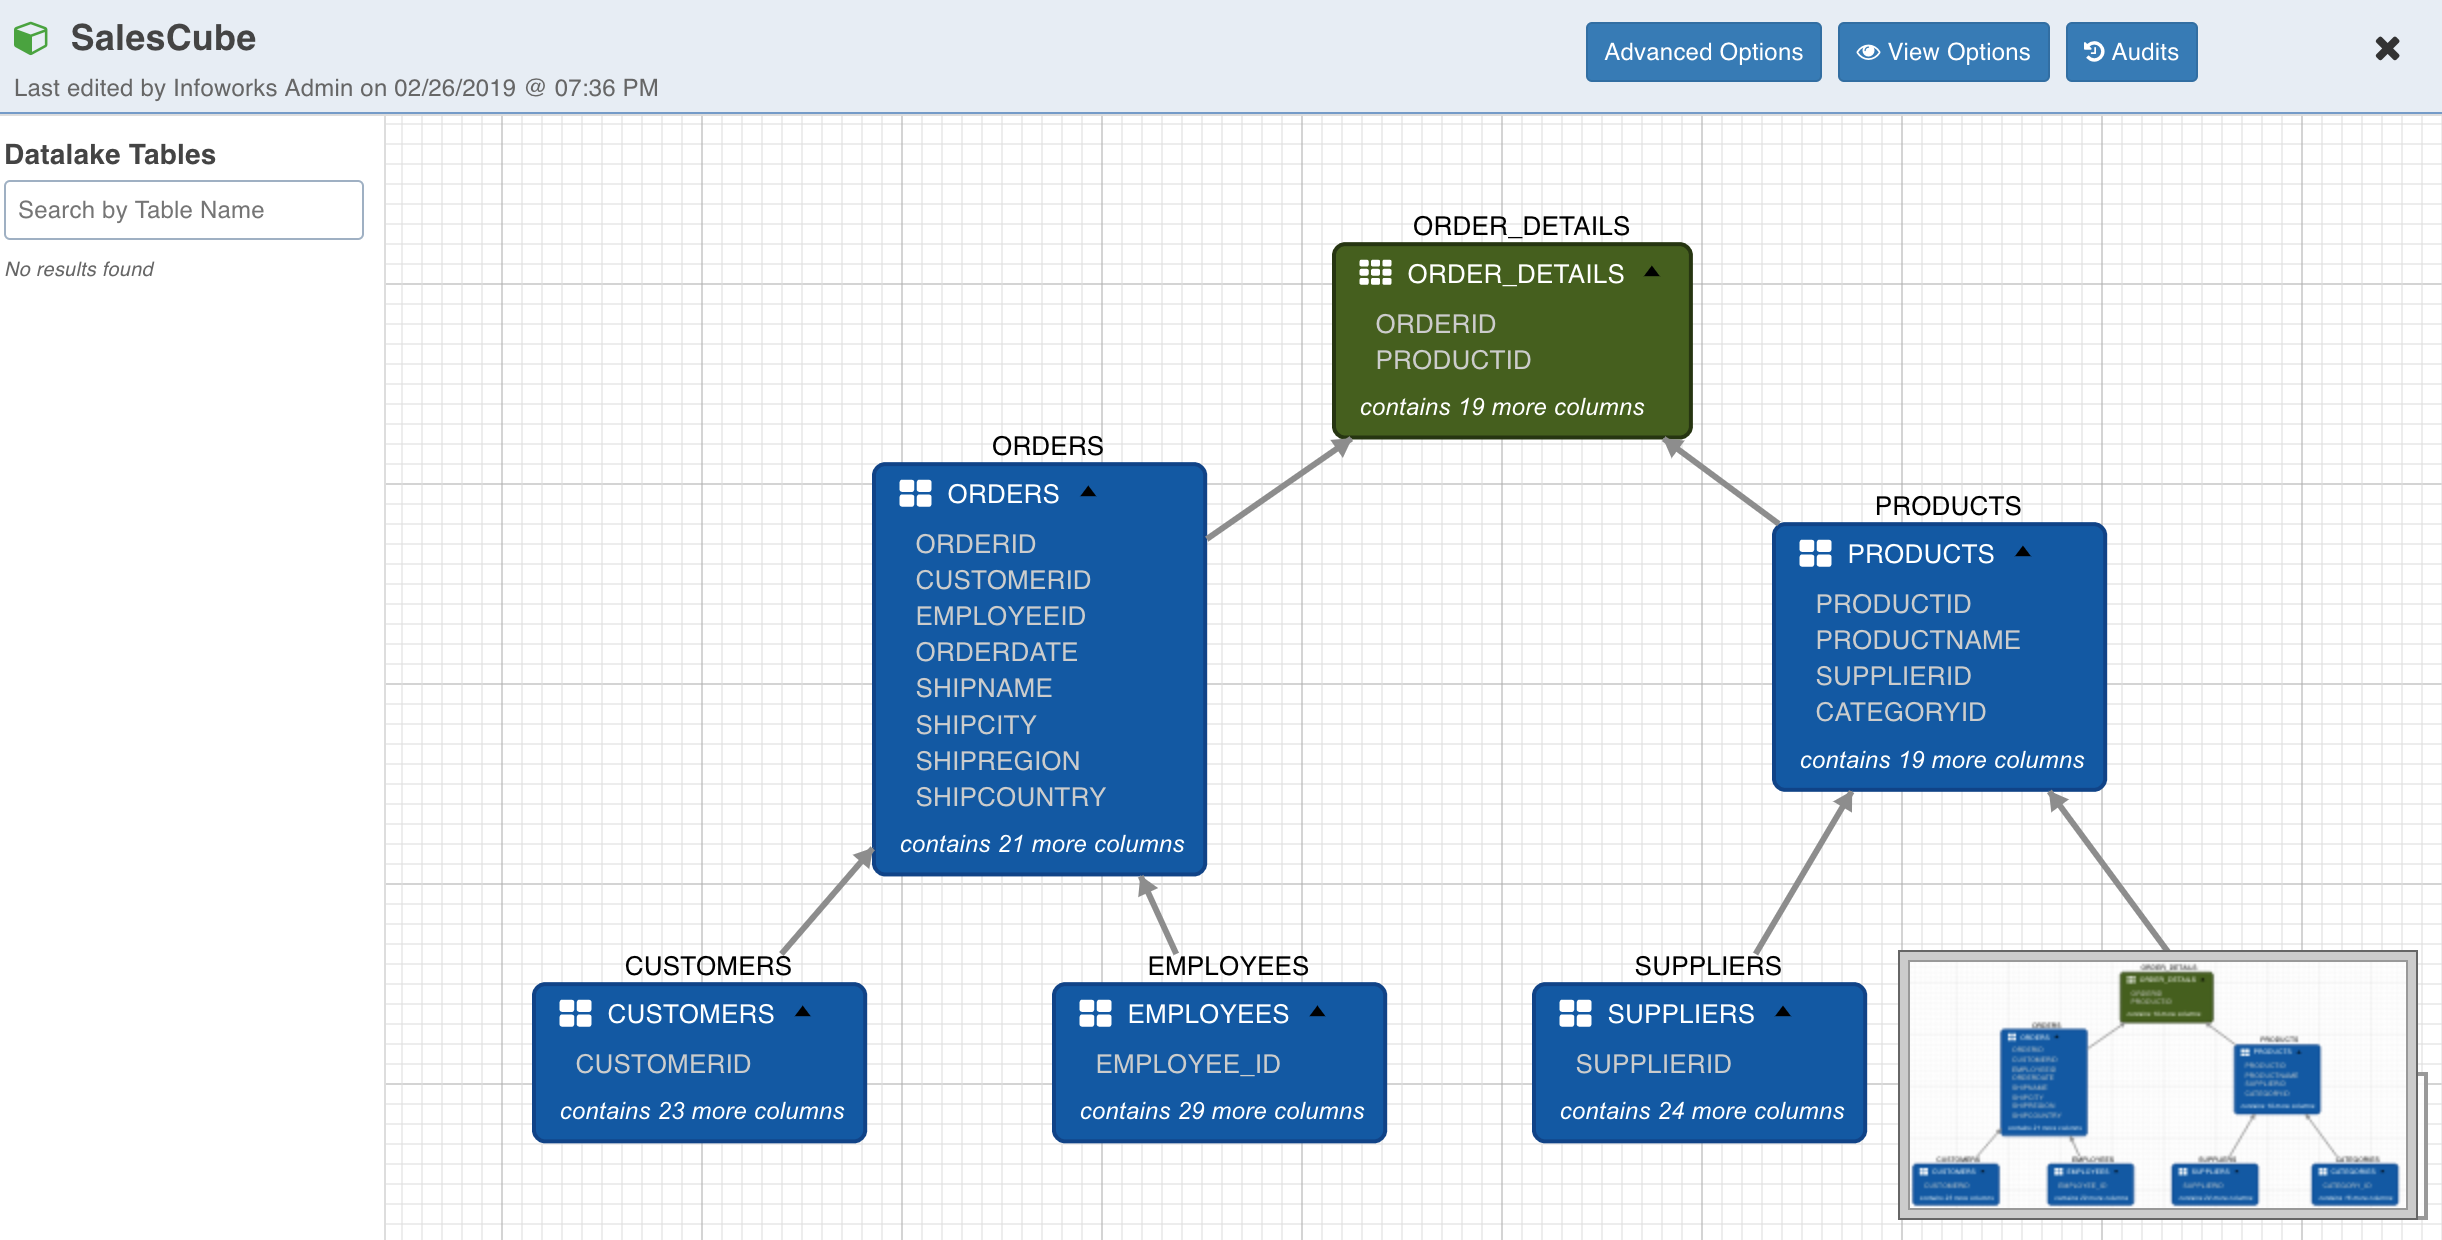
- After specifying other join criteria, following is the state of cube:
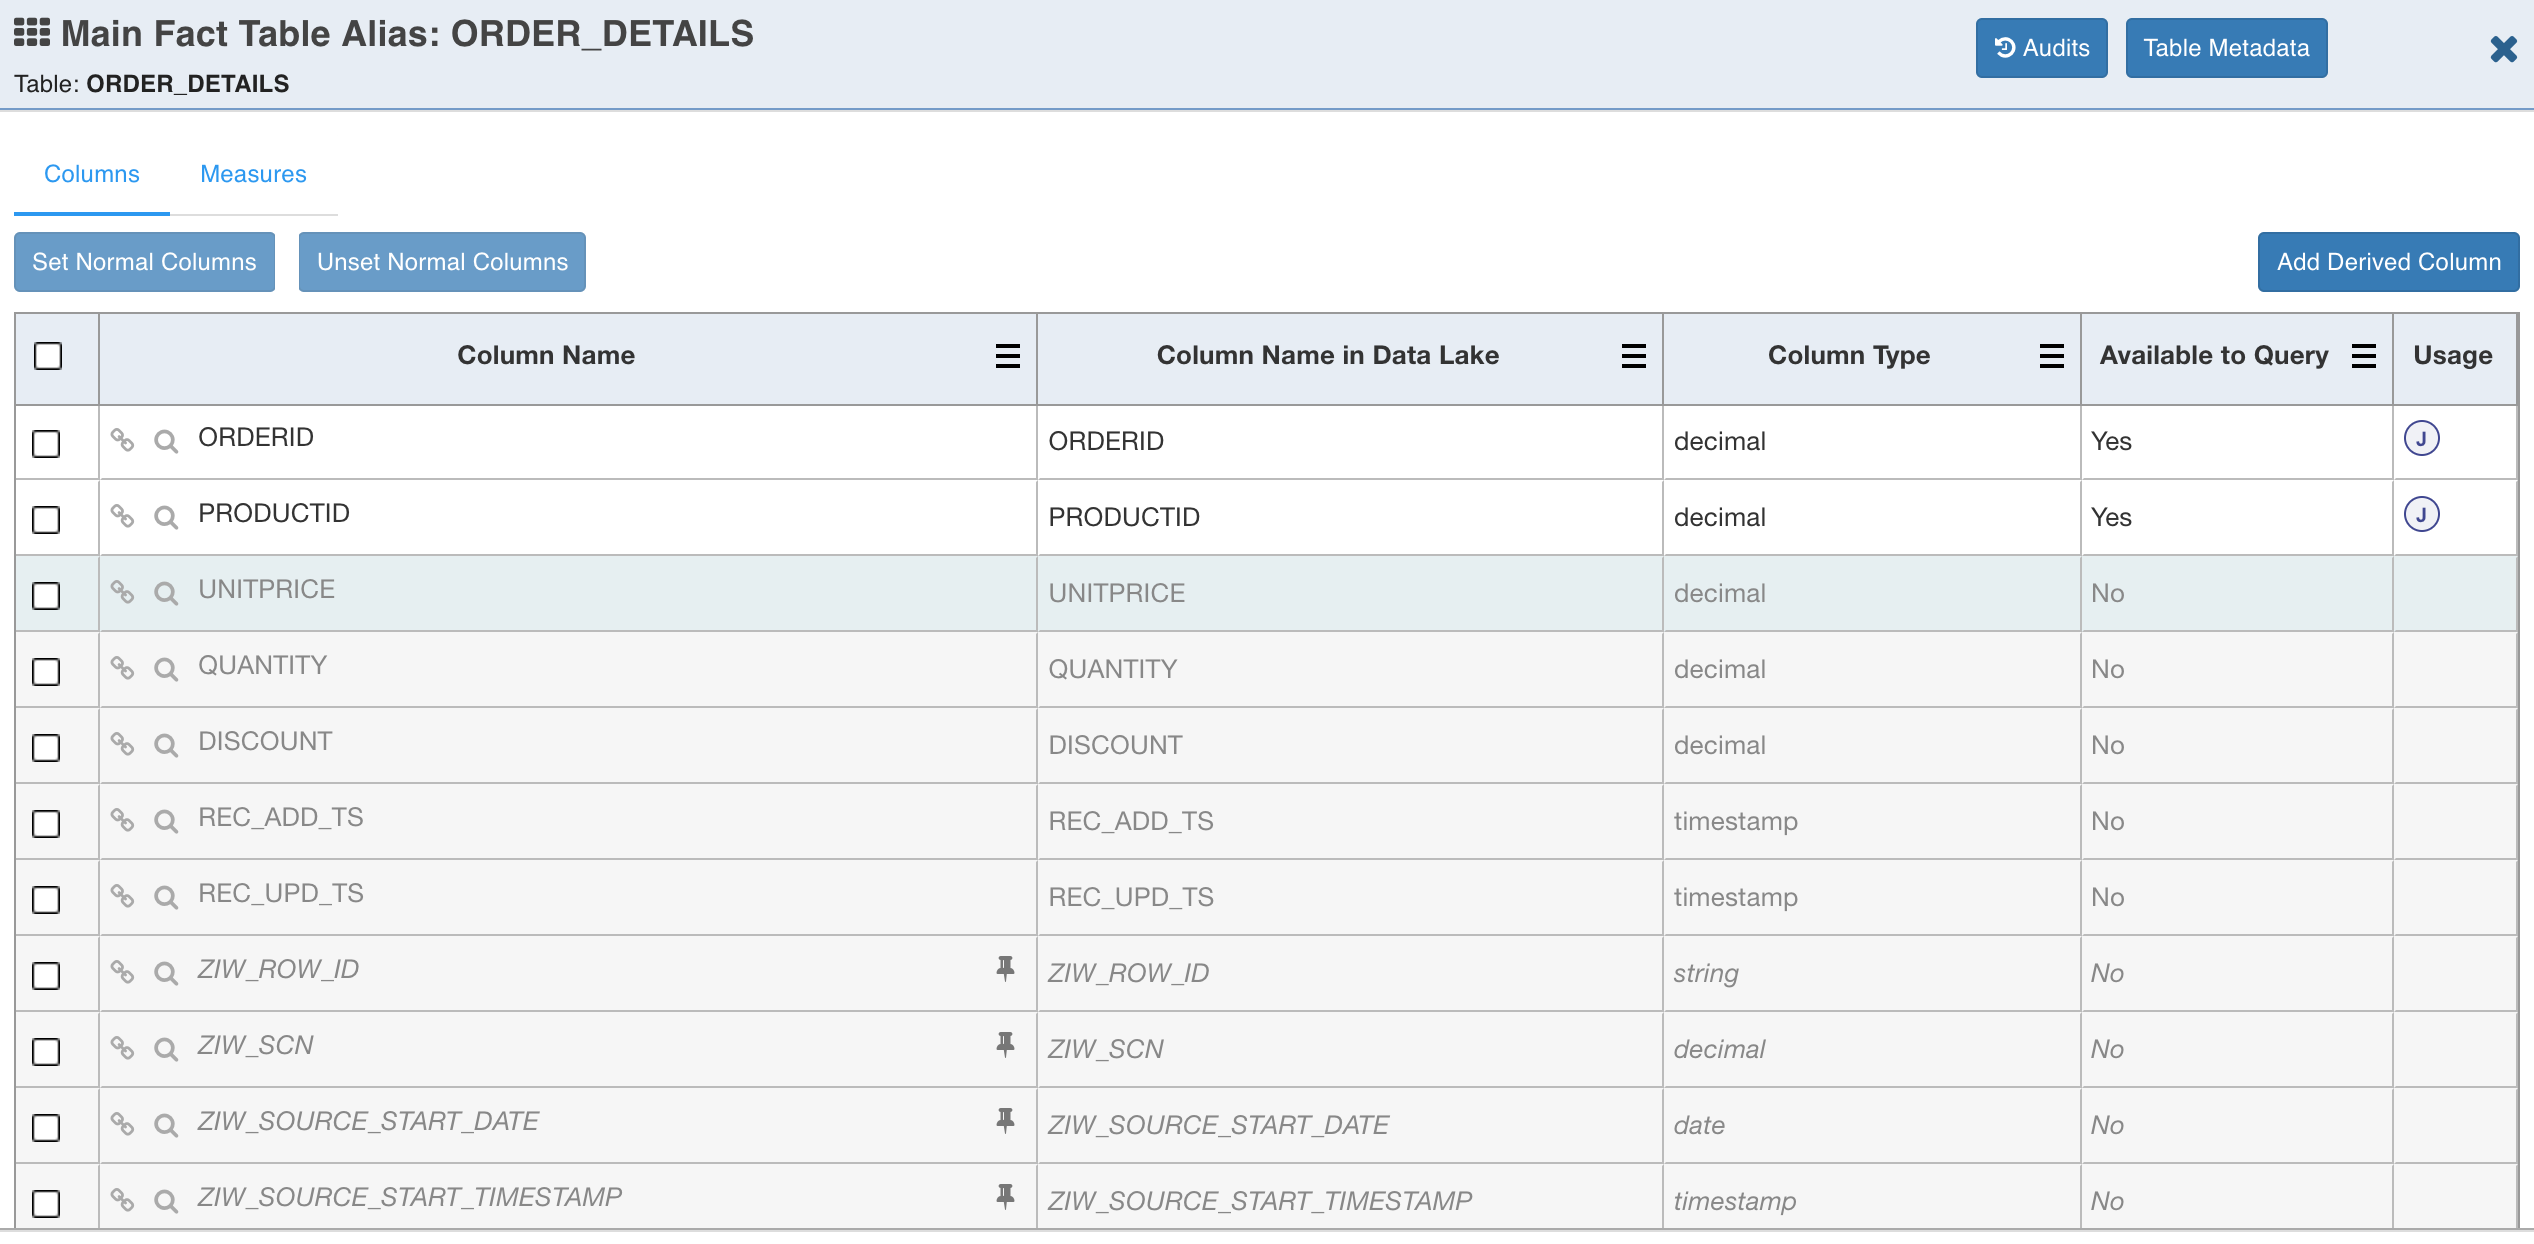
- Double-click the fact or dimension table to view its details.
NOTE: Table columns used in join conditions will be indicated by J symbol in the usage column for the respective tables._
- To add derived attributes, normal dimensions and measures, double-click the fact table. The following page is displayed.
NOTE: Derived attributes, normal dimensions and measures can be created for tables. Measures must be created only for fact tables.
This tab has two sections, Columns and Measures. Follow the steps below to create derived attributes, normal dimensions, and measures:
Following are the steps for creating derived attributes, normal dimensions and measures only in fact table. Same steps can be followed for dimension tables.
The table has two sections:
- Columns
- Measures
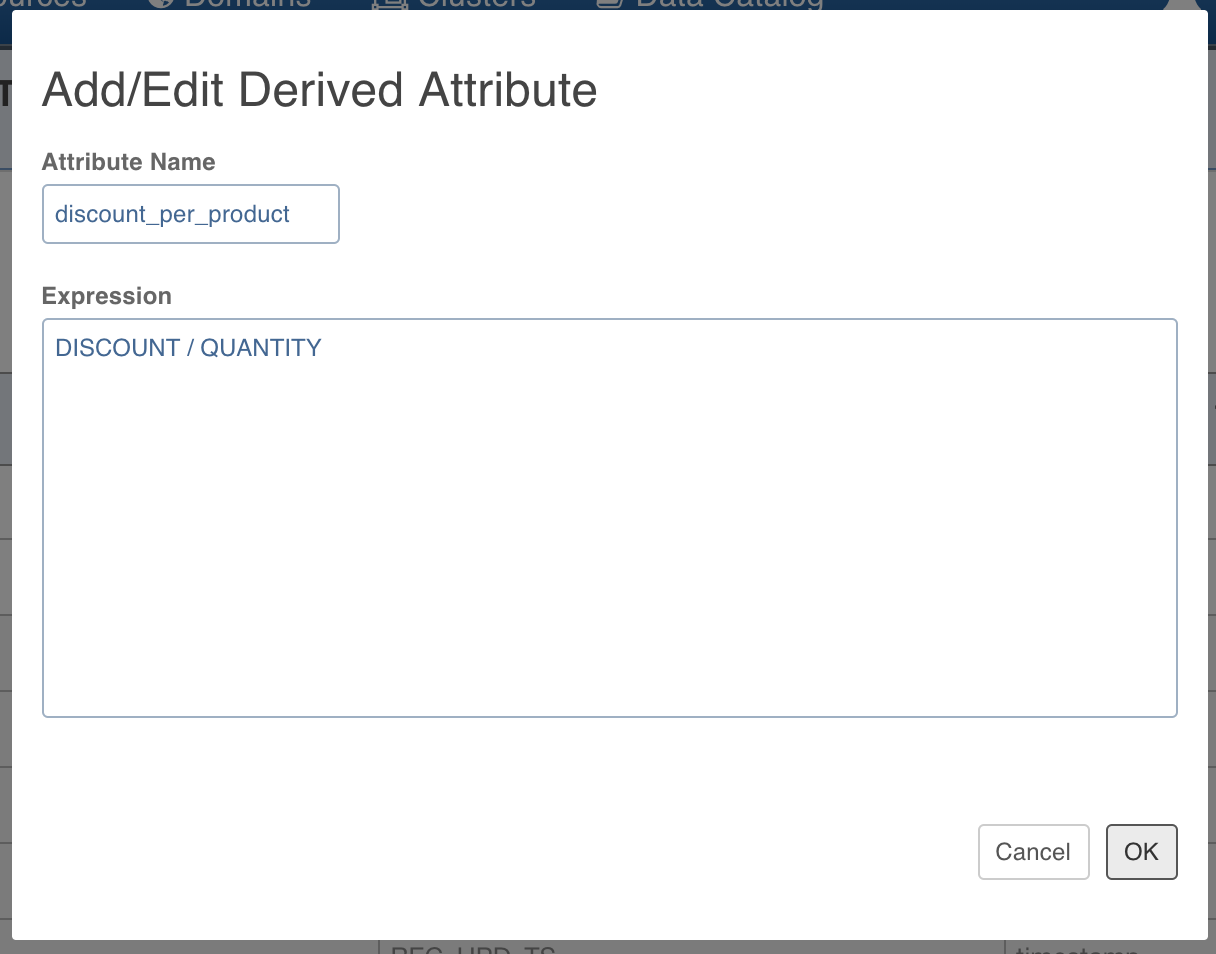
- To derive new attributes, click the Add Derived Column button. The Add/Edit Derived Attribute page is displayed.
- Enter the Attribute Name and Expression. For example, to derive the discount per product (discount divided by the quantity for the order), enter the values as shown below.
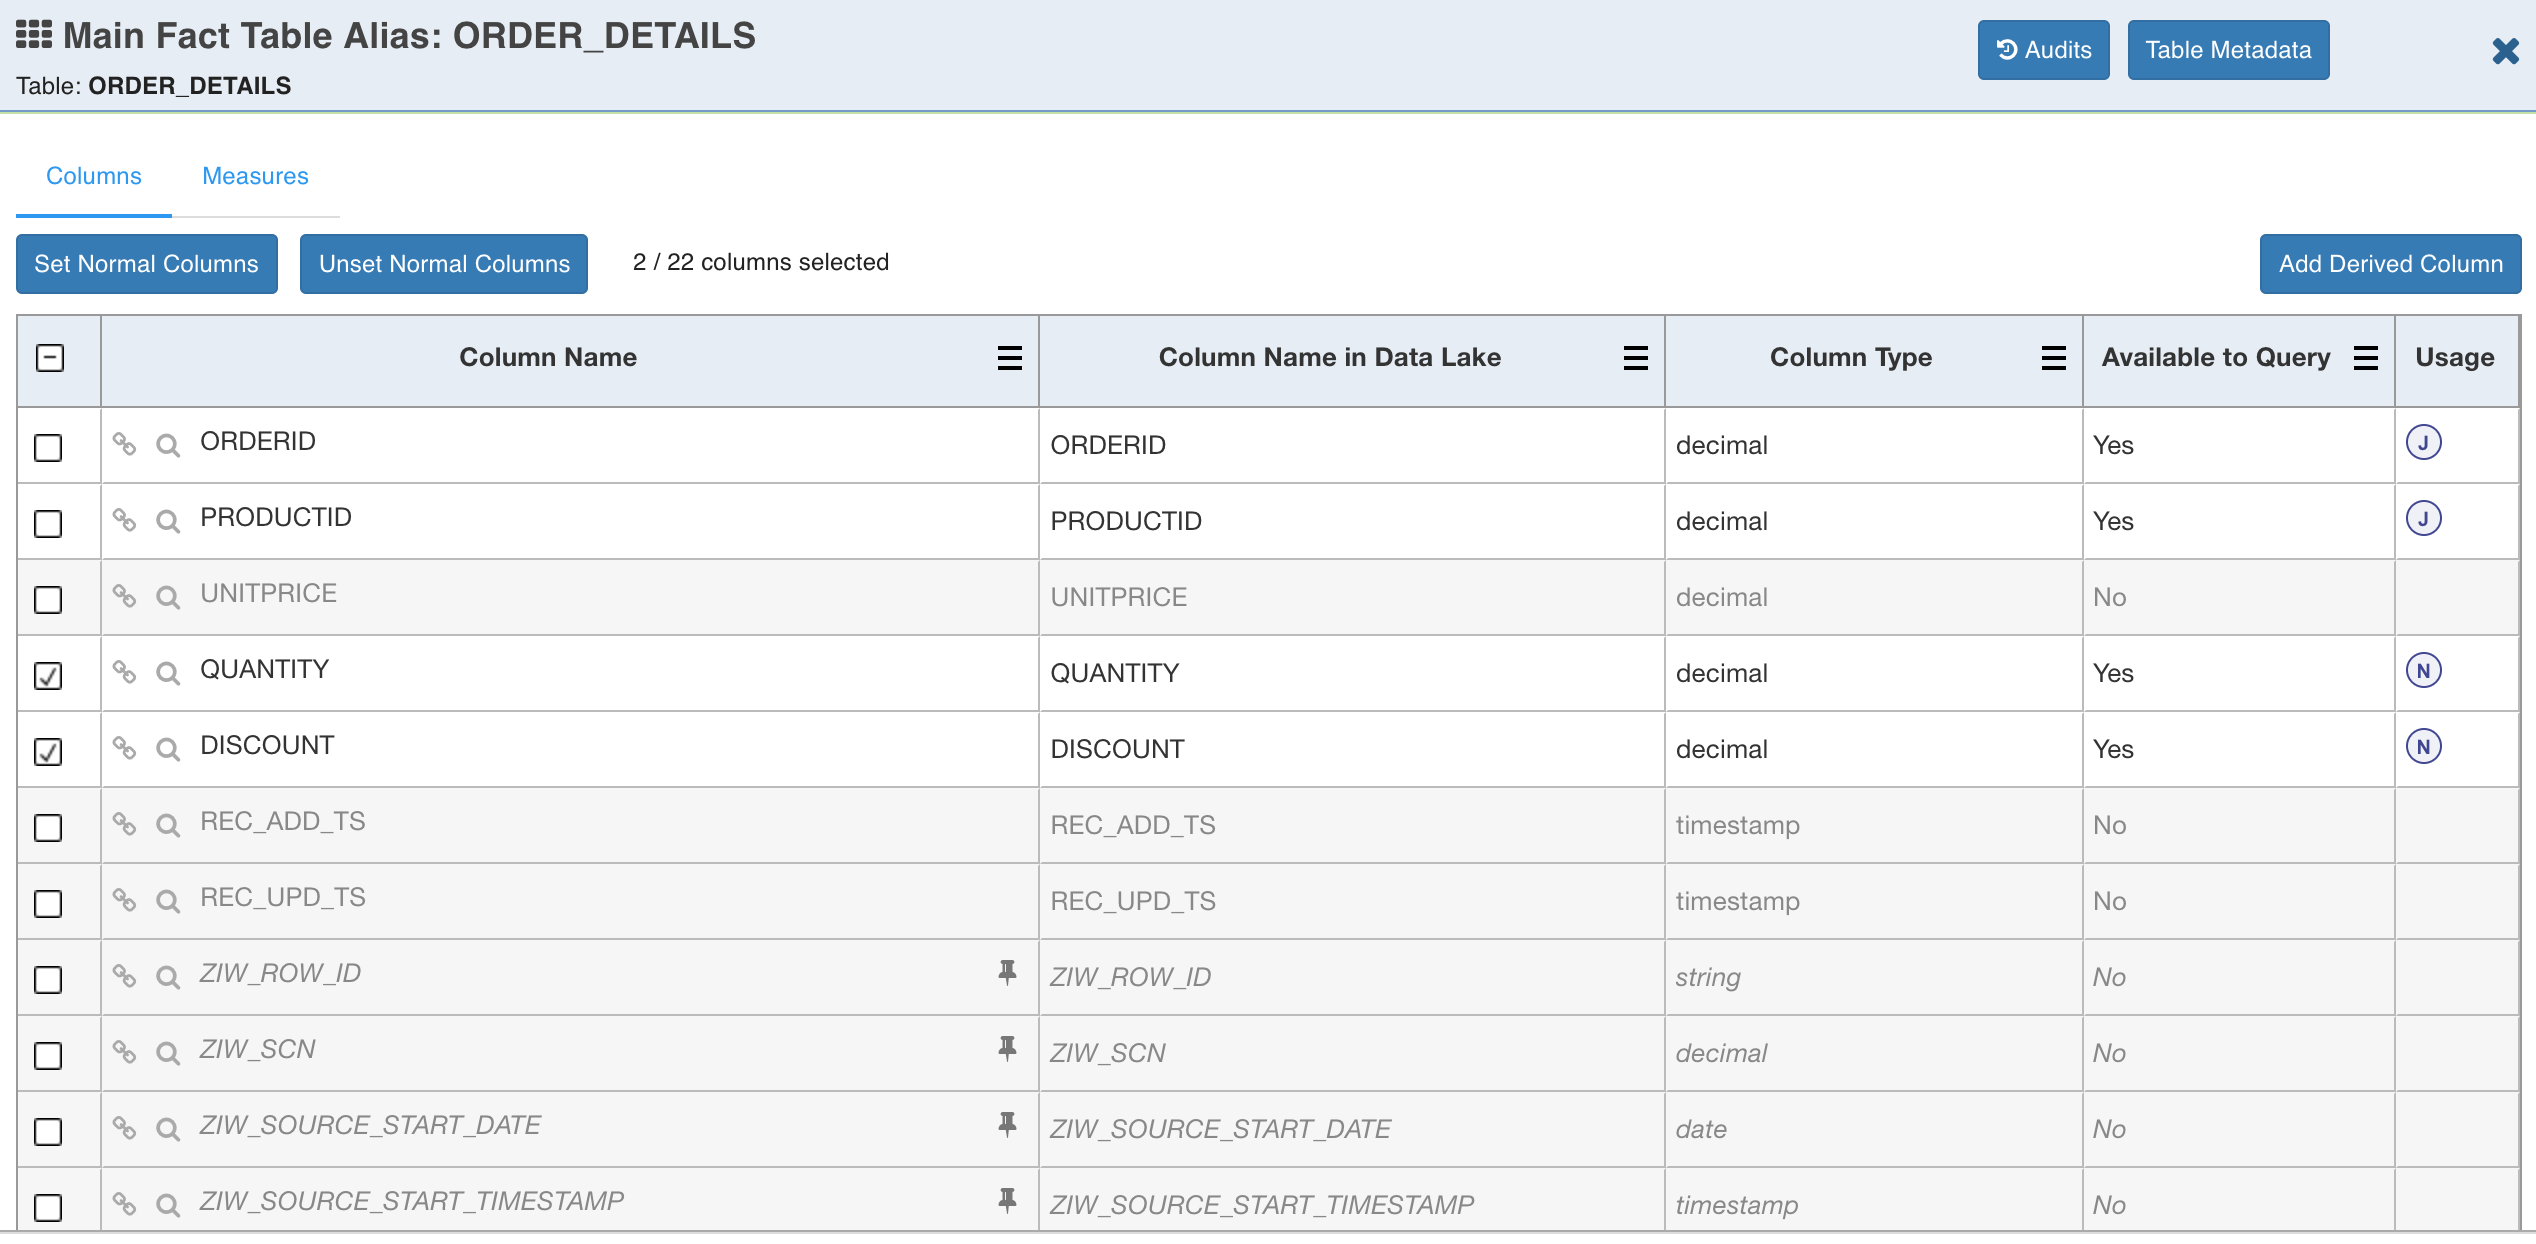
- Click OK. The table details page is displayed as shown below.
NOTE: You can now see the newly derived attribute (discount_per_product) in the table.
- To set or unset a column as normal dimension, use the Set Normal Columns and Unset Normal Columns buttons.
NOTE: Table columns used as normal dimension will be indicated by N symbol in the usage column.
- To add new measures, click the Measures tab. The following page is displayed.
NOTE: A measure is typically an aggregate which will be pre-computed and stored by the cube engine.

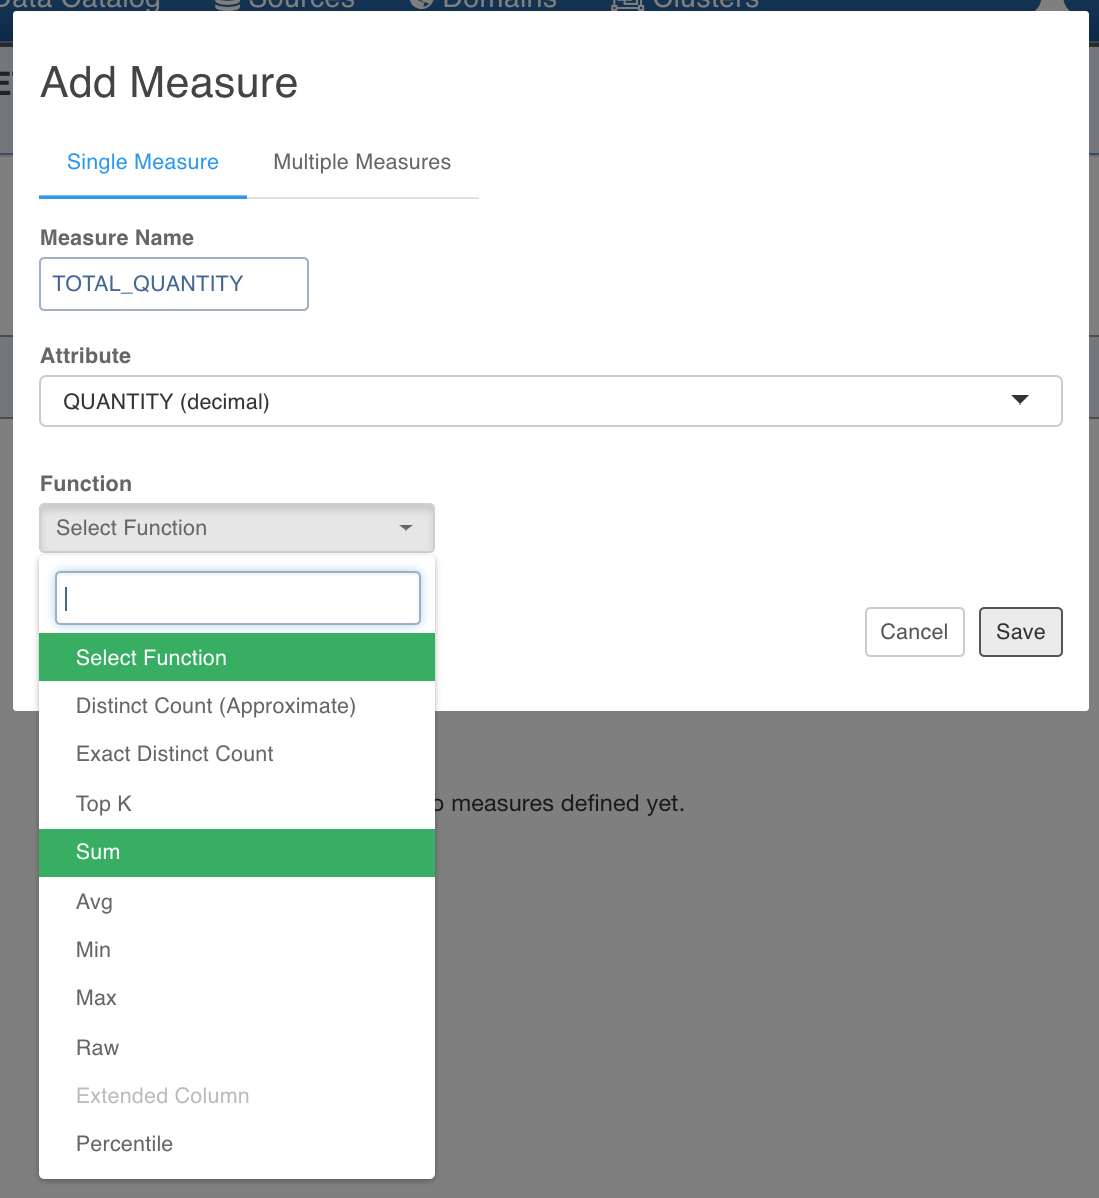
- Click Add Measure.
- Enter the required values in the following fields:
- Measure Name: Specify the name of the measure.
- Attribute: Select a column out of those listed in the fact table.
- Function: Select the required function to be used for the selected column.
The available aggregate functions are:
- Distinct Count (Approximate)
- Exact Distinct Count
- Top K
- Sum
- Avg
- Min
- Max
- Raw
- Extended Column
- Percentile
Raw measure function is used to query the detail data on the measure column. Extended Column allows you to derive lookup table column (extended column) from host column (a join column or normal dimension column from fact table).
For example, product_name can be derived from product_id where product_id is a normal dimension on fact table and product_name is fetched from products lookup table. Once the column is defined as Raw or Extended Column, you may lose the ability to use them in filters and groupby. You may only be able to use them for representation.
NOTE: Extended Column measures are allowed in facts table only.
- In this Cube example, we will pre-compute total quantity, top 10 ship cities by discount, total discount, and average discount. For pre-computing total quantity, enter the values as shown below.
The measure entry calculates the total quantity for every valid dimension value combination for which data exists.
- For pre-computing top 10 ship cities by discount, enter the values as shown below.
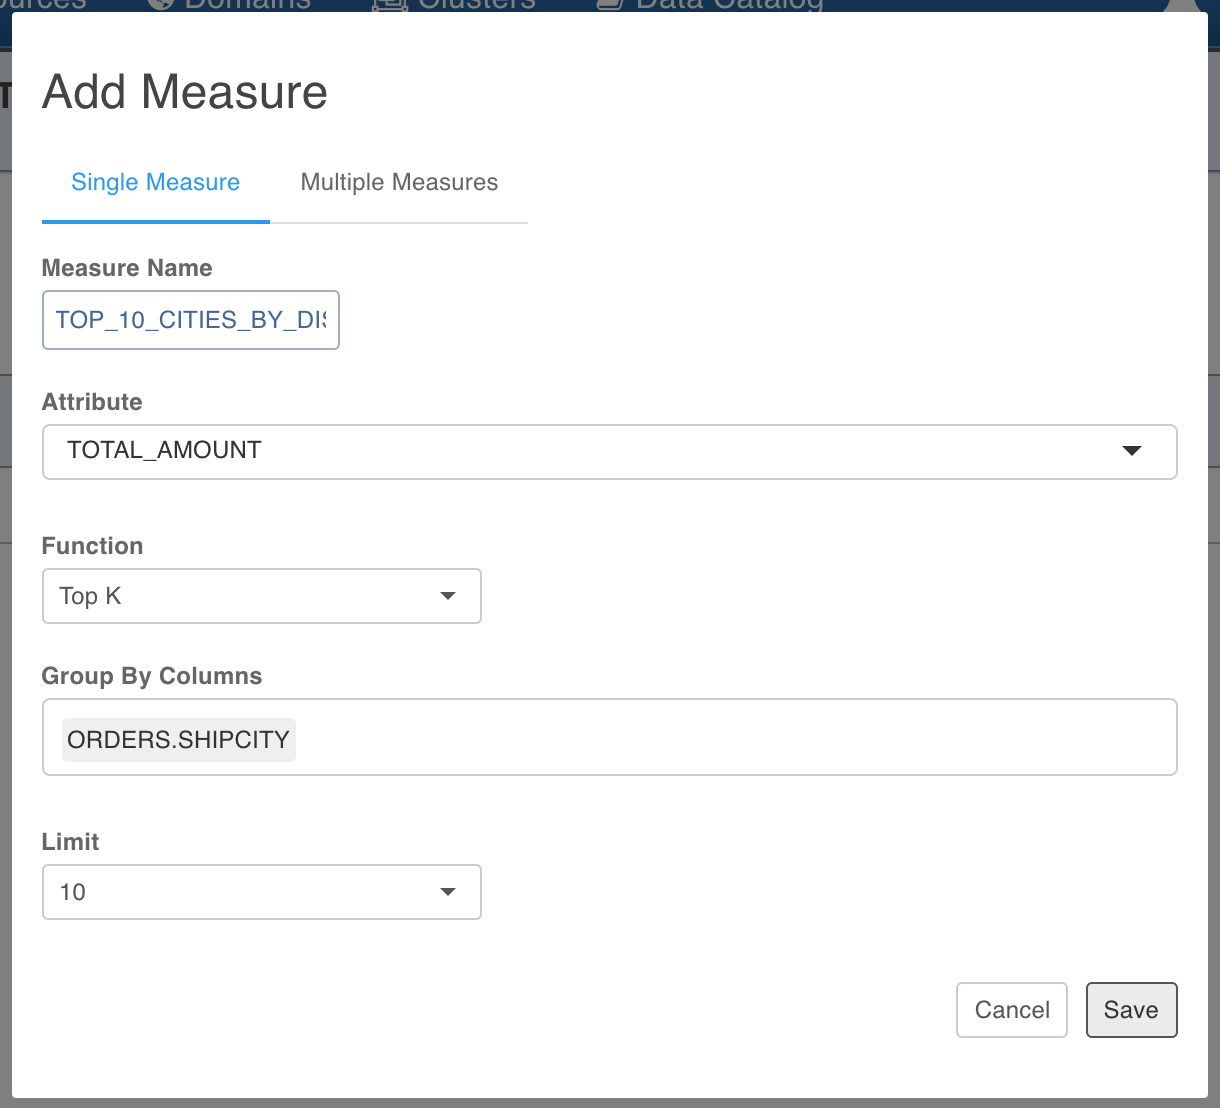
NOTE: Group by columns can be from both fact and dimension tables.
Similarly, we can add the other two measures, total discount which is the sum of discount and average discount.
- To add the bulk measure, click the Multiple Measures tab.
- You can add any number of attributes and functions on them, for example, the following page displays the Avg, Min and Max measure on the TOTAL_AMOUNT and UNITPRICE columns.
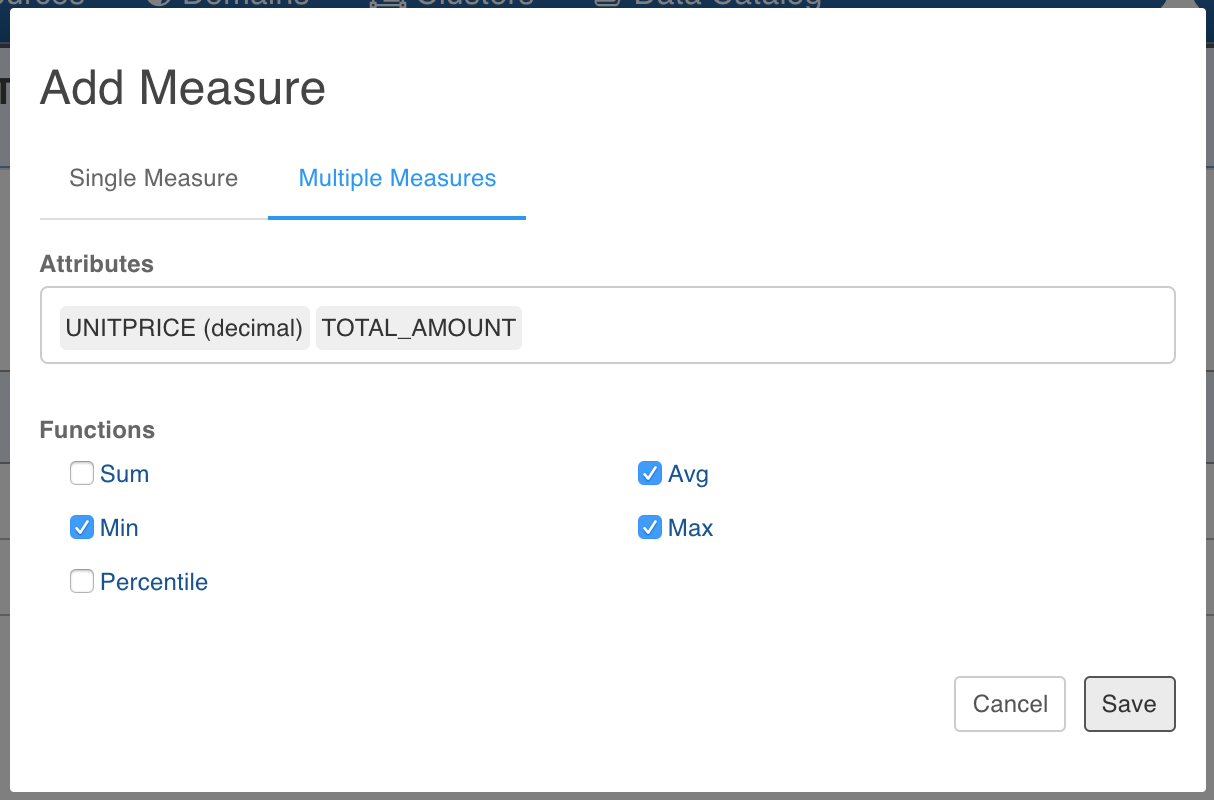
NOTE: Bulk measure creation works only on numeric columns. Table columns used as measures will be indicated by M symbol in usage column.
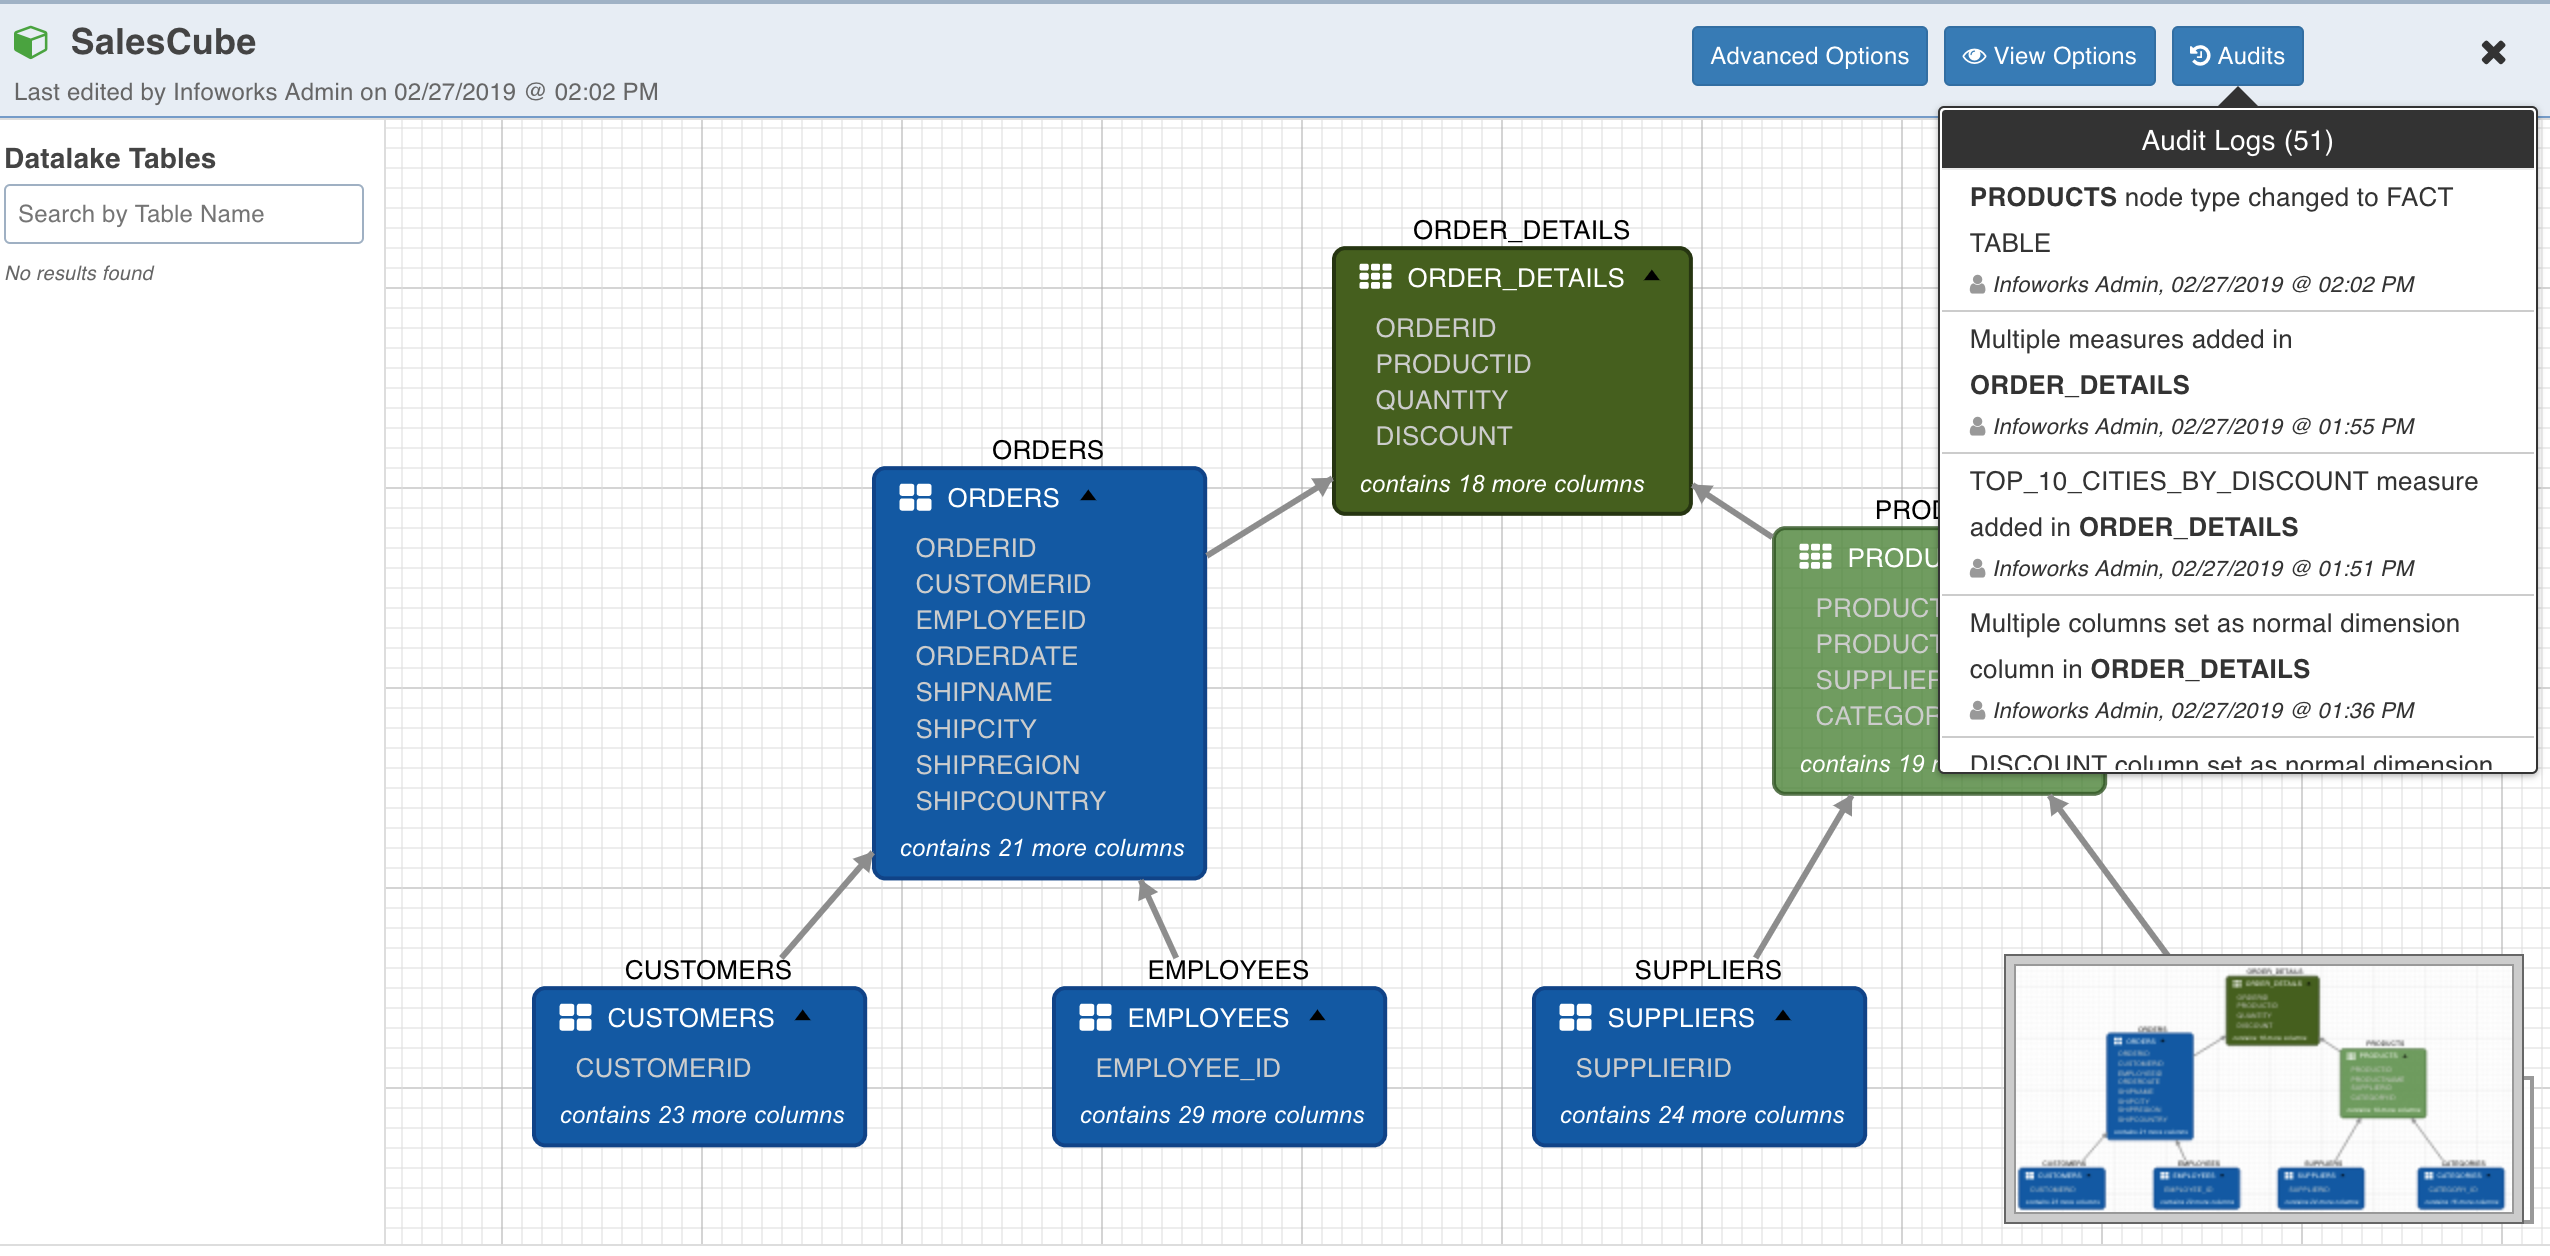
Cube Audits Log
Whenever any changes are made to the cube design, Infoworks automatically audits them as shown below, and makes the data available for search. This is helpful in a collaborative environment. Click the Audits button to view the audit log.
Advanced Options
Advanced Options page consists of two sections:
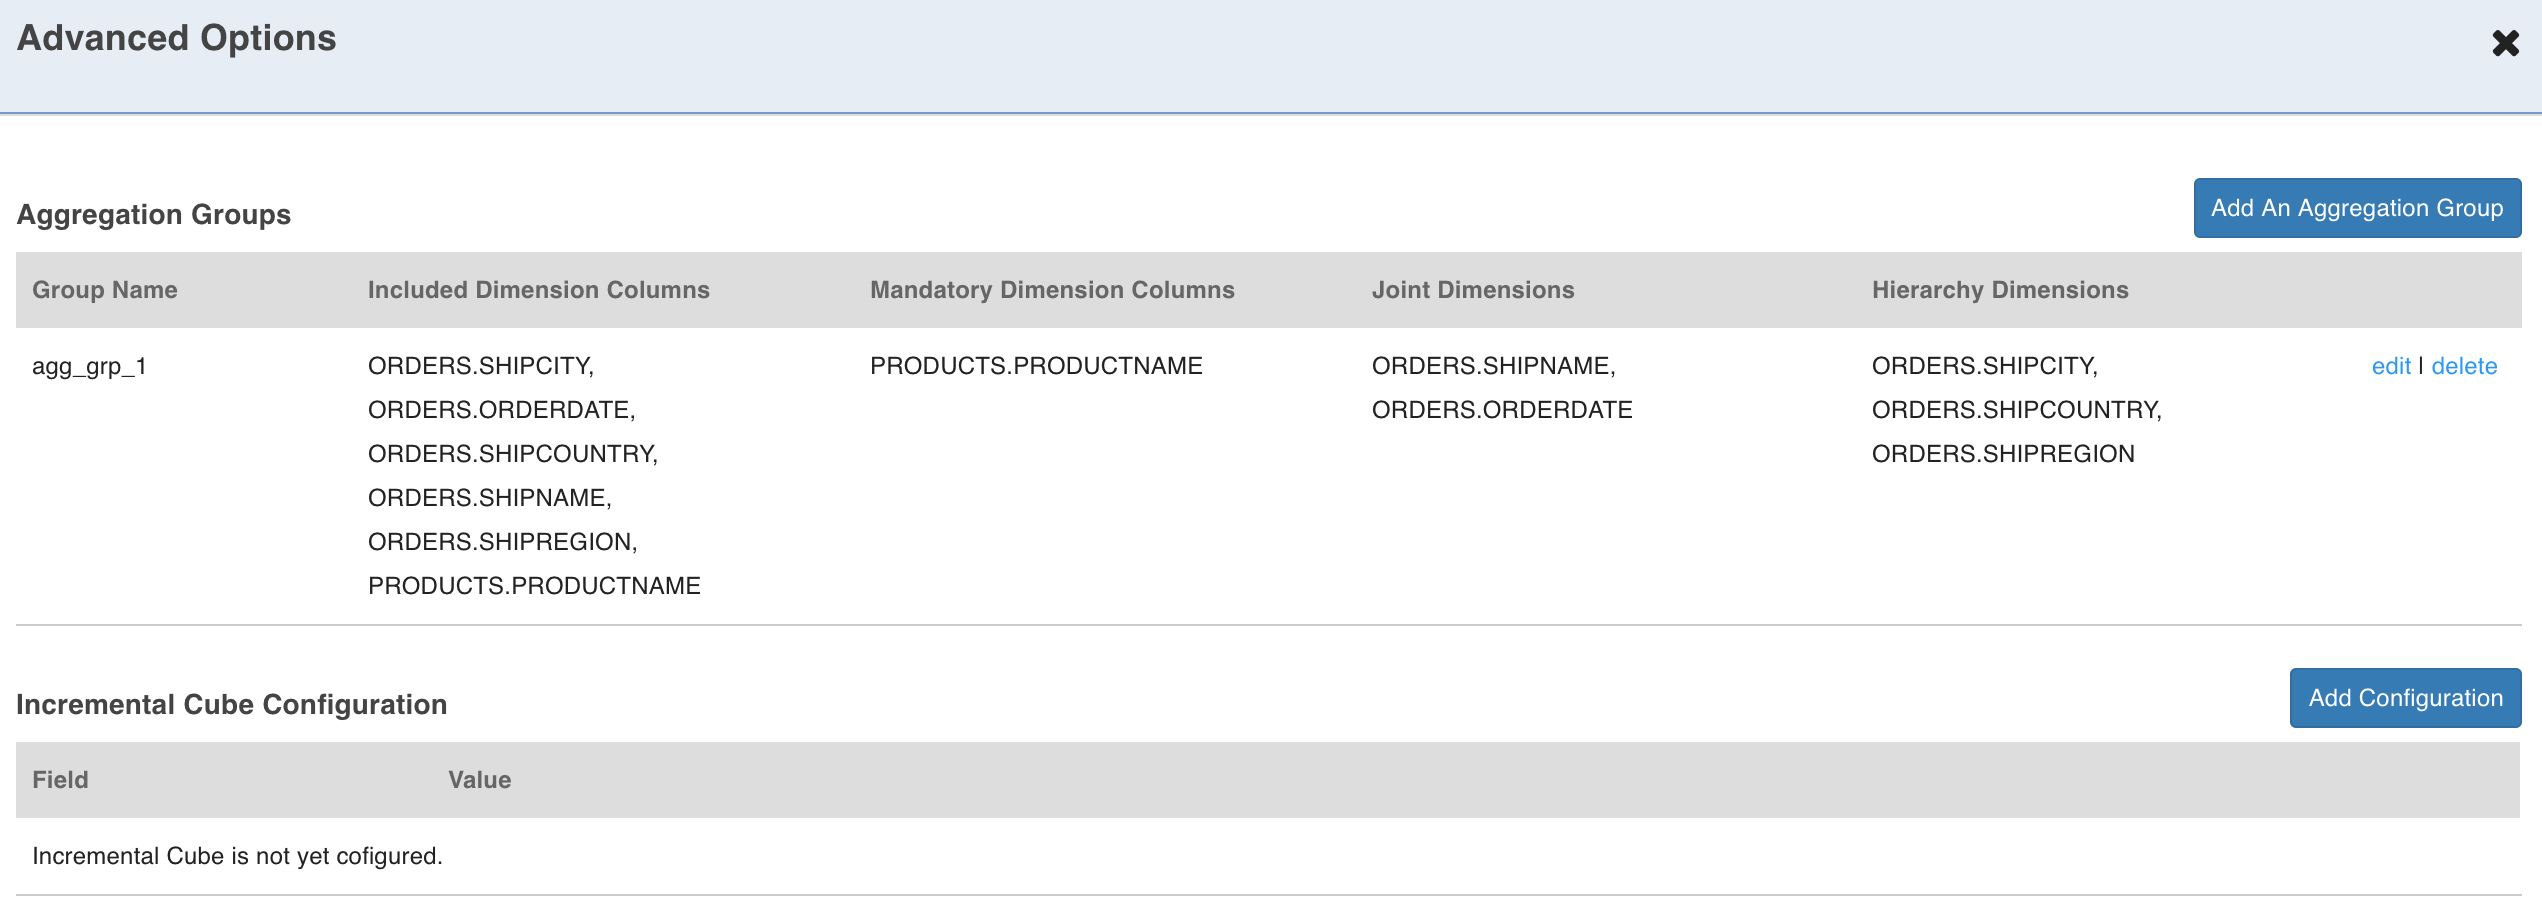
Aggregation Groups
The Cube Editor page, after adding and configuring the required fact and dimension tables looks as shown below.
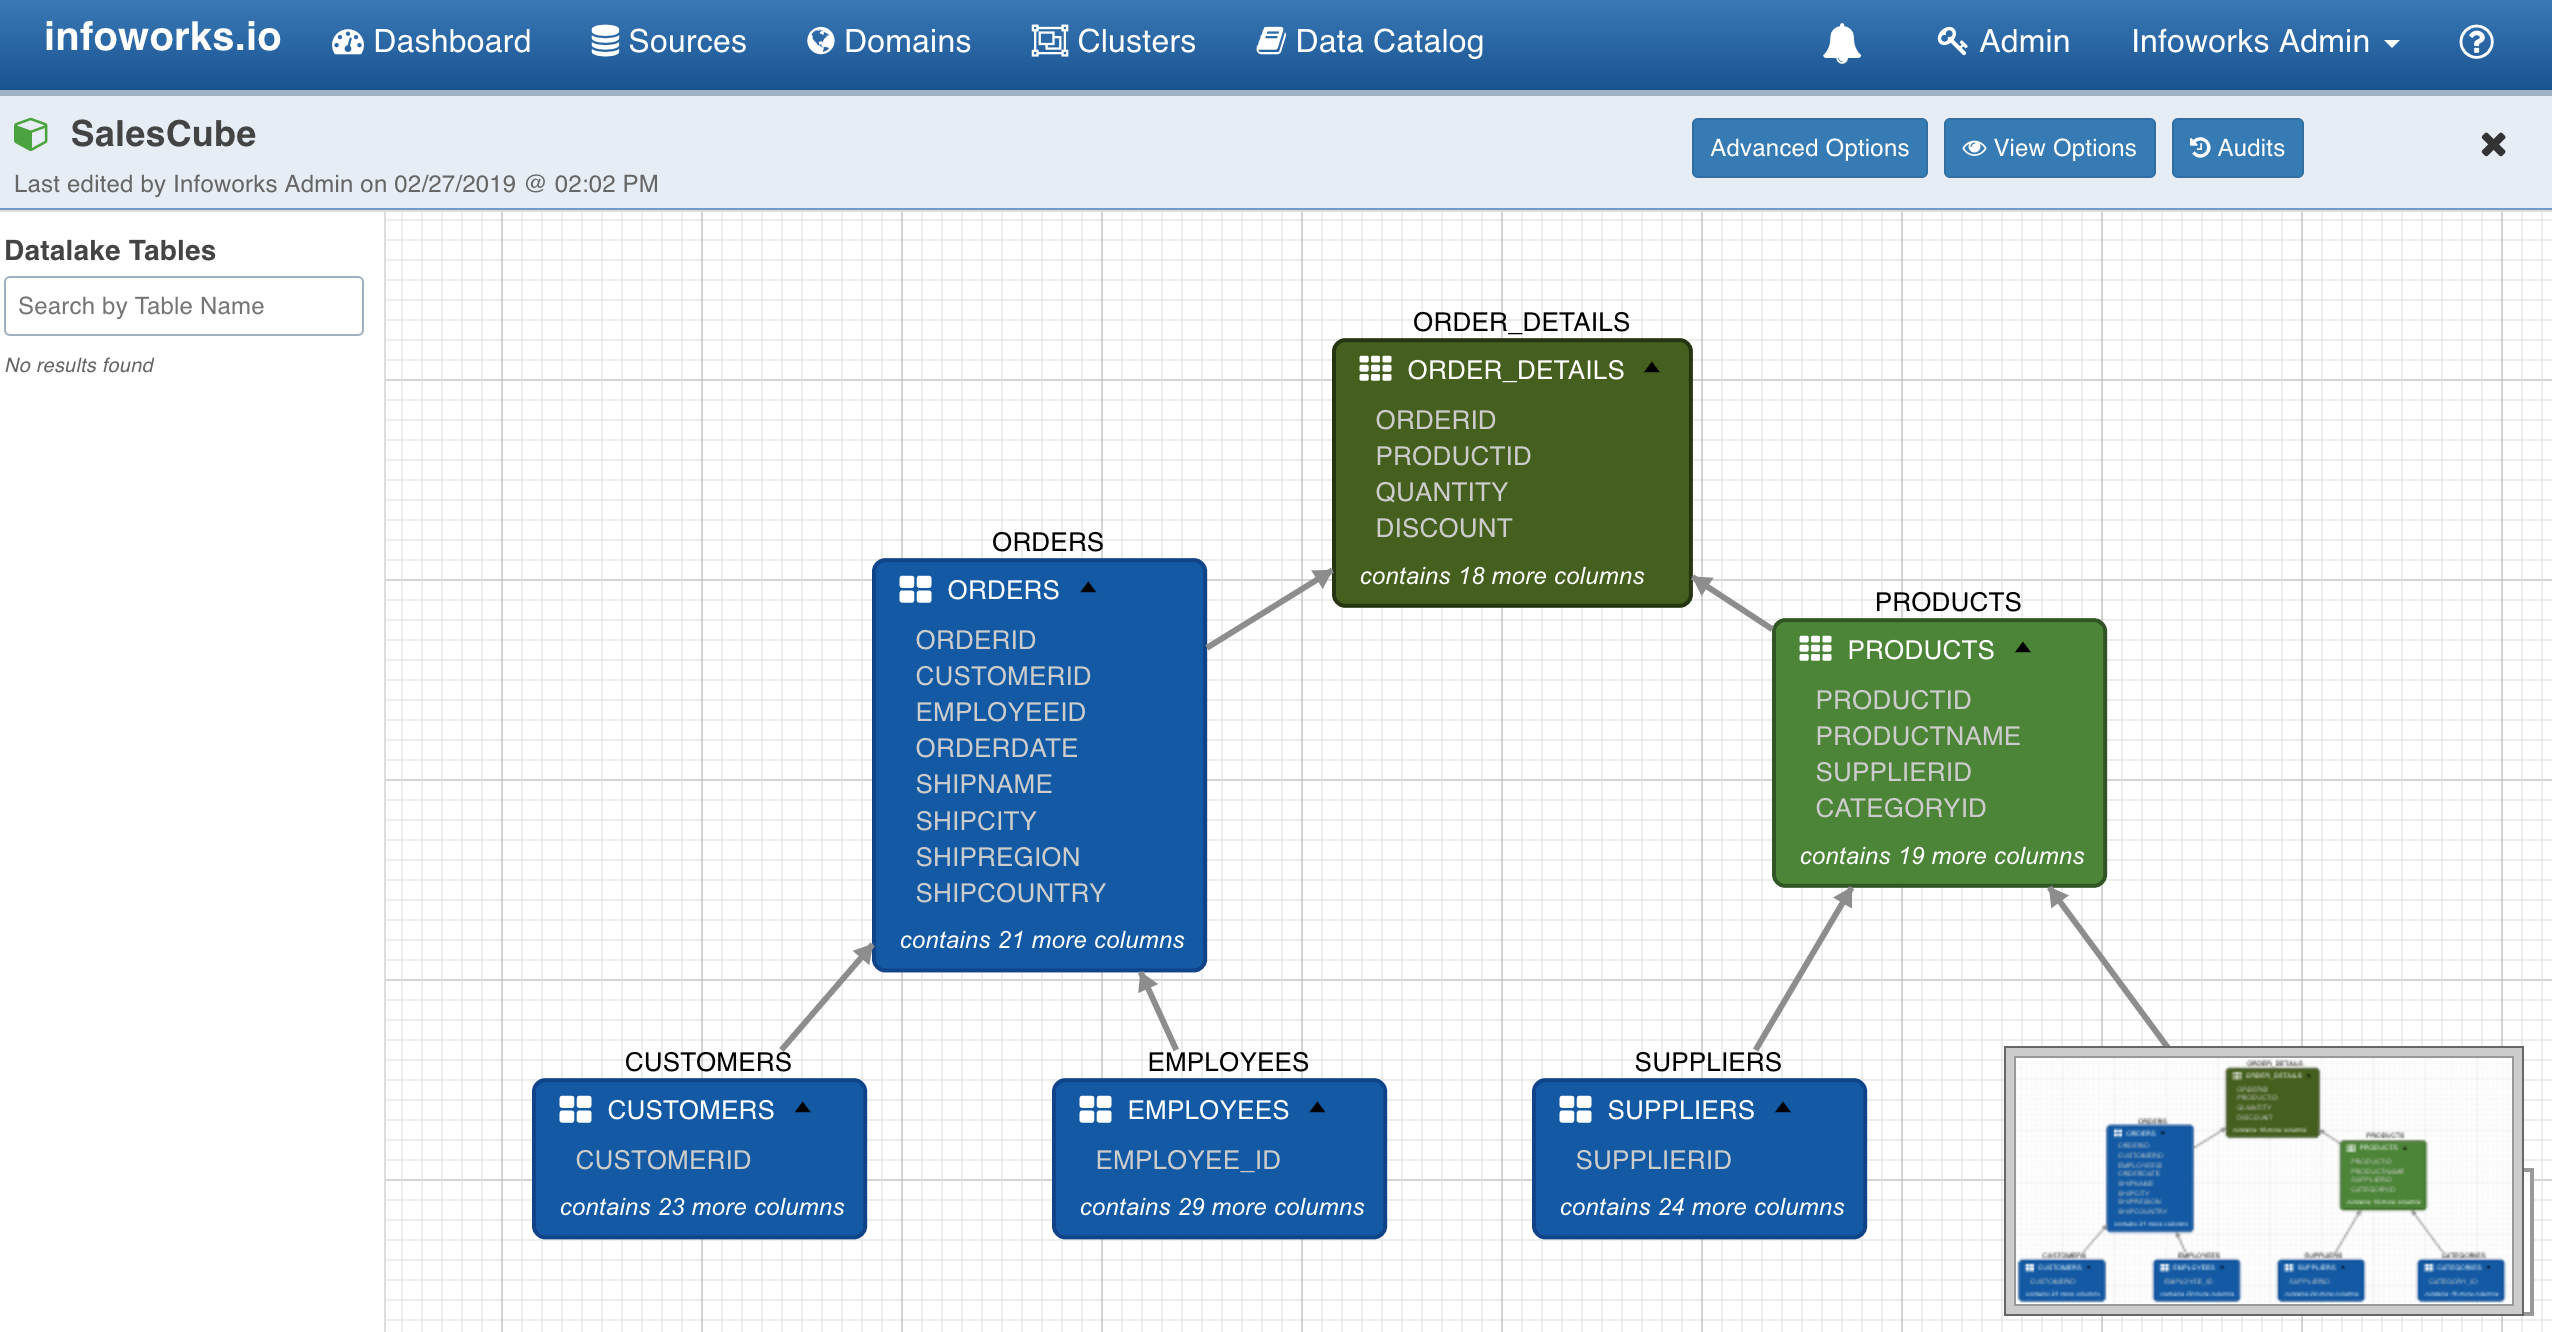
NOTE: In the design view, only join and normal dimension columns of the tables are visible. To see all the columns of a table, double-click the table or node on the canvas.
Aggregation Groups
Cube lattice is made up of all possible combinations of the dimension attributes that are required by the user. The dimensions can be divided into multiple groups, each group is called an aggregation group.Each aggregation group is a subset of cube lattice, thereby removing the other combinations that are unnecessary. By using the aggregation groups, you can control which cuboid must be computed or skipped. This could significantly reduce the computation and storage overhead, especially when the cube is serving for a fixed dashboard, which will reproduce SQL queries that only require some specific cuboids.
If you have the information about the incoming data as well as the queries or reports that are expected to be run against the cube, using Advanced Options (top right corner) shown in the above figure can improve the cube build performance.
By default, no aggregation groups are present and you can continue to build the cube without any aggregation groups. In this case, default options are applied where all join and normal dimensions are part of single aggregation group.
For more details, see General Guidelines on Cubes.
To improve the build performance of cube, follow these steps:
- Click Advanced Options. The following dialog box is displayed.
- Click Add An Aggregation Group.
NOTE: A cube can have more than one aggregation group.
- Enter the name for aggregation group.
- Select Included Dimension Columns to use in this aggregation group.
NOTE: Included Dimension Columns input will only show normal dimension columns and join columns from the tables.
- Select Mandatory Dimension Columns, if any.
- For joint dimensions, click Add Joint and select dimension columns.
NOTE: A single aggregation group can have multiple joint sets and each joint set must have two or more dimension columns.
- For hierarchies, click Add Hierarchy and select dimension columns. The aggregation group is displayed as below.
NOTE: A single aggregation group can have multiple hierarchy sets and each hierarchy set must have two or more dimension columns.
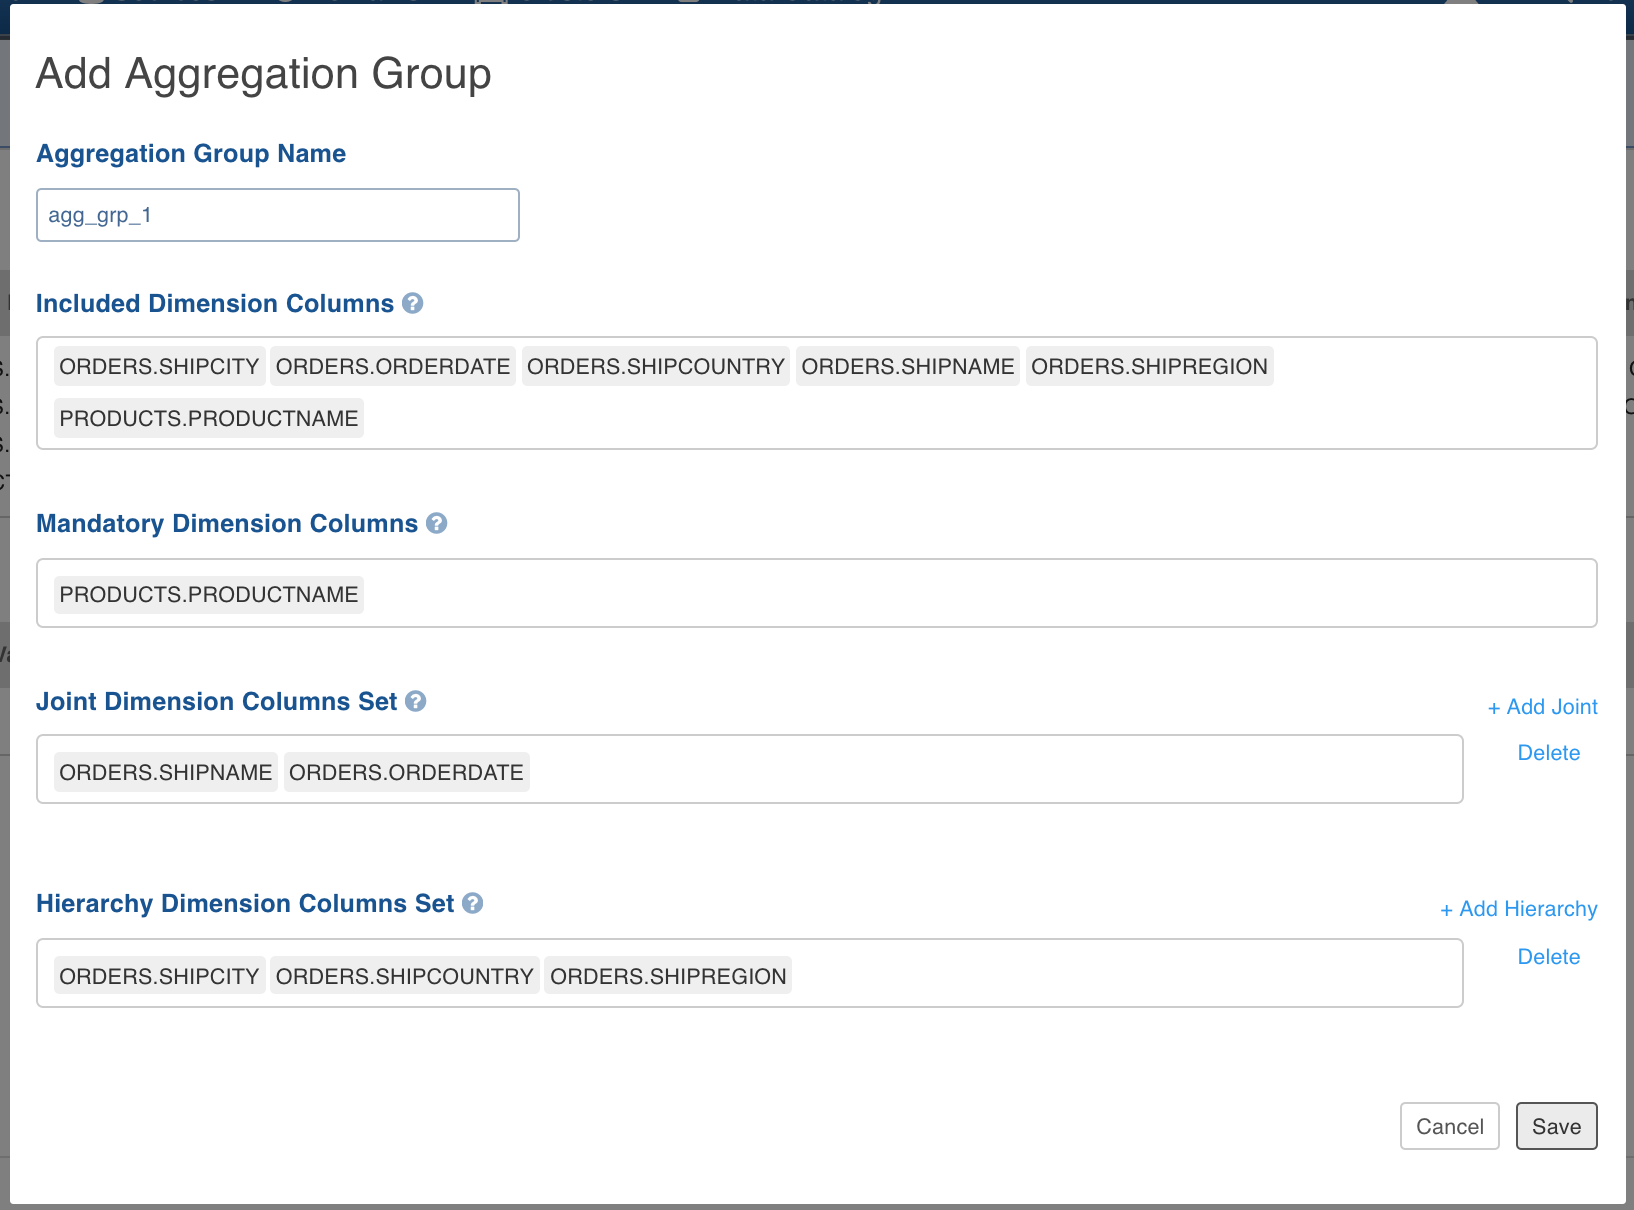
- Click OK to save.
Incremental Cube
If, for example, you need to add daily sales records to the cube automatically every night, you may configure cube for incremental update by specifying partition column (or incremental load column) and its format in advanced options. Based on the partition column specified, we automatically calculate low and high watermark for incremental build and add records within the watermarks range (excluded high watermark) to cube. At present, you can only add/append new data to the cube.
To add or edit an incremental cube configuration, follow these steps:
- In Advanced Cube Options screen, under the Incremental Cube Configuration section, click Add Configuration.
- Specify partition column, its format and auto-merge thresholds for cube data compaction as shown below.
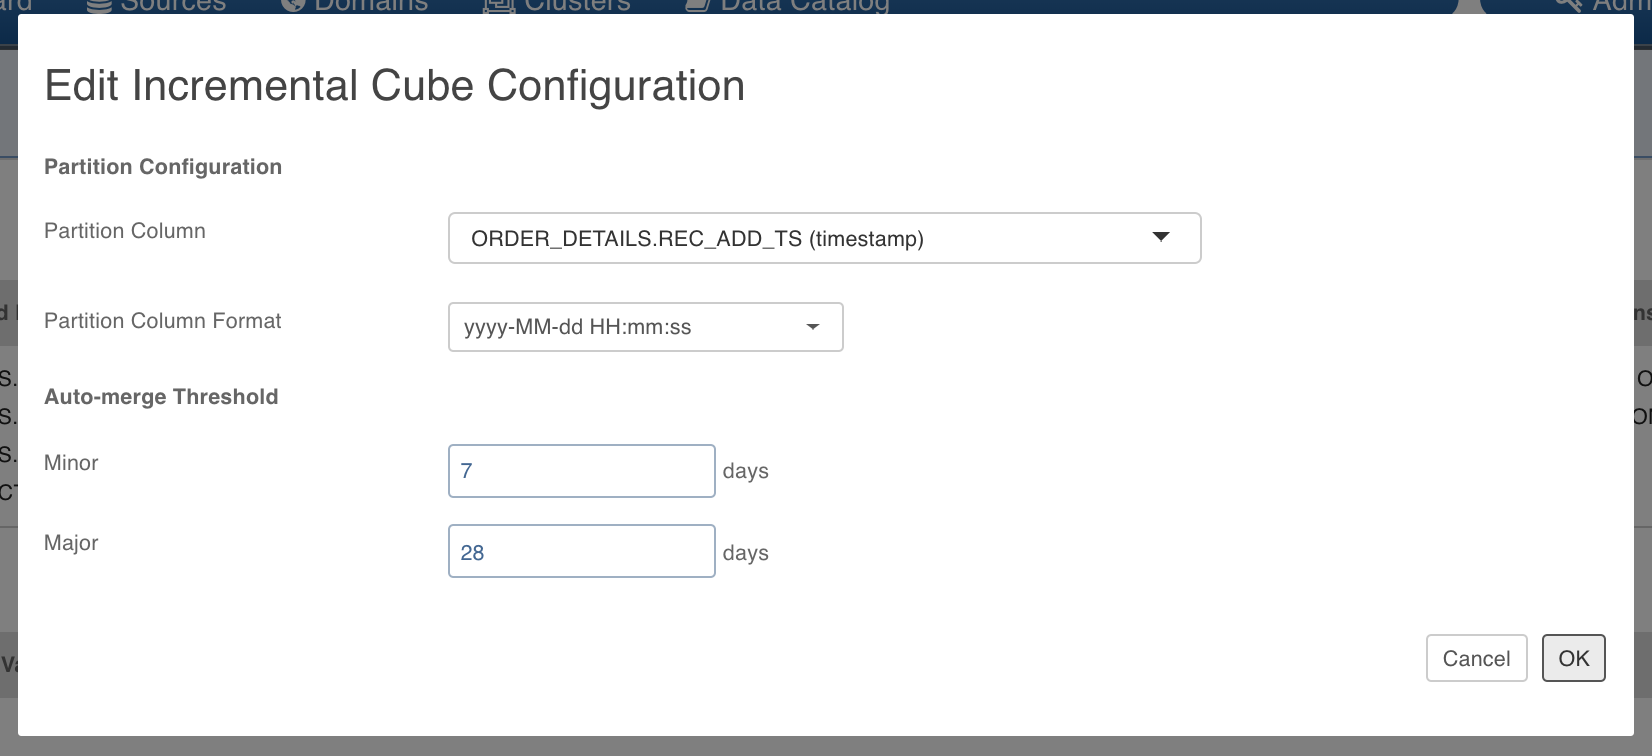
NOTE: Partition Column can come from any fact table. Supported partition columns are Timestamp, Date, StringandBigInt. For Timestamp column, the only valid format is "yyyy-MM-dd HH:mm:ss" and for Date column, the only valid format is "yyyy-MM-dd". For string column, all the formats are valid. In case of BigInt, you need not have to specify column format but we assume that the column values are Unix epoch time.
Auto-merge thresholds are optional, but recommended for data compaction.