Title
Create new category
Edit page index title
Edit category
Edit link
Designing Pipeline Version
Following are the steps to design a pipeline:
- In the Pipelines page, click the new pipeline created. The Overview page is displayed with the pipeline version details and a blank design window.
- Click Open Version Editor to open the editor page.
- Drag and drop the Sources and Transformations to the pipeline editor and connect them to design a pipeline.
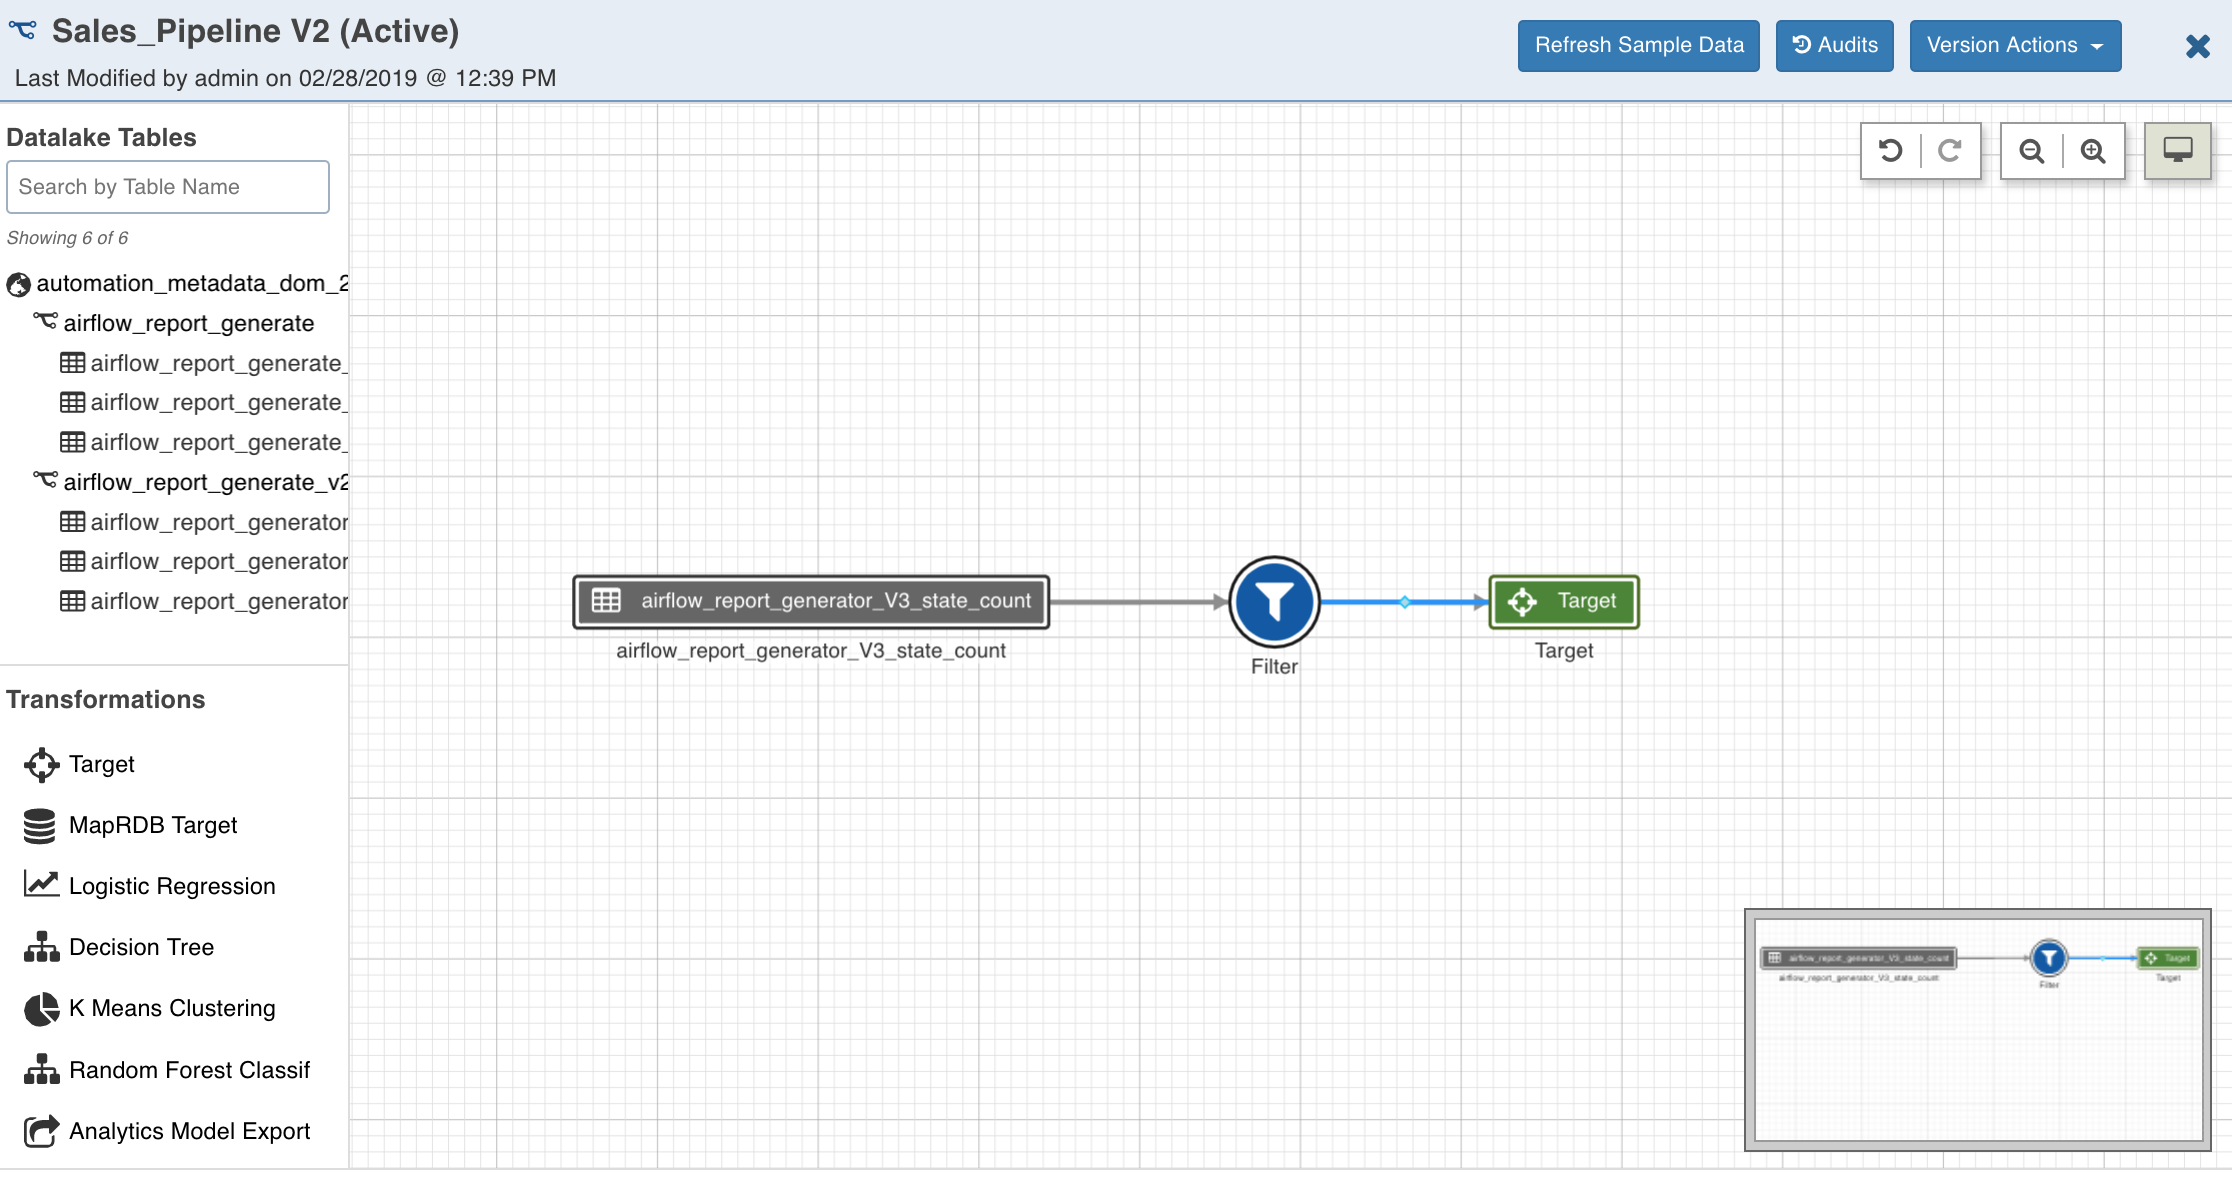
Pipeline Editor Actions
The following sections describe the options available in the pipeline editor page.
Refresh Sample Data
Clicking the Refresh Sample Data button (after creating the pipeline) refreshes the source sample data to ensure the most recent data is available for the data transformation.
Audits
The Audits option displays an audit log of activities on the pipeline version like adding/removing/renaming nodes, adding/removing/renaming columns, editing properties, etc. It contains information about the action, user, and timestamp.
Version Actions
Create A Version
This option allows you to create a new version of the pipeline.
Edit Version Details
This option allows you to edit the description and tags of the current version.
Setting Pipeline Parameters
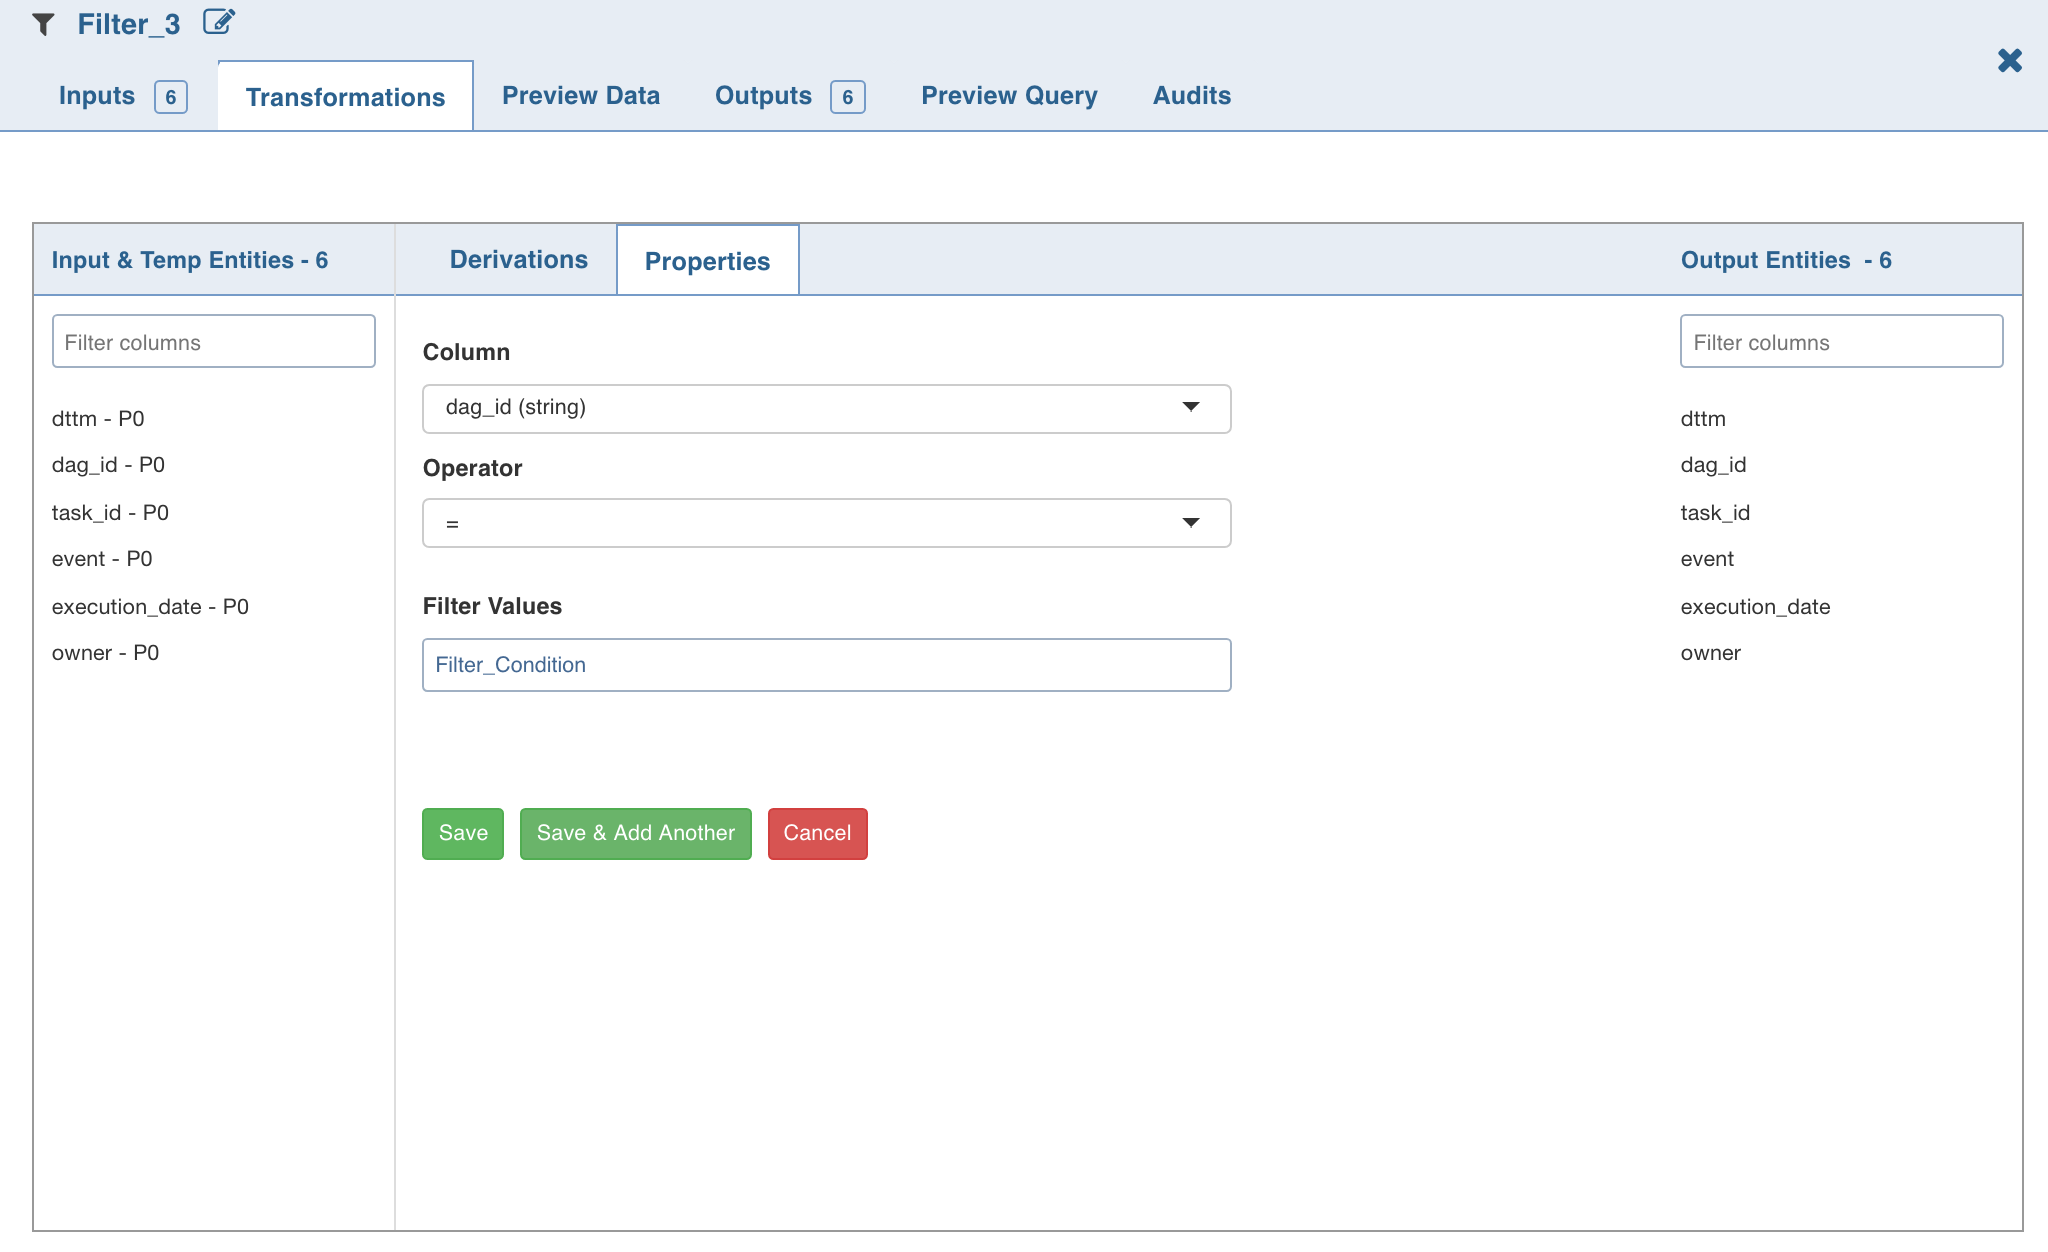
Data Transformation supports parameters in expressions within a pipeline. The Pipeline Version Parameters page allows you to add Key and Value for parameters. For example, Key = Filter_Condition and Value = group_id or “US”, or ‘US’.
NOTE: If the entry in the Value field is without quotes (“” or ‘’), it will be considered as a variable key reference. For example, the value “US” or “0” is an input string while, group_id is the variable reference to the group_id key.
The parameters must be referenced as $param_name.

These parameters will be used in pipelines. The values for parameters will be used during pipeline execution. A parameter used in pipeline must have a value in the pipeline parameters.
Limitation
Usage of column names as pipeline parameter values is not supported.
View Options
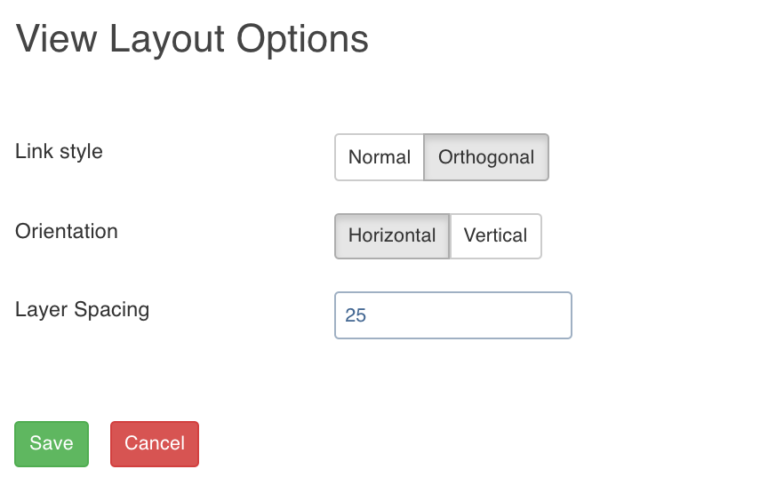
The View Options page allows you to set the layout of the pipeline on the pipeline version editor page. It includes the following fields:
- Link Style - Normal: displays straight arrows connecting the nodes, Orthogonal: displays right-angular arrows connecting the nodes.
- Orientation: repositions the nodes on the canvas horizontally or vertically .
- Layer Spacing: repositions the nodes on the canvas as per the spacing number provided.
Undo and Redo
Undo and Redo operations can be performed on the following actions:
- Layout modifications (in view options) for pipeline version
- Position modifications of nodes in a version
- Modifications in nodes like edit properties, exclude, include, rename columns, schema synchronisation, etc
- Addition and deletion of nodes and links
Overview
The Overview option comes in handy if you are working on a big pipeline with many nodes and if the pipeline exceeds the normal page view.
Node Settings
Double-clicking each node displays the following list of settings:
Inputs
This section includes the following:
- This screen lists all the column details of the node, name of the table (Data Lake) and whether it is included or excluded downstream.
- Clicking the icon next to each header displays Filter text box where you can enter the required value to be filtered.
- Clicking the header (Column Name, Column, Type, Data Lake, or Available Downstream) reorders the rows alphabetically.
- Selecting the columns using the checkbox and clicking Exclude Columns or Include Columns excludes or includes them respectively.
- Clicking the Synch Table Schema button synchronizes the input columns of the source node used in the pipeline with the columns in the source table. For more details, see the Pipeline Source Schema Synchronization section.
- Double-clicking the column name enables a text box to edit / rename the column name. The new column name is validated and checked for duplicates.
- Clicking the view column lineage icon next to each column name displays the details of the origin of the column.
- Clicking the search for column in the pipeline icon next to each column name displays the list of nodes that the column is included in that particular pipeline. You can also include and exclude columns.
Transformations
This section includes the list of transformations or nodes that can be added to the pipeline. The transformation tab includes the following two options:
- Derivations: The derivation can be: Output: transformations are not reflected in the output columns, Temporary: transformations are reflected in the output columns.
- Properties: The configurations to perform transformation.
Preview Data
This section includes sample data for the selected transformation/node. You can click the icon next to the column headers to filter and view the required columns. To rearrange the placement of the columns, drag and drop the column headers towards right or left.
Outputs
This section includes the list of output columns of the transformation performed on the inputs. You can also rename and remove columns.
Preview Query
This section displays the representational SQL queries for the transformations performed. The actual queries are optimized for the execution engine.
Audits
This section displays the list of all actions performed on the specific node of the pipeline.
Auto-Suggestion in Expressions
The Infoworks DataFoundry supports auto-suggestion in the Expression text boxes. When you type an expression, the system auto-suggests the relevant column names and functions. For more details on functions, see the Functions Library section.
Auto-suggestion is supported in the following sections:
- Derivation section in all nodes.
- Advanced Properties section in Filter, Join and Aggregate nodes.
- Properties section in Exists, Split nodes.
This feature helps the user to add expressions faster without switching visual context.
Source Node Functionalities
The Sources section includes list of all sources and the tables added to the sources in the domain. It also includes the tables built in the pipelines of the domain in which you are creating the pipeline. The Search by Table Name field allows you to search for the required table.
You can drag the tables from the source section and drop them to the editor and double-click it to view the columns and data present in the source table.
NOTE: The maximum number of source and pipeline tables displayed in the Sources section can be configured in the SOURCE_TABLES_COUNT_LIMIT configuration in the Admin > Configuration > System Configuration page.
The following section explains the options available in the Source Transformation page.
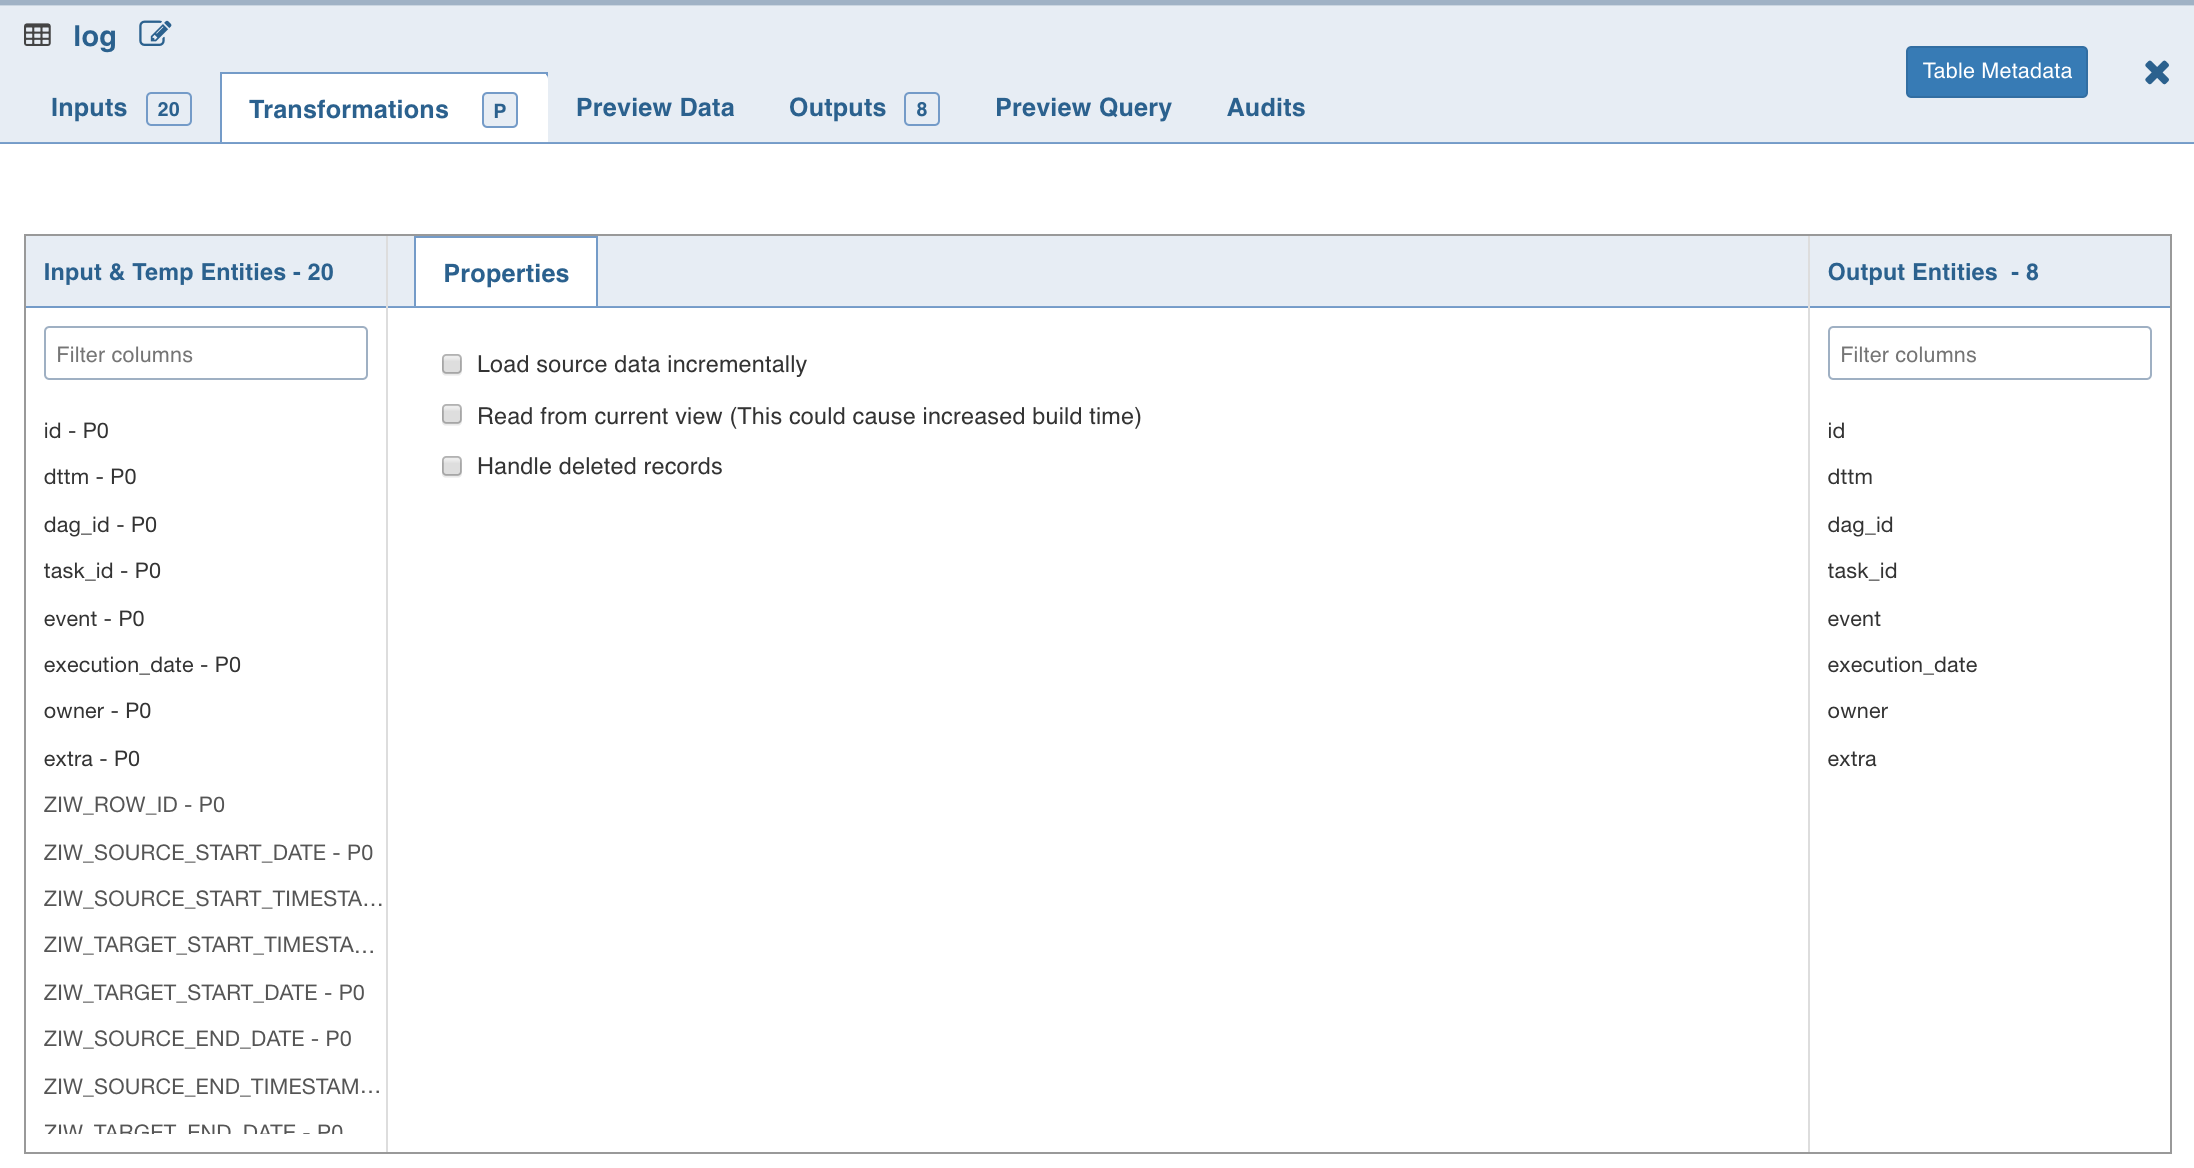
Load Source Data Incrementally
Incremental data loading is considered as a best practice in data modelling. If a database contains large amount of data from various sources that are continuously updated, reloading the entire data set can be time consuming.
The Load source data incrementally option helps in loading only the new and updated records for the selected source with incremental load.
- If the incoming data set includes no updates to the existing data, append incremental pipelines can be built. The pipeline is designed such that the append target obtains only the data to be added to an existing target.
- If the incoming data set includes updates to the existing data, merge incremental pipelines can be built. The pipeline is designed such that the merge target obtains only the data to be inserted or updated to an existing target.
A sample pipeline is explained below:
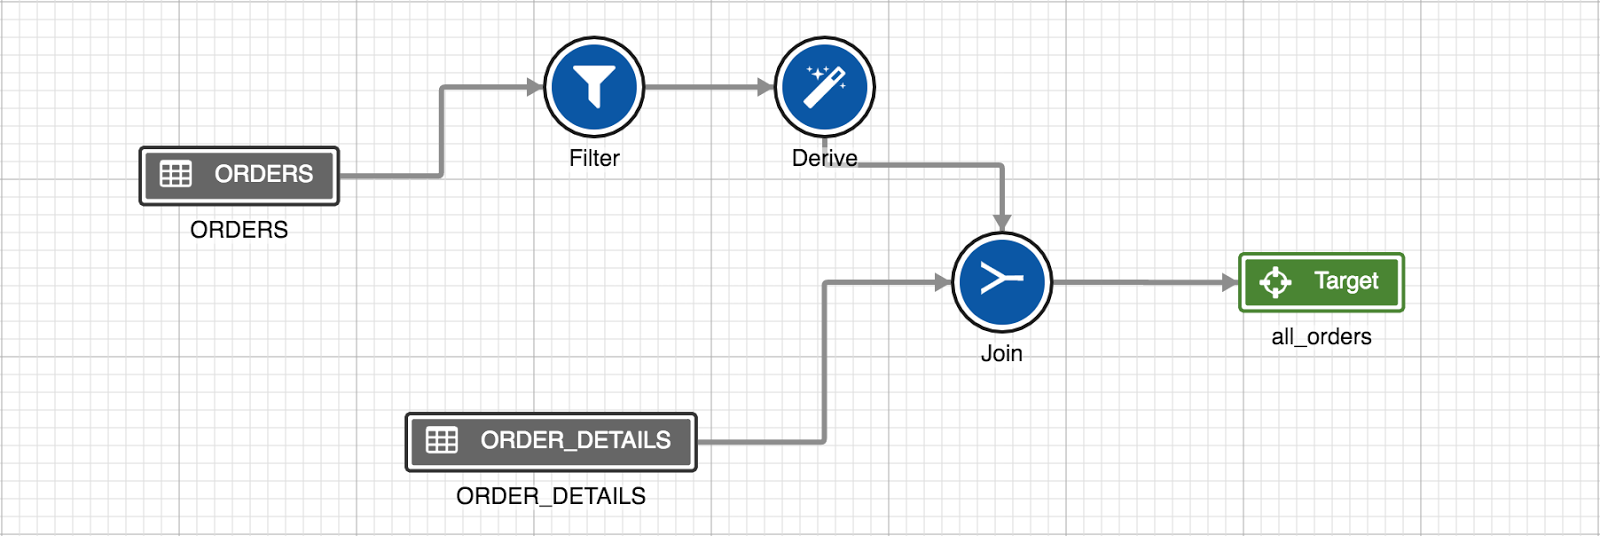
For example, ORDERS is a source where only new data is added and ORDER_DETAILS is a dimension table where the records do not get updated. A target with sync mode set to Append can be added to this pipeline to speed up the pipeline build.
If there are updates on ORDERS, a target with the sync mode set to Merge can be added to speed up the build.
Reading from Current View – Lockless Pipeline
The objective of this feature is to read the data that resides in CDC but not merged. If the CDC is running on a source, there will be a lock over on the source. Alternatively, even if there is a lock over the source, you can build pipelines using the current view feature.
Pre Requisite : Every source has to go with cdc or cdc_merge with the latest package
Limitation
- Pipelines cannot be built if the merge (switch) is in progress.
- After switching from the current view to existing source, merge (switch) operation is recommended else, incremental data might be corrupted.
NOTE: When switching from table to view, the following steps must be performed:
- All CDCs must be merged and switched to the table.
- The pipeline must be built after the merge and switch.
Handle Deleted Records
You can load deleted records with the incremental load by enabling the Handle deleted records option. The deleted records from source table will be loaded with inserts and updates. The deleted record can be identified by value true in the ZIW_IS_DELETED audit column of source table.
Prerequisite: The Generate History View option must be enabled for the source table.
Pipeline Source Schema Synchronization
You can map or change the selected source table schema with any other Hive table used as a reference table using the Change Table Schema feature. This feature allows you to change the entire table schema.
If there are any updates to the schema of the original Hive table and if that table is used in the pipeline, there will be a mismatch in schema of the pipeline source table and schema of the original Hive table. In case of schema mismatch, a warning icon is displayed on the pipeline editor page. When you click the warning icon, the dialogue box with a list of source nodes that are not in sync with the source tables is displayed.
Following are the steps to change the source table schema:
- Double-click the source and click the Inputs tab.
- Click the Sync Table Schema button. A _Table Schema Sync_window is displayed.
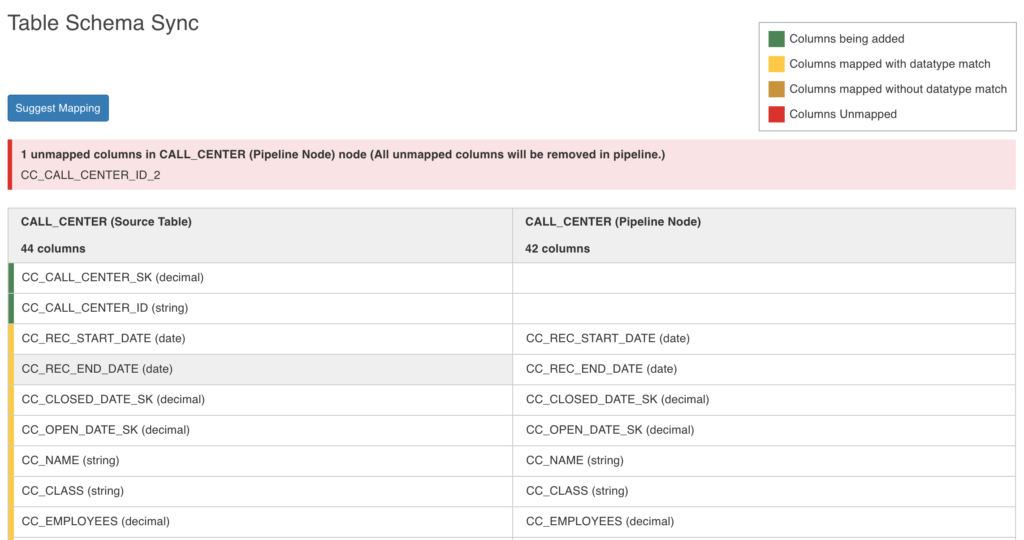
The columns on the left are the reference columns derived from the reference table (desired table schema) selected in the drop down. The columns on the right are the ones from the pipeline source table. Following are the color conventions used for the reference table columns:
- Green highlight: Columns to be added (new columns)
- Yellow highlight: Columns mapped with datatype match
- Brown highlight: Columns mapped without datatype match
- Red highlight: Columns to be removed
NOTE: All the mapped columns from the left will take the flag available downstream from the corresponding mapped node columns. All unmapped audit columns will be excluded by default.
- Click Suggest Mapping to sync the schema of the source node used in the pipeline. The derived column name will be empty for the mismatched column.
- Click the Edit icon in the derived column list and select the column from the drop-down list.
- Click Save.
NOTES:
- Once the source schema used in the pipeline is modified, you must run the ingestion job and click Generate Sample Data in order to get the updated sample and data in the pipeline.
- You can disable this feature by setting IWConstant PIPELINE_SOURCES_AUTO_SYNC_CHECK_DISABLED = true.
Support for Non-Infoworks Hive Tables
To use non-Infoworks Hive tables in pipelines, ensure that Hive ingestion is performed on the tables.
To successfully design a pipeline with non-Infoworks Hive tables, which incrementally updates an existing Data Transformation target, the user can use the following control variables in a filter:
- $.highWatermark which will be set to the time the last incremental load finished.
- $.lowWatermark which is initially set to the epoch start (Jan 1, 1970) for the first build. Later builds will have same value as the highWatermark of the previous build. For example, to load the ORDERS incrementally, you must add a filter as follows: The watermark variables operate similar to the Load source data incrementally option for the Infoworks managed tables.
Pipeline Node Error Handling
The errors and warnings in pipeline nodes are handled from the client-side. This error check provides the user an early and instant feedback on the node errors in a pipeline. This avoids request (REST API call) to the server (and potentially to Hive) and reduces the load on server for errors.
Following are the errors and warnings handled in the UI:
- Error message for input and output unmapped columns.
- Error message for unmapped derivation (a derivation expression without expected output columns). This occurs when the user deletes the derived output column without deleting the expression.
- Warning message for non-target and non-model export type node being the leaf node in the pipeline.
WARNING: Request is sent from the client to the server only for warnings. For errors (or errors and warnings), no request is sent from the client to the server.
For more details, refer to our Knowledge Base and Best Practices!
For help, contact our support team!
(C) 2015-2022 Infoworks.io, Inc. and Confidential