Infoworks supports the following types of structured file ingestion:
Delimited File Ingestion
Delimited File Ingestion supports crawling delimited text files with Append and CDC modes.
It can be performed in the following ways:
Record Level Processing
DFI provides the following features for record-level processing:
Schema crawl
Data Crawl
Append Mode
CDC and Merge
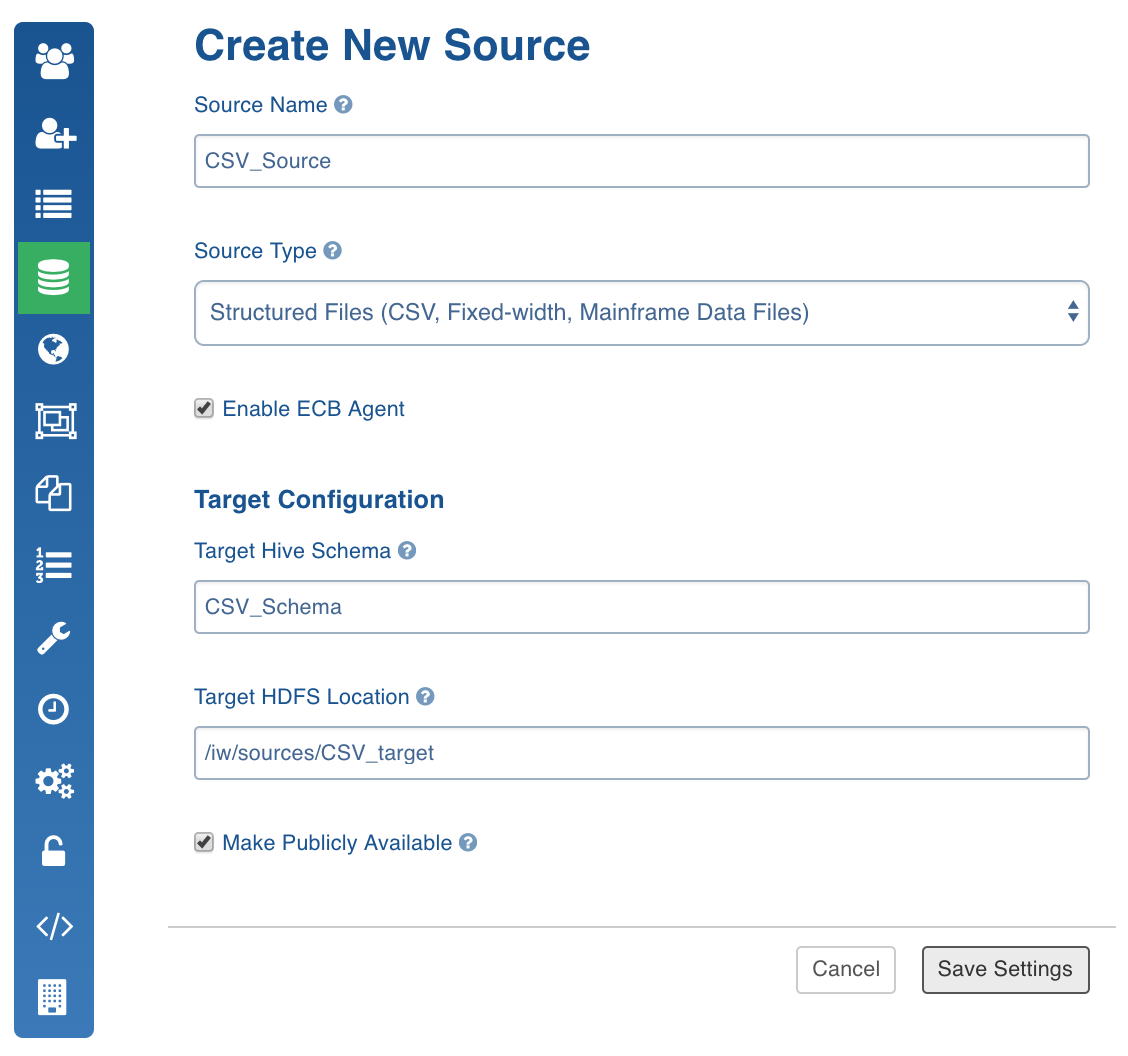
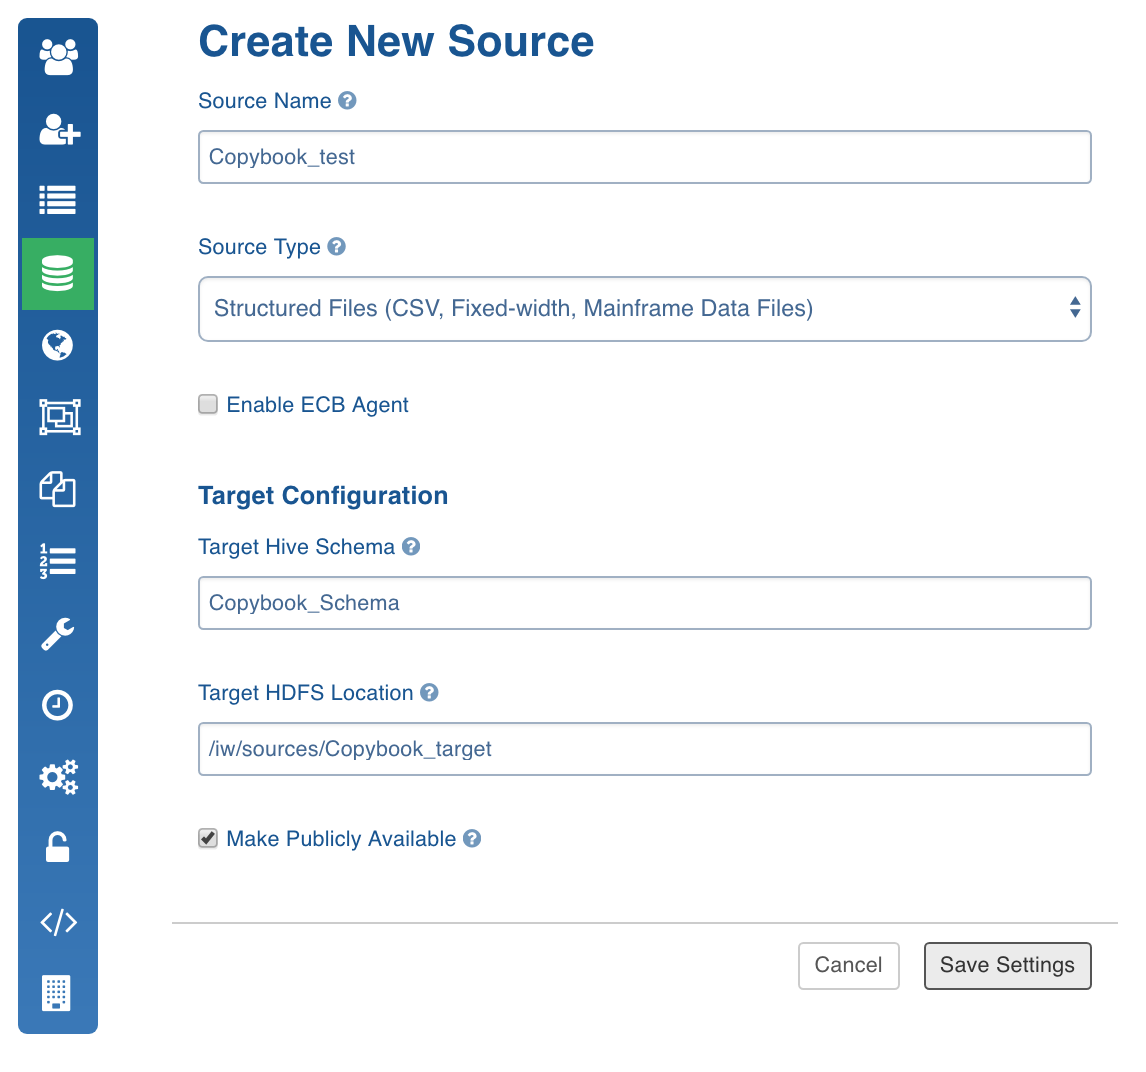
Creating Source
In the Admin section (Admin > Source > New Source), create a source and select the source type as Structured Files. Enter the Hive schema name and HDFS location. Select Enable ECB Agent option to enable the ECB agent.
Configuring Source
Click the Sources menu and select the structured file source you created.
In the Source Configuration page, click the Click here to enter them link.
In the Settings page, perform the following:
Select either of the following depending on where the files are stored: From FileSystem, From Hadoop Cluster, From Remote Server (using SFTP), From Cloud Storage.
NOTE: If it is From Remote Server, specify the sftp User Name, Password, Host, and Port.
Enter the source base path.
Select the ECB agent.
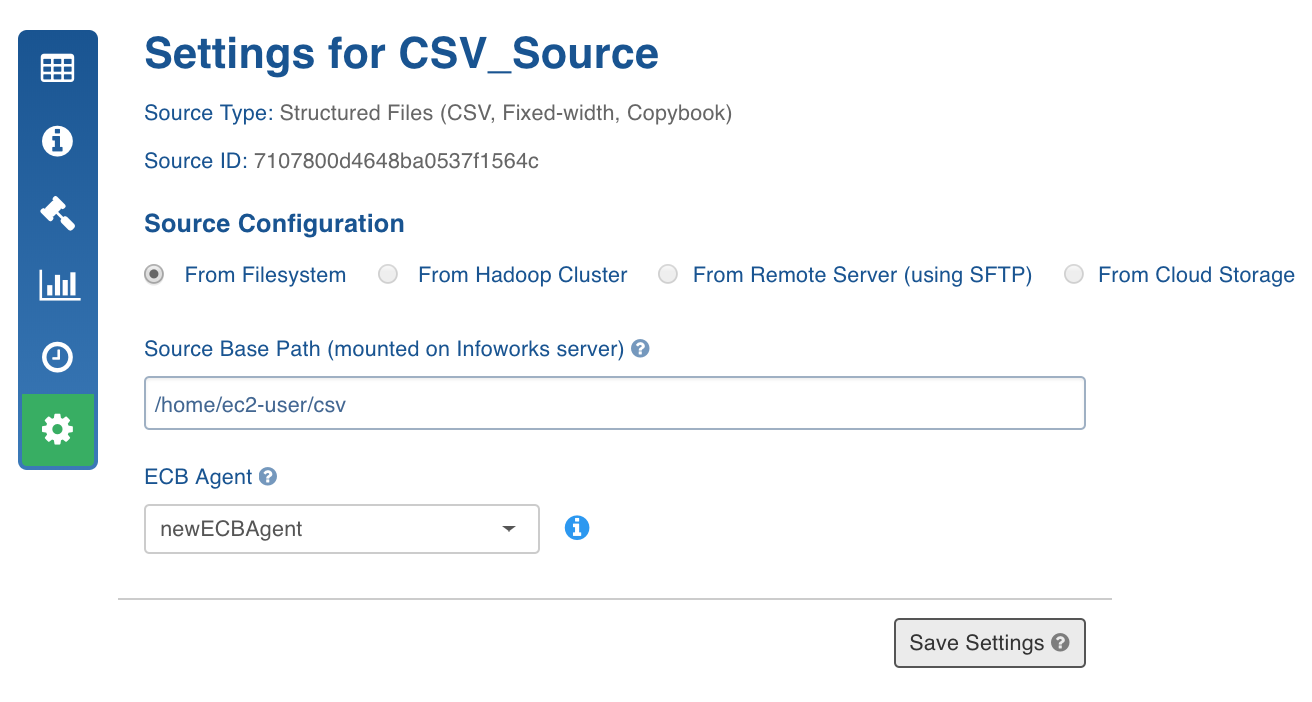
Click Save Settings.
Schema Crawl
NOTE: For a folder that contains files with similar structure, the system can detect the types of all columns.
Following are the steps to perform a schema crawl:
Click the Sources menu and select the source you created.
Click the Source Settings icon.
In the File Mapping section, click Add Entry to add a folder as a table.
Configure the following table details:
Table: Table name.
Source Path: Folder path of the table. This is relative to the source base path.
Target HDFS Path: Target HDFS path. This is relative to the target base path.
Include/Exclude Files From Directory: Regex pattern to include or skip files.
Ingest sub-directories: Specifies whether to crawl the files in the recursive structure of the specified source path.
Archive source files: Archives the files for which the data has been crawled and inserted into Hive. The files will be archived on the edge node.
NOTE: Truncate and Truncate reload of table will not affect archived files. For every data file the control file will also be archived.
Processing Level: Record-level processing or file-level processing.
Number of Header Rows: Can be zero or greater than zero. If greater than zero, (for example, n), the first line of the file will be used to get the column names. The next n-1 lines will be skipped.
Column Separator: Column/Field Separator.
Column Enclosed By: Column/Field Encapsulator.
Escape Character: Character to escape delimiter, encapsulator, and new lines in data.
Character Encoding: Character encoding.
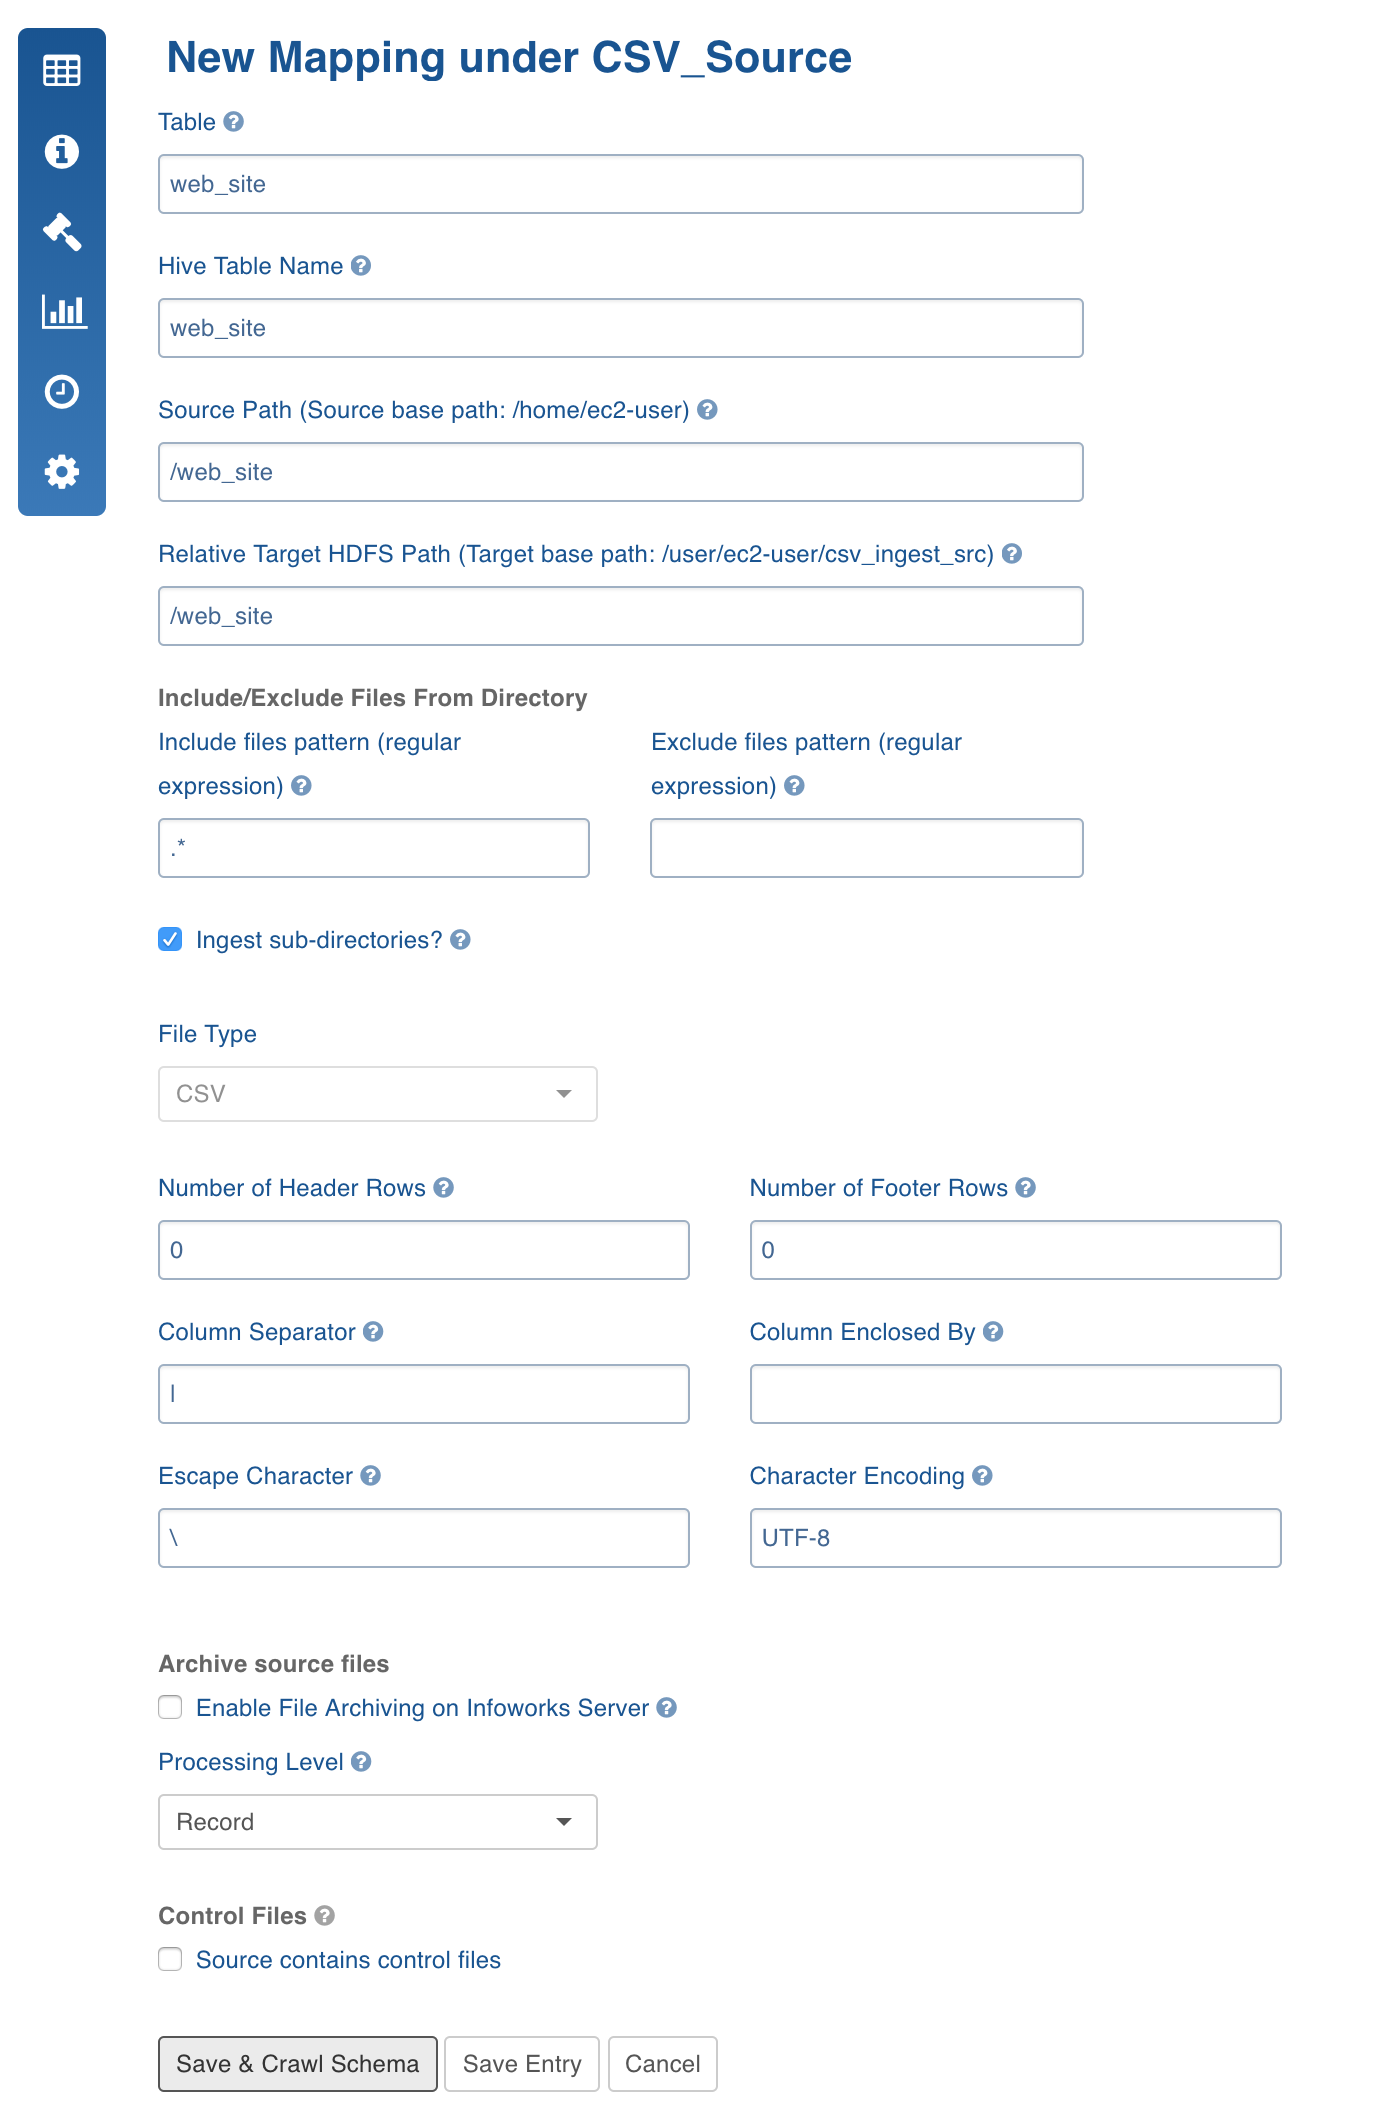
Control Files: A control file (a file with data file metadata) against which you can validate the data file. The regular expression fields, Data Files pattern and Extract format, allows you to specify the corresponding control file for every data file as a function of the data file path. Every file with CSV extension will be considered as a data file and the same file path ending with CTL extension will be treated as control file.
Ensure that the data directory after applying the include and exclude filters only returns data files and control files. When processing, the system first applies include and exclude filters for every file. Assuming that the file path which passes the Data Files pattern regex is a data file, the corresponding control file is found using the mentioned regex patterns. Also ensure that control files should not pass Data Files pattern regex.
Currently, the control files support java properties file format which validates checksum , count, and file size.
NOTE: Control file features with compressed files in are not supported in DFI ingestion.
Following is an example:
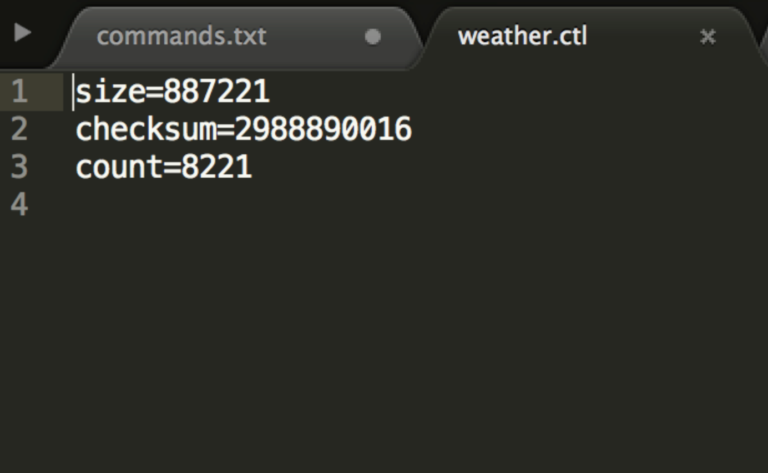
The validation logic and control file reading logic is pluggable. Hence multiple validation variables and different control file parsing logics can be plugged to extend this feature.
NOTE: For the validations to function, the calc_file_level_ing_metrics configuration must be set as true.
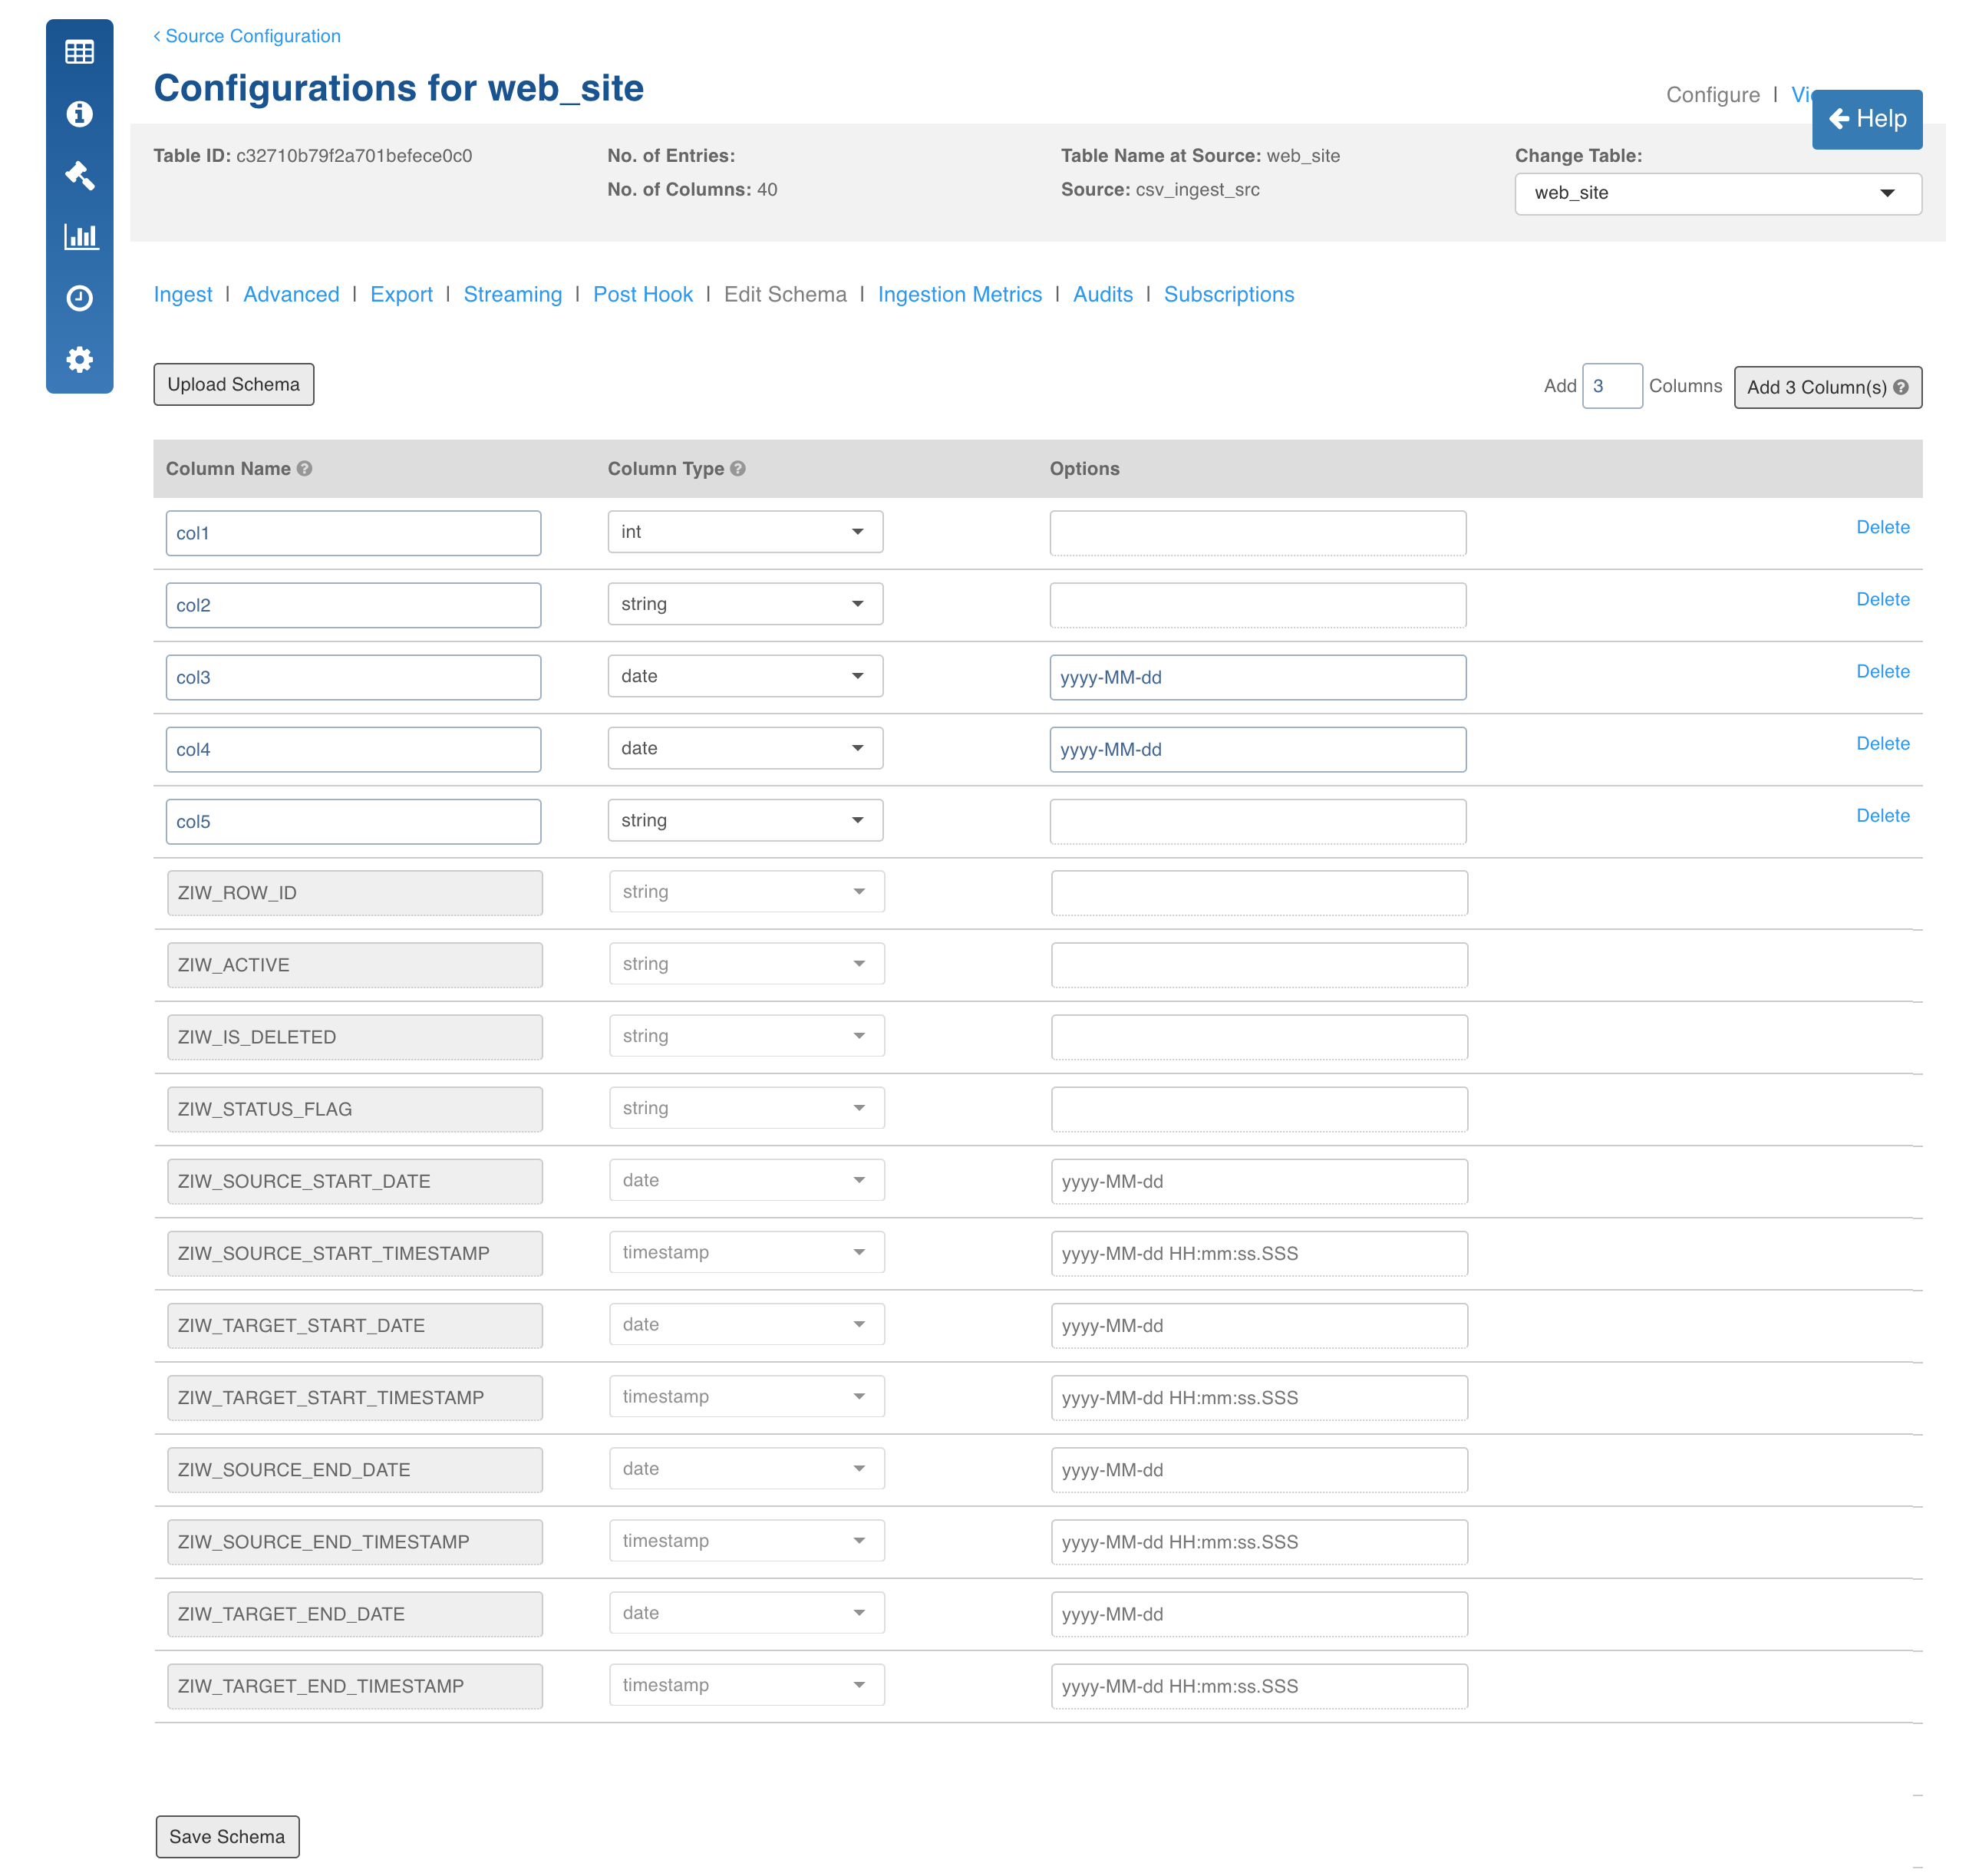
Click Save and Crawl Schema. You will be redirected to the Edit Schema page where you can add or edit columns.
Click Save Schema.
To recrawl metadata, navigate to the Source Configuration page and click Recrawl Metadata.
NOTE: If the table is not mapped the Crawl Metadata button will be displayed in the Source Configuration page.
Data Crawl Full Load
Following are the steps to perform a full load data crawl:
Click the Sources menu and click the DFI source file. The Tables page is displayed with the list of tables in the source.
Click the Configure button for the table that requires a full load data crawl.
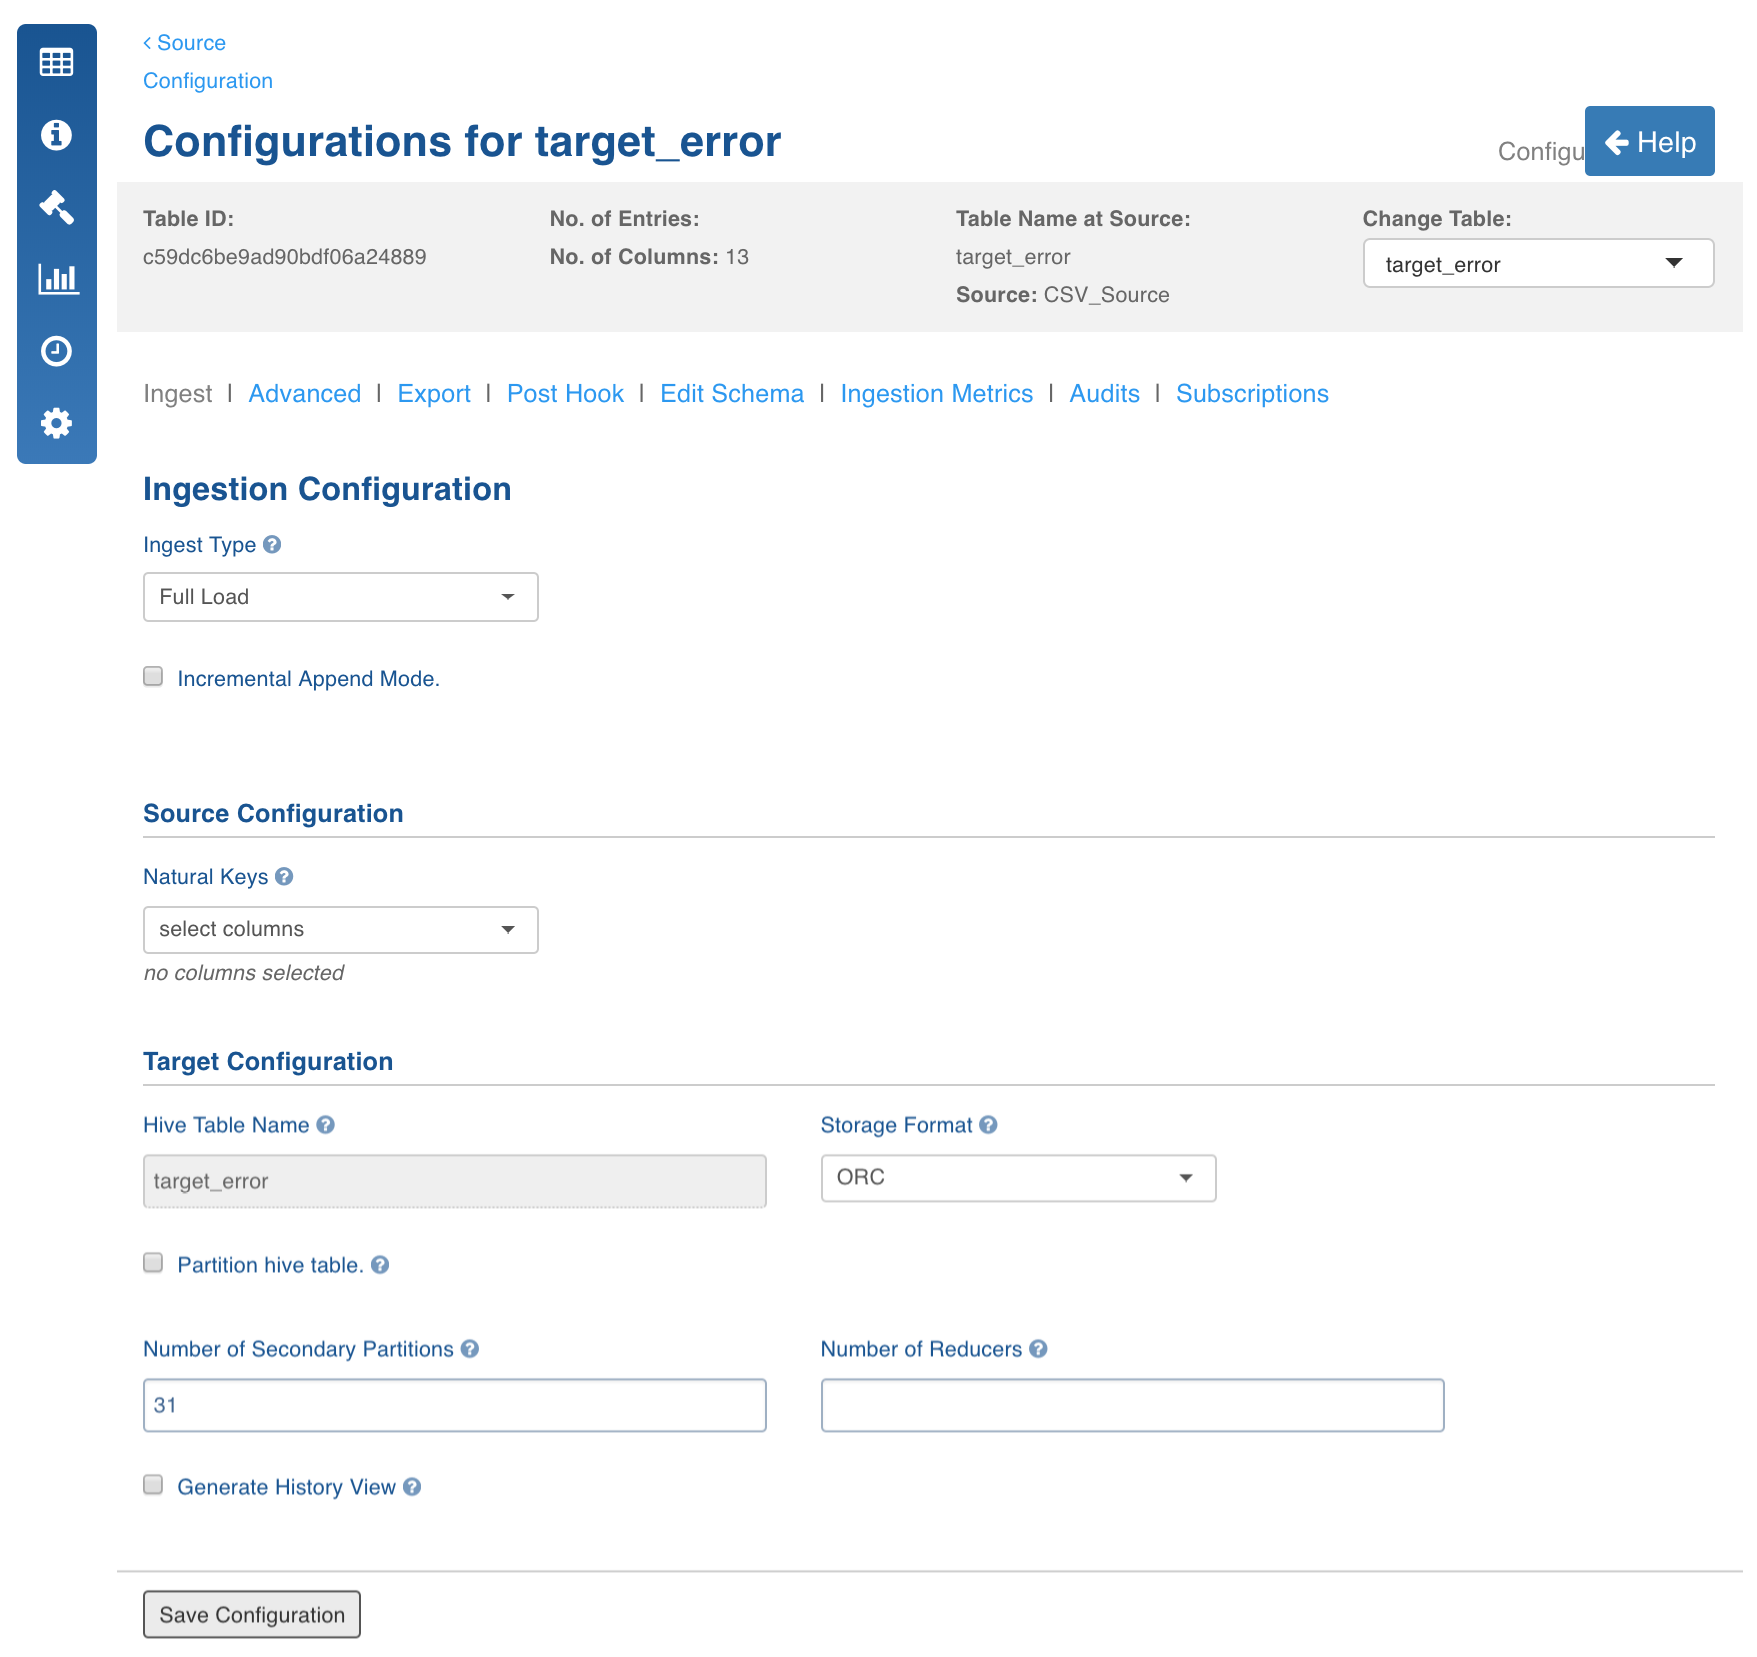
Select the Ingest Type as Full Load, enter the required values and click Save Configuration. For descriptions of fields, see the Source Table Configuration Field Descriptions section.
In the Table page, click the Table Group tab.
Click the View Table Group icon for the required table group.
Navigate to table group and click Initialize and Ingest Now.
For first time ingestion, and if you need a clean crawl, click Initialize and Ingest Now.
NOTE: This mode should be used for cases where new inserts come in new files and there are no updates.
To append new data to the crawled source click Ingest Now from the second crawl onwards. The new data can be placed in the same location. Only new and changed files would be picked.
NOTE: This mode should be used for cases where new inserts and new updates are present for every crawl.
Data Crawl Incremental Load
Following are the steps to perform incremental load data crawl on the DFI files:
Click the Sources menu and click the DFI Source file. The Tables page is displayed with the list of tables in the source.
Click the Configure button for the table that requires an incremental load data crawl.
Select the required incremental load Ingest Type, enter the required values and click Save Configuration.
For descriptions of fields, see the Source Table Configuration Field Descriptions section.
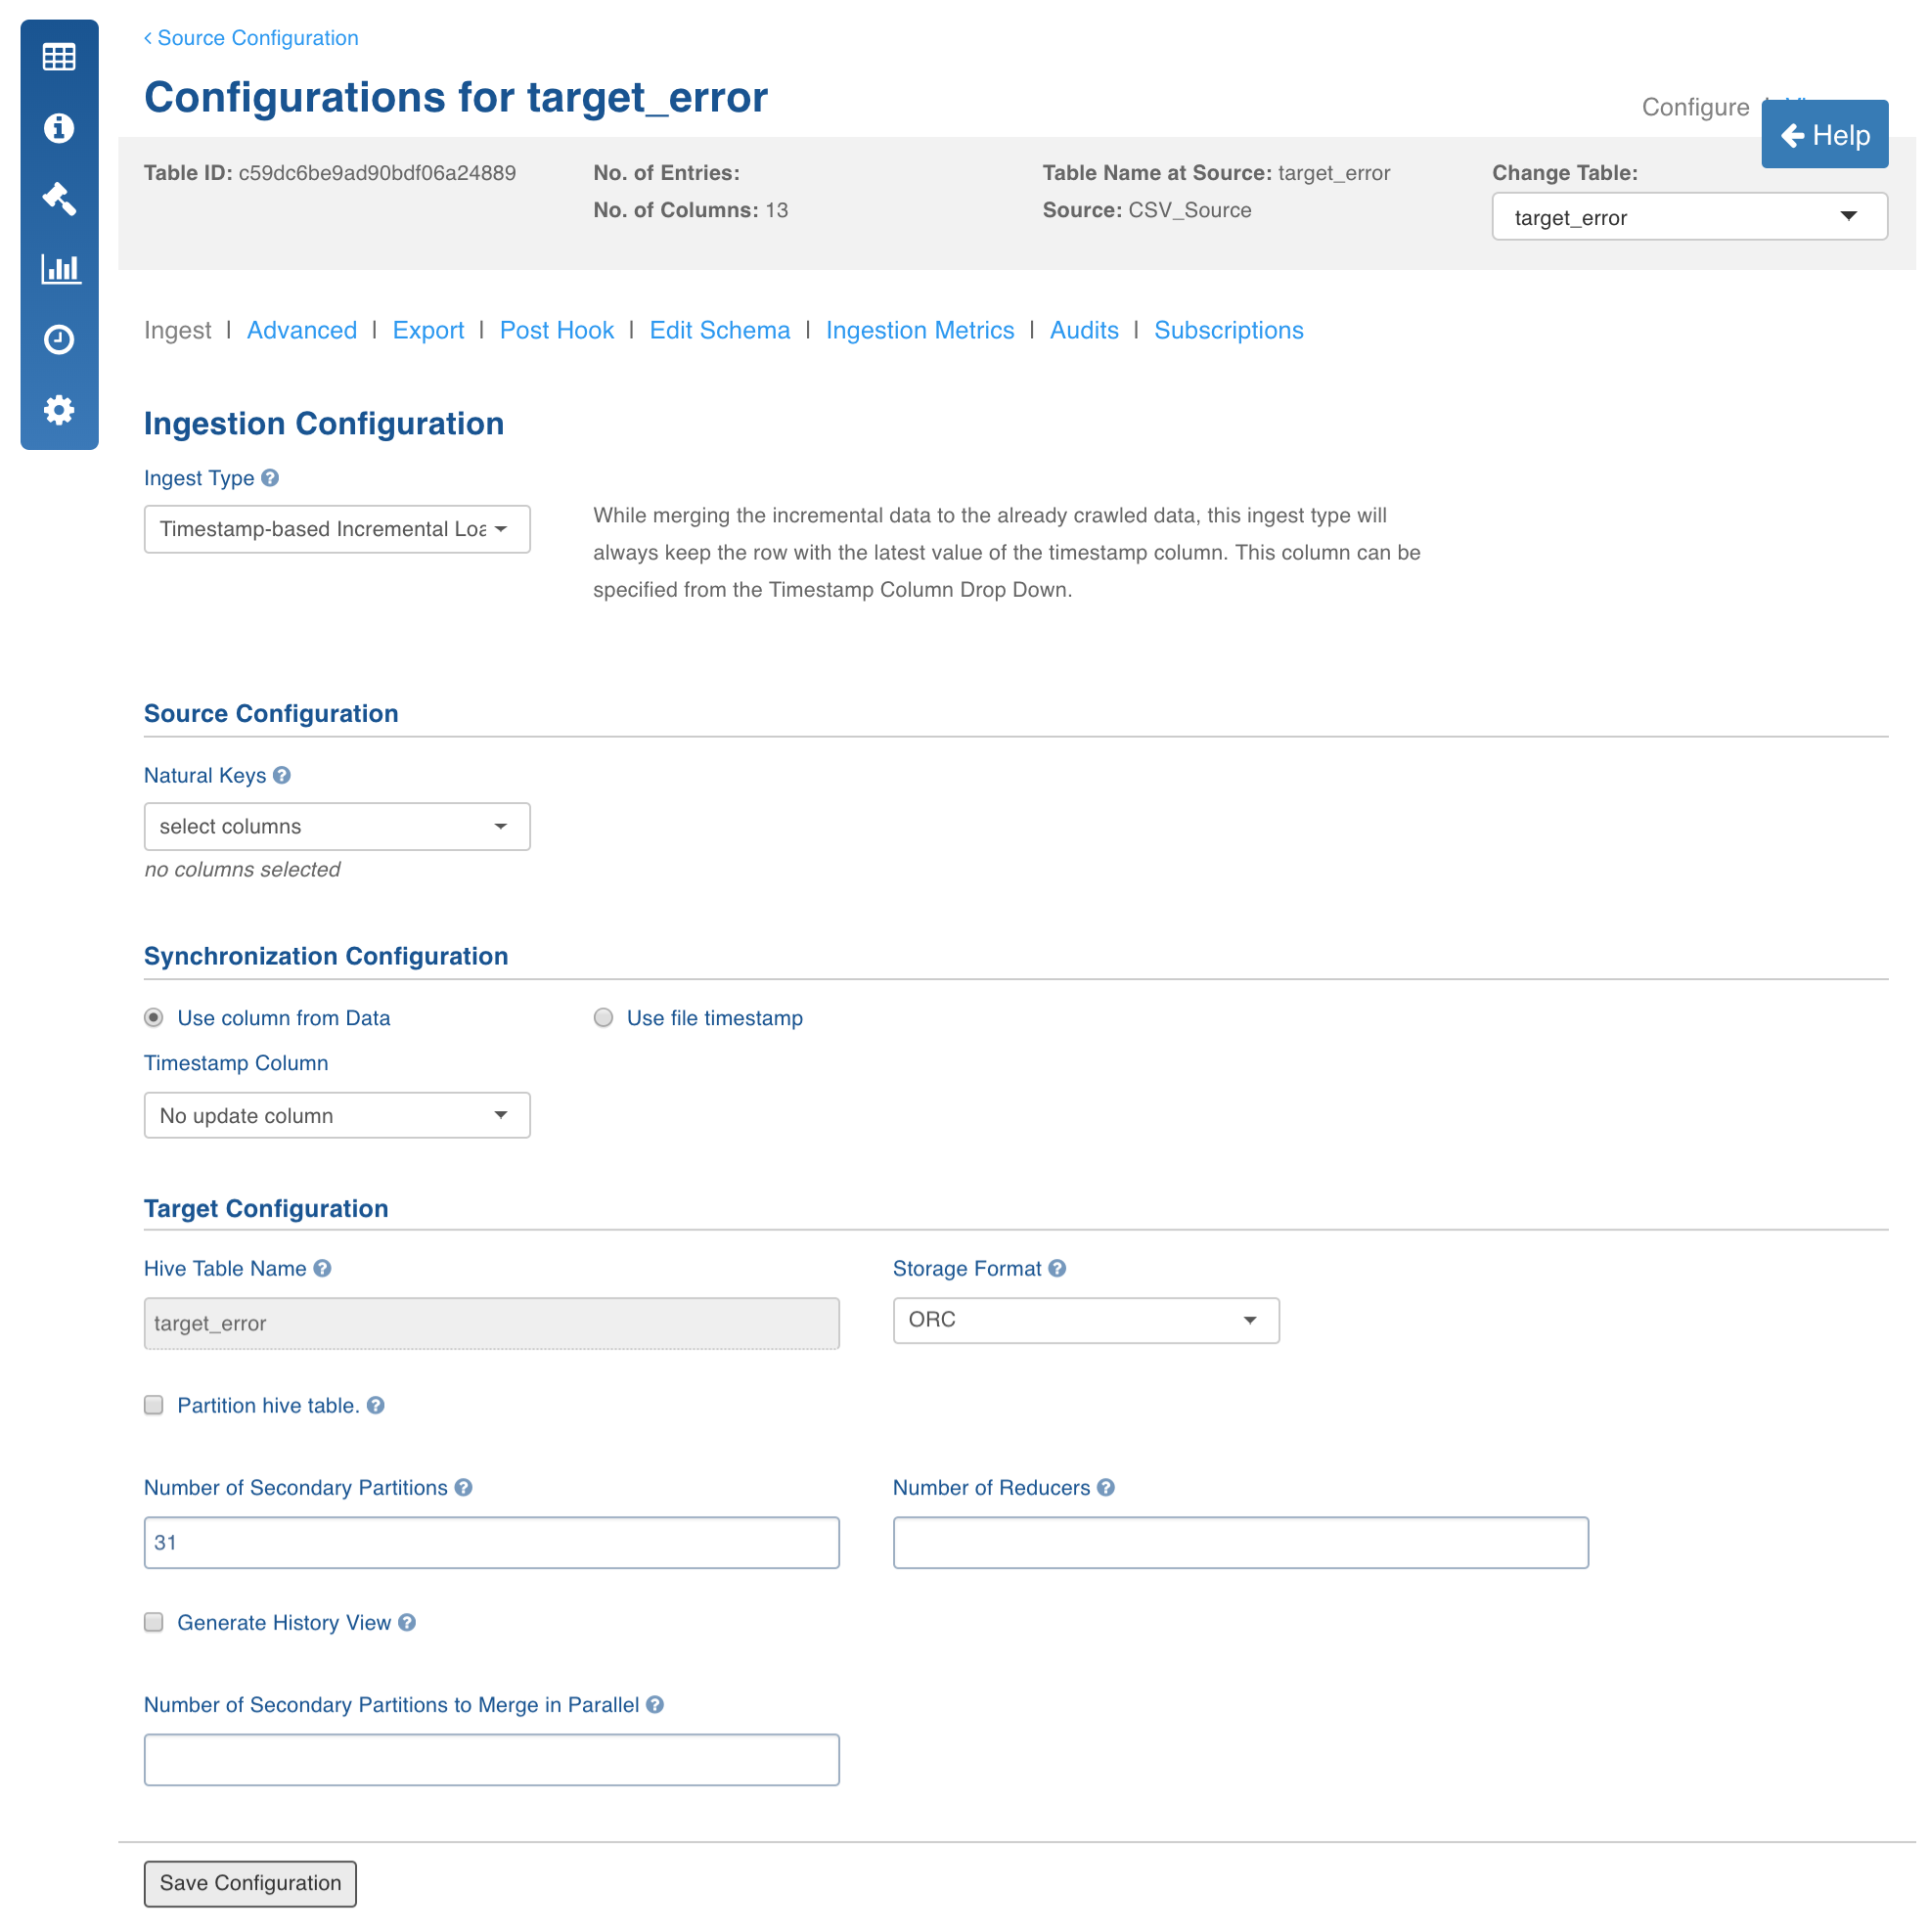
NOTE: For timestamp-based incremental ingestion, only timestamp datatypes can be selected as a Timestamp Column.
In the Tables page, click the Table Group tab.
Click the View Table Group icon for the required table group.
Navigate to table group and click Initialize and Ingest Now.
For first time ingestion, and if you need a clean crawl, click Initialize and Ingest Now.
NOTE: This mode should be used for cases where new inserts come in new files and there are no updates.
To get the new CDC data and merge it to the crawled source click Ingest Now from the second crawl onwards. The new data can be put in the same location. Only new and changed files would be picked.
NOTE: This mode should be used for cases where new inserts and new updates are present for every crawl.
Limitations
If multiple versions of the same record (same natural key) are present in the same file, one of the records will be picked randomly and the others will be moved to the history table.
Editing previously ingested files is not supported since the current version of the record might be affected.
File-Level Processing
DFI provides the following features for file-level processing:
Schema specification
Data crawl
CDC append mode
Creating Source
In the Admin section (Admin > Source > New Source), create a source and select the source type as Structured Files. Enter the Hive schema name and HDFS location. Select Enable ECB Agent option to enable the ECB agent.
Configuring Source
Click the Sources menu and select the source you created.
In the Source Configuration page, click the Click here to enter them link.
Configure the source by selecting either of the following options depending on where the files are currently stored: From FileSystem, From Hadoop Cluster, From Remote Server, From Cloud Storage.
If you choose From Cloud Storage , select the Cloud Type:
Google cloud service : Select the Service Account Type, copy the Service Account JSON Credentials File to the edge node and provide the path.
S3: Select the Access Type. If you choose Use IAM, ensure that the Edge node runs with the same IAM role and has access to the S3 bucket. If you choose Use Access Credentials, provide the access credentials of S3 bucket.
Enter the source base path.
Scroll down and click Add Entry to add a folder as a table.
Configure the table as shown in the example below.
The following table lists and describes the fields.
Field | Description |
|---|---|
Table | Table name. |
Source Path | Folder path of the table. This is relative to the source base path. |
Target HDFS Path | Target HDFS path. This is relative to the target base path. |
Include/Exclude Files From Directory | A regex pattern to include or skip files. |
Ingest sub-directories | Specifies whether to crawl the files in the recursive structure of the specified source path. |
Processing Level | Option to select record-level processing or file-level processing. |
Number of Header Rows | Can be 0 or greater than 0. If greater than 0, (for example, n), the first line of the file will be used to get the column names. The next n-1 lines will be skipped. |
Column Separator | Column/Field Separator |
Escape Character | Character to escape delimiter, encapsulator, and new lines in the data. |
Character Encoding | Character encoding. |
File Compression Format | The compression format of file if the file is compressed. |
Schema Specification
For a given folder which contains files with similar structure, you can specify the table schema.
To specify the table schema, follow these steps:
Create tables as described in the Prerequisites section.
Navigate to source configuration section and click Recrawl Metadata.
Click the View button for the table after the metadata crawl is complete. You will find the types are assigned to column names if header is specified. Otherwise, columns will have names such as Col1 and Col2.
Data Crawl Full Load
To perform a full load data crawl, follow these steps:
Navigate to table configuration of the table.
Enter the required configurations for full load.
Ingest Type: Full load
Hive Table Name: Hive table name.
Infoworks Managed Table: This option specifies whether we are putting data to existing Hive table which is not maintained by Infoworks or to the Hive table which is created and maintained by Infoworks.
Click Save Configuration.
Navigate to table group and click Initialize and Ingest Now.
Incremental Load Append Only
To append new data to the crawled source click Ingest Now from the second crawl onwards.The new data can be added in the same location. Only new and changed files will be picked. If you need a clean crawl, click Initialize and Ingest Now.
This mode should be used for cases where new inserts come in new files and there are no updates.
Configurations
CSV_ERROR_THRESHHOLD: if the number of error records increases this threshold, the mr job will fail. Default is 100.
CSV_KEEP_FILES: if the host type is local before the mr job runs, the csv files are copied to the tableId/csv directory. If this config is true, the files are not deleted after the crawl. Default is true.
CSV_TYPE_DETECTION_ROW_COUNT: Number of rows to be read for type detection/metacrawl. Default is 100.
CSV_PARSER_LIB: The underlying CSV parser library used by Infoworks. The default value is UNIVOCITY. It is recommended to use the default parser. In case of any issue, user can try setting COMMONS, JACKSON or OPENCSV parser. This configuration can be set at the source or table level.
CSV_SPLIT_SIZE_MB: Split size to be used for mr for every file. Default 128.
dfi_job_map_mem: mapper memory for the crawl map reduce. Default is the value of iw_jobs_default_mr_map_mem_mb in properties.
dfi_job_red_mem: reducer memory for the crawl map reduce. Default is the value of iw_jobs_default_mr_red_mem_mb in properties.
calc_file_level_ing_metrics: If this is set to true, the file level ingestion metrics are calculated at the end of the job. Default is true.
modified_time_as_cksum: If this is true, the modified time is used to determine if the file has been changed or not. If it is set to false, the actual checksum is calculated. Default is false.
delete_table_query_enabled: By default, Delete Query feature is available at table level. Set IW Constant delete_table_query_enabled to false from UI to hide Delete Query.
multiline.mode: Set this to true if the file has multiline records and all the columns are quoted/unquoted.
CSV_NULL_STRING: The configuration to set the NULL string. This configuration is available on table, source and global level. The default value is NULL.
USE_GTE_FOR_CDC: This configuration allows you to fetch the CDC records based on the use case.
** true: the CDC records will be fetched using the >= comparator. This is the default behaviour and this should be used for merge use cases to make sure that the data from the last batch is brought again. This is done for the scenarios where some data for the last batch and timestamp was still being populated in the source system when the ingestion job finished.
false: the CDC records will be fetched using the > comparator. This behaviour should be used for append mode scenarios, where the data for the last batch or timestamp in the source system is fully populated and the user does not want the old data again. ** This configuration is applicable for Timestamp and BatchID sync type tables.
NOTE: Data might be lost when the > comparator is used. If records with same batch ID are being inserted in the source system when the ingestion job is running, all the records that are inserted just after the job is run and with same batch ID will be missed in next CDC job.
IGNORE_EXTRA_COLUMNS_IF_ANY: Set this value to true to ignore the newly added columns (if any). The value must be set to true at the table or source level before running the job. The default value is false.
Limitations
Column order must be maintained; a new column always gets added at the end.
If data is not enclosed and data contains delimiter it has to be escaped with escape char.
If data is enclosed and data contains enclose character it has to be escaped.
Known Issues
Infoworks managed tables are not supported as of now, that is, we can only add data to an existing Hive table.
Since file-level processing adds data to existing table, Initialize and ingest button should not be used.
Azure Blob Storage Ingestion
Following are the Azure Blob Storage configurations:
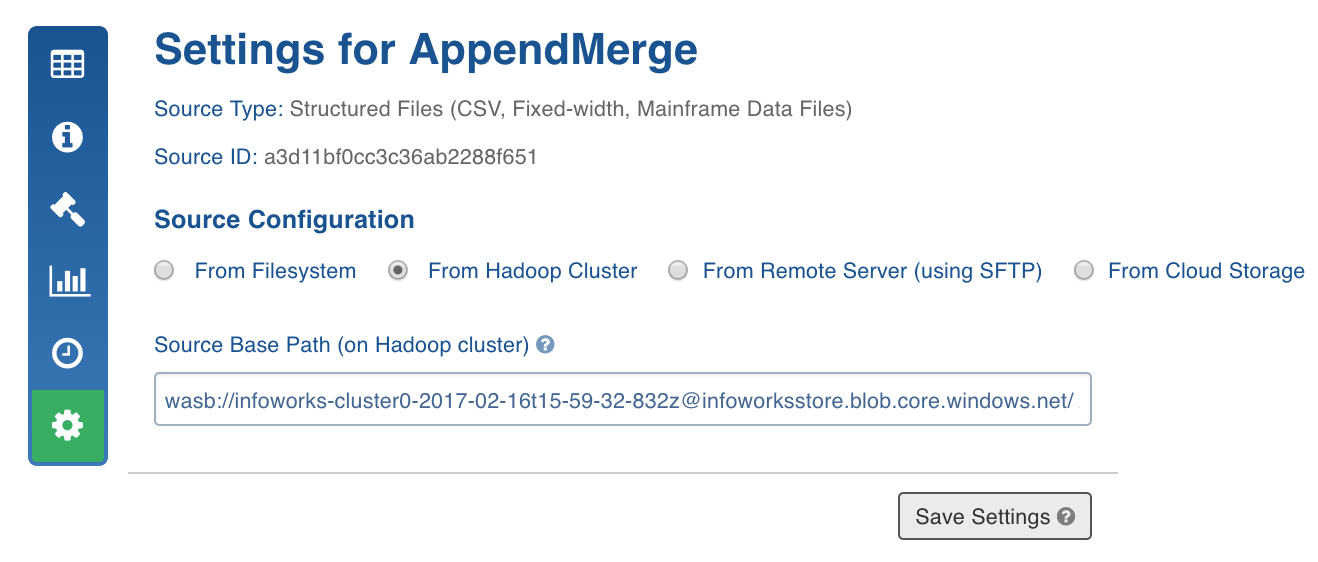
In the Source Settings page Source Configuration section, select the host type as From Hadoop Cluster.
Prefix the Source Base Path with the wasb protocol and container address as follows:
wasb://<CONTAINER_NAME>@<STORAGE_ACCOUNT_NAME>.blob.core.windows.net/
The table path can then be specified as the path of the table folder in that container.
For example, consider the following:
a Resource Group, R1, with a storage account, ASC, is used, which in turn has a container, C
and, inside the container two files are available in the following folder structure: /a/b/x/file1.csv, /a/b/y/file2.csv
where file1.csv and file2.csv have different schemas, two tables must be created.
You can provide the following as the source base path: wasb://C@asc.blob.core.windows.net/a/b
The target path for table 1 will be x or x/file1.csv
The target path for table 2 will be y or y/file2.csv
For containers which are private, if the source container has the access type as private in azure, then the following configuration must be added in the custom core-site.xml file:
Key:
fs.azure.account.key.<STORAGE_ACCOUNT_NAME>.blob.core.windows.netValue: Container Access Key (available in the accessKeys section of the azure storage account).
Fixed Width Ingestion
Fixed width ingestion is supported with structured files. Data in a fixed-width text file is arranged in rows and columns, with one entry per row. Each column has a fixed width, specified in terms of number of characters, which determines the maximum amount of data it can contain. No delimiters are used to separate the fields in the file. Instead, smaller quantities of data are padded with spaces to fill the allotted space.
Fixed width ingestion provides the following features:
Schema Input
Data Crawl
Append Mode
CDC and Merge
Prerequisites
To create a source table and map it to the fixed-width folder location, follow these steps:
Create a new source.
Navigate to the new source that you just created and click Click here to enter them.
On the Settings page, select From FileSystem or From Hadoop Cluster or From Remote Server depending on where the files are currently stored.
NOTE: If it is From Remote Server, specify the sftp User Name, Password, Host, and Port.
Enter the source base path.
Scroll down and click Add Entry to add a folder as a table.
Configure the following fields:
Field | Description |
|---|---|
Table | Table name. |
Source Path | Folder path of the table. This is relative to the source base path. |
Target HDFS Path | Target HDFS path. This is relative to the target base path. |
Include/Exclude Files From Directory | A regex pattern to include or skip files. |
Ingest sub-directories | Specifies whether to crawl the files in the recursive structure of the specified source path. |
Archive Source Files | This option is used to archive files for which the data has been crawled and inserted into Hive. The files will be archived on the edge node. NOTE: <i>Truncate</i><i> and Truncate reload</i><i> of the table will not affect archived files. For every data file the control file will also be archived.</i> |
Processing Level | For fixed width ingestion, select <i>Record</i>. |
File Type | For fixed width ingestion, select <i>Fixed-width</i>. |
Number of Header Rows | Can be 0 or greater than 0. If greater than 0, (for example, n), the first line of the file will be used to get the column names. The next n-1 lines will be skipped. |
Pad Character | Padding character which is used in the fixed width file. |
Character Encoding | Character encoding. |
Control Files | <p>This feature lets the user to specify a control file (a file with data file metadata) against which user can validate the data file. The regular expression fields Data Files pattern and Extract format let the user specify the corresponding control file for every data file as a function of the data file path. In the above example, every file with csv extension will be considered as a data file and the same file path ending with ctl extension will be treated as control file.</p><p>Make sure that the data directory after applying include and exclude filters only returns data files and control files. While processing, the system first applies include and exclude filters for every file. Assuming that the file path which passes the Data Files pattern regex is a data file, the corresponding control file will be found using the mentioned regex patterns. Also make sure that control files should not pass Data Files pattern regex.</p><p>Currently, the supported format for control files is java properties file format, which validates checksum , count, and filesize.</p><p>The validation logic and control file reading logic is pluggable. Hence multiple validation variables and different control file parsing logics can be plugged to extend this feature.<br></p> |
Pad Character | Character used to add padding for smaller data columns. |
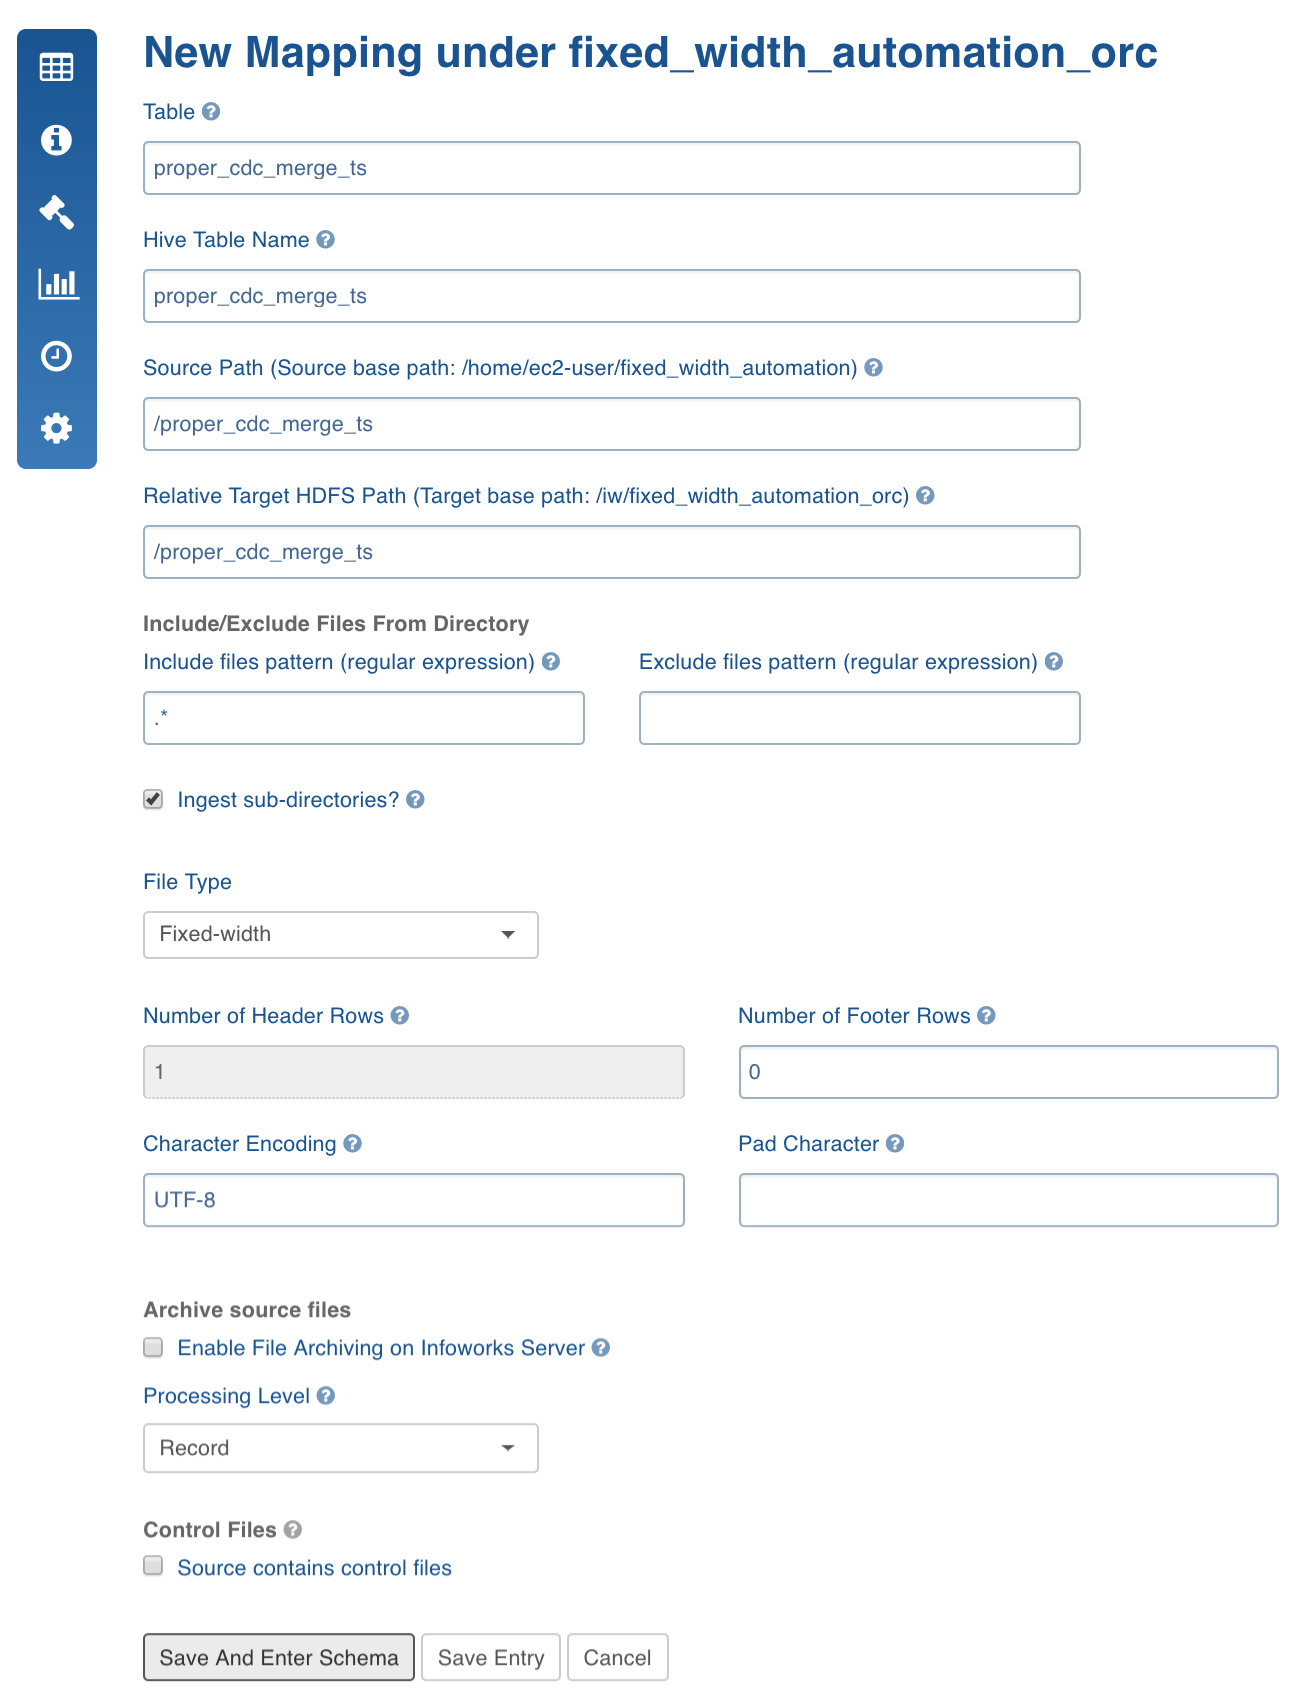
Click Save and Enter Schema.
Schema Crawl
For a given folder which contains files with similar structure, the system can detect the types of all columns.
To perform a schema input, follow these steps:
Create tables as described in Prerequisites.
Navigate to table configuration page.
Click Edit Schema.
NOTE: Ensure that the columns you specify are in the order that would be in the files.
Enter the number of columns in the Add field.
Enter the details for each column added which includes column name, Start Position (any non-negative integer) and width.
Limitation: The Start Position of new columns must be greater than the Start Position of the previous column.
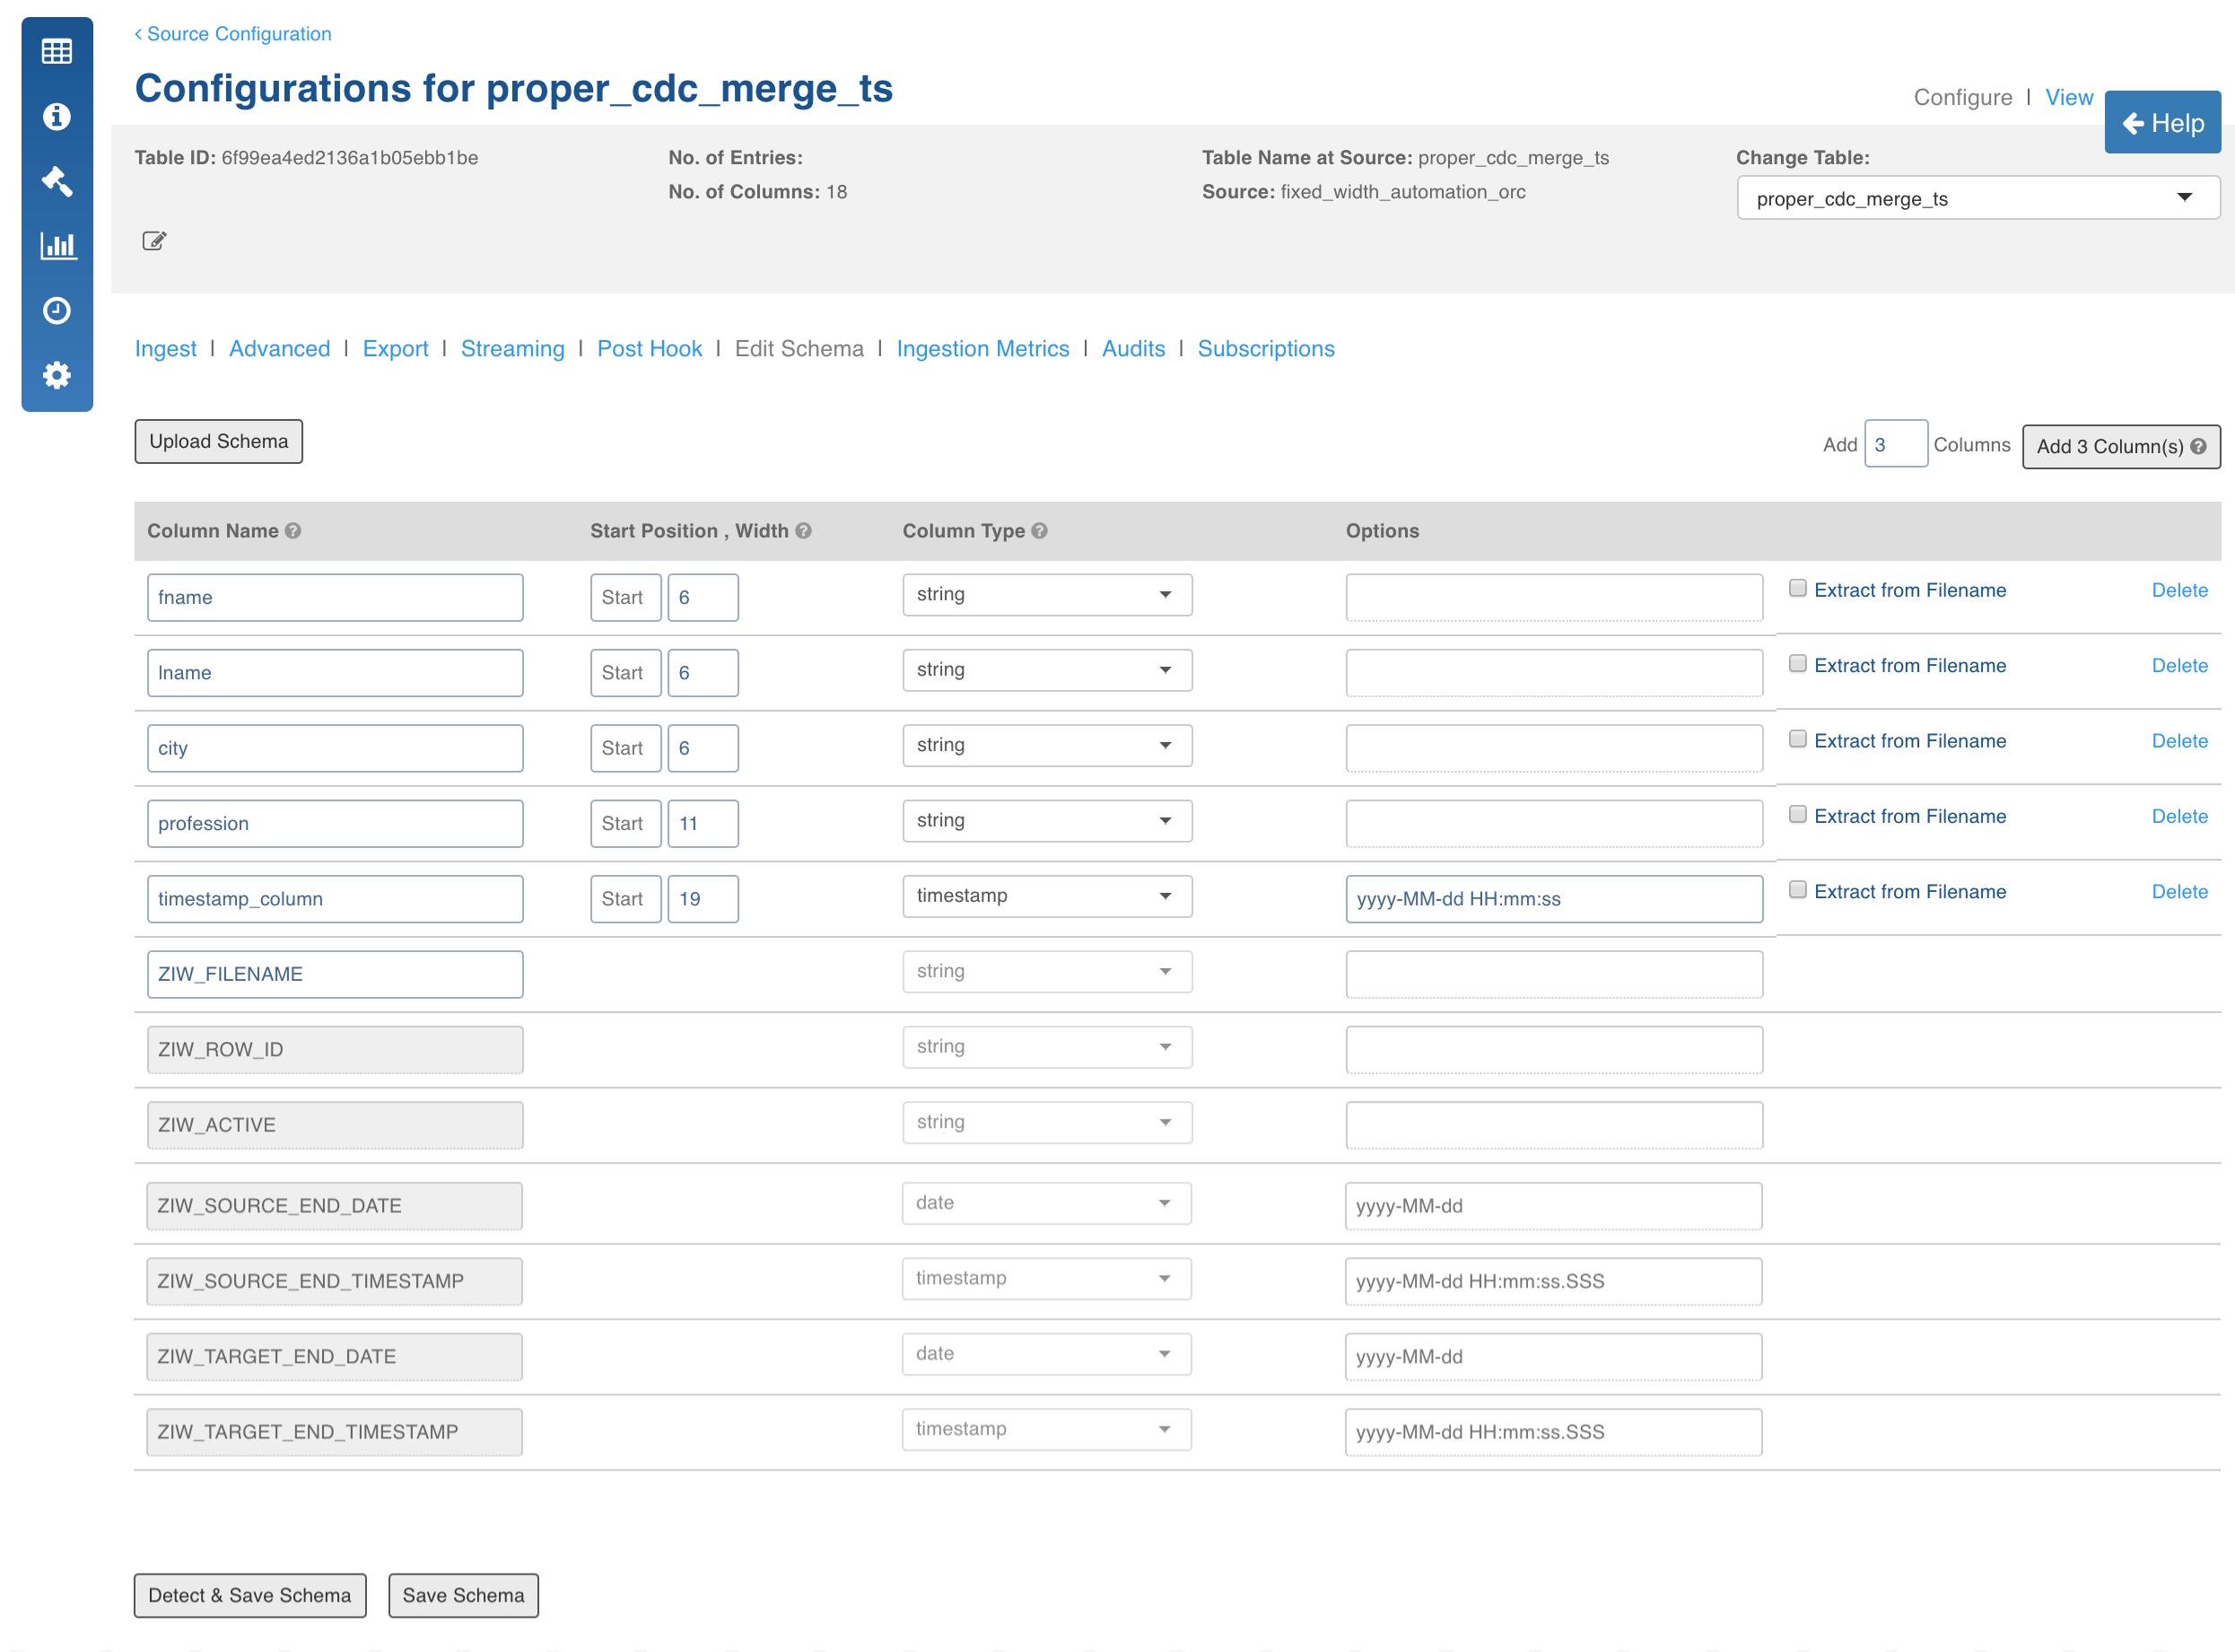
Click Detect and Save Schema, the recommended datatypes are displayed. You can reconfigure datatypes if required.
Click Save Schema.
Data Crawl Full Load
To perform a full load data crawl, follow these steps:
Navigate to table configuration of the table.
Enter the required configurations for full load.
Click Save Configuration.
Navigate to table group and click Initialize and Ingest Now.
NOTE: To append new data to the crawled source click Ingest Now from the second crawl onwards. The new data can be placed in the same location. Only new and changed files will be picked. If you need a clean crawl, click Initialize and Ingest Now. This mode should be used for cases where new inserts come in new files and there are no updates.
Data Crawl Incremental Load
To perform a full load of CDC table, follow these steps:
Navigate to the table configuration page.
Enter the required configurations for incremental load.
Click Save Configuration.
Navigate to table group and click Initialize and Ingest Now.
NOTE: To get the new CDC data and merge it to the crawled source, click Ingest Now from the second crawl onwards. The new data can be added in the same location. Only new and changed files will be picked. If you need a clean crawl, click Initialize and Ingest Now. This mode should be used for cases where new inserts and new updates are present for every crawl.
Configurations
FIXED_WIDTH_ERROR_THRESHHOLD: If the number of error records increases this threshold, the MR job fails. Default is 100.
FIXED_WIDTH_KEEP_FILES: If the host type is local before the MR job runs, the csv files are copied to the tableId/csv directory. If this config is true, then the files are not deleted after the crawl. Default is true.
FIXED_WIDTH_SPLIT_SIZE_MB: Split size to be used for MR for every file. Default is 128.
fixed_width_job_map_mem: Mapper memory for the crawl map reduce. Default is the value of iw_jobs_default_mr_map_mem_mb in properties.
fixed_width_job_red_mem: Reducer memory for the crawl map reduce. Default is the value of iw_jobs_default_mr_red_mem_mb in properties.
calc_file_level_ing_metrics: If this is set to true, the file-level ingestion metrics are calculated at the end of the job. Default is true. This holds good for both CSV and Fixed Width.
modified_time_as_cksum: If this is true, the modified time is used to determine the file has been changed or not. If it is set to false, the actual checksum is calculated. Default is false. This holds good for both CSV and Fixed Width.
delete_table_query_enabled: By default, Delete Query feature is available at table level . To hide this feature, set IW Constant delete_table_query_enabled to false.
Extract, Transform, and Load Features
This section describes the Extract, Transform, and Load (ETL) features that include:
File-level ingestion metrics
Column extraction
Delete functionality
Archive Directory
Control Files
File-Level Ingestion Metrics
This feature provides information on how many correct and error records were contributed by a file. A compulsory string column will be appended to every row in the data. The column will be named ZIW_FILENAME. The name can be changed. This column will be used to run "group by" queries on the crawled data for file-level ingestion metrics.
Column Extraction
This feature includes appending columns to the row which are extracted from a "match regex" and "extract regex" applied from the filename.
Follow these steps to make use of this feature:
Click Edit Schema tab in the Configuration page.
Add columns and check Extract from Filename.
You can match and extract the regex. For example, for the file name Infoworks_001_2004-09-28, the column names will extract following values:
Extracted_Date: 2004-09-28
Extracted_Int: 1
Extracted_Str: Infoworks
Extracted_without_format: 2004-09-28 (If format is not specified, the items matching the regex becomes the value.)
Click Save Schema.
Delete Functionality
The delete functionality enables you to delete all the rows from the current Hive table.
Follow these steps to make use of this functionality:
Navigate to the Source Configuration.
Click the Actions button for the table from which you want to delete the rows.
Click Delete Records. The record will be deleted from the current table data.
Archive Directory
Refer to Archive source files for more details.
Control Files
Refer to Control Files for more details.
Mainframe Data File Ingestion
Mainframe data file ingestion provides the following features:
Schema crawl
Data Crawl
Append Mode
CDC and Merge
Creating Source
In the Admin section (Admin > Source > New Source), create a source and select the source type as Structured Files. Enter the Hive schema name and HDFS location. Select Enable ECB Agent option to enable the ECB agent.
Configuring Source
Click the Sources menu and select the structured file source you created.
In the Source Configuration page, click the Click here to enter them link.
In the Settings page, perform the following:
Select either of the following depending on where the data files are stored: From FileSystem, From Hadoop Cluster, From Remote Server (using SFTP), From Cloud Storage.
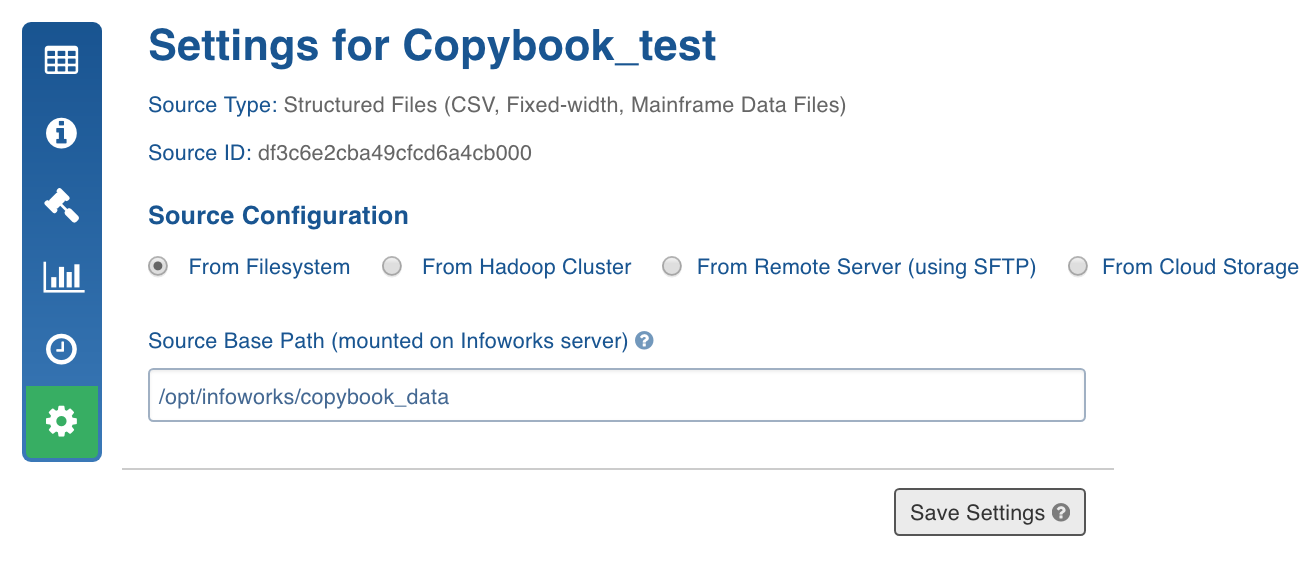
Click Save Settings.
Schema Crawl
Following are the steps to perform a schema crawl:
Click the Sources menu and select the source you created.
Click the Source Settings icon.
In the File Mapping section, click Add Entry to add a folder as a table.
Configure the following table details:
Table: Table name.
Hive Table Name: Name of the Hive table that holds the crawled data.
Source Path: Folder path of the table. This is relative to the source base path.
Relative Target HDFS Path: Target HDFS path. This is relative to the target base path.
Include/Exclude Files From Directory: Regex pattern to include or skip files.
Ingest sub-directories: Specifies whether to crawl the files in the recursive structure of the specified source path.
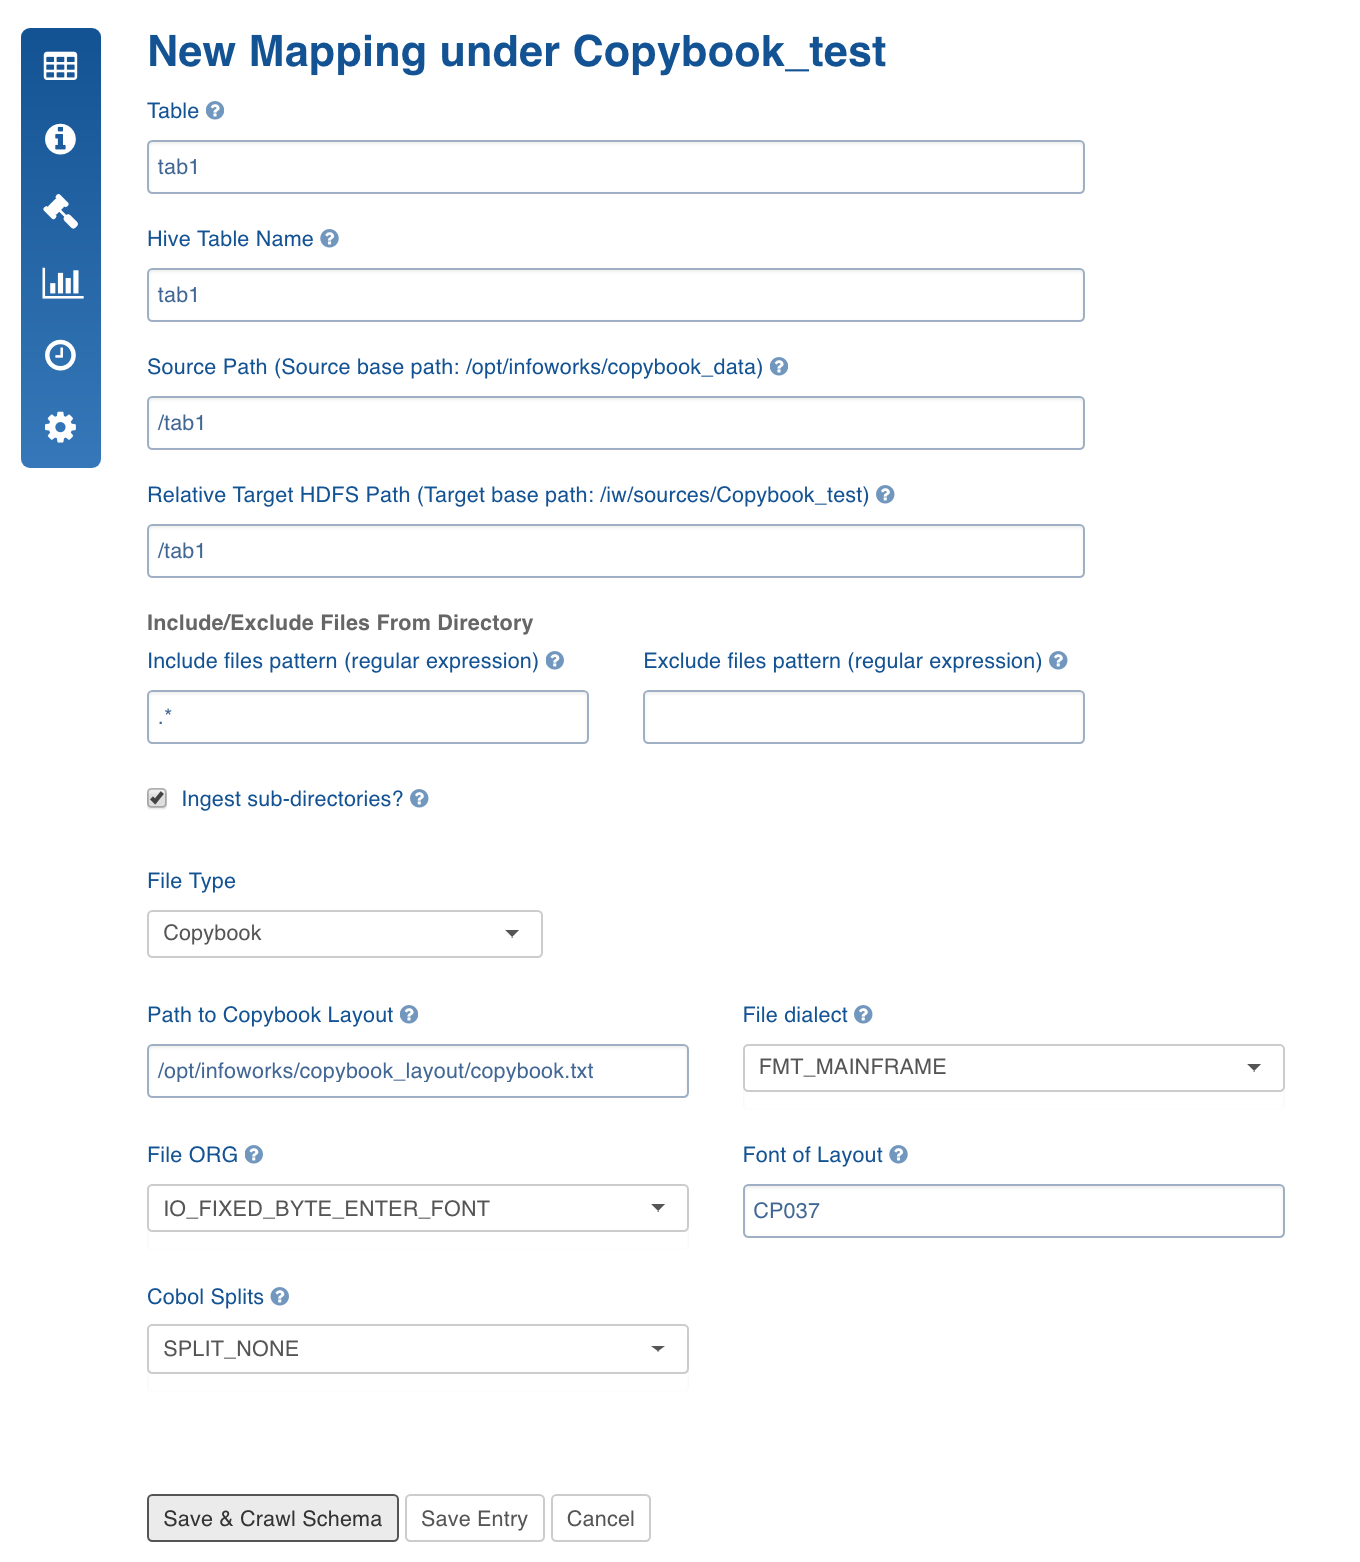
File Type: Type of structured file. Select Copybook.
Path to Copybook Layout: Location of the Copybook layout file which defines schema for the table.
File Dialect: Cobol dialect used. The default value is Mainframe.
File ORG: The format with which the records are organized in the files.
Font of Layout: Font or character set.
Cobol Splits: Option to split records when the data includes hierarchy.
Click Save and Crawl Schema. The Edit Schema page is displayed.
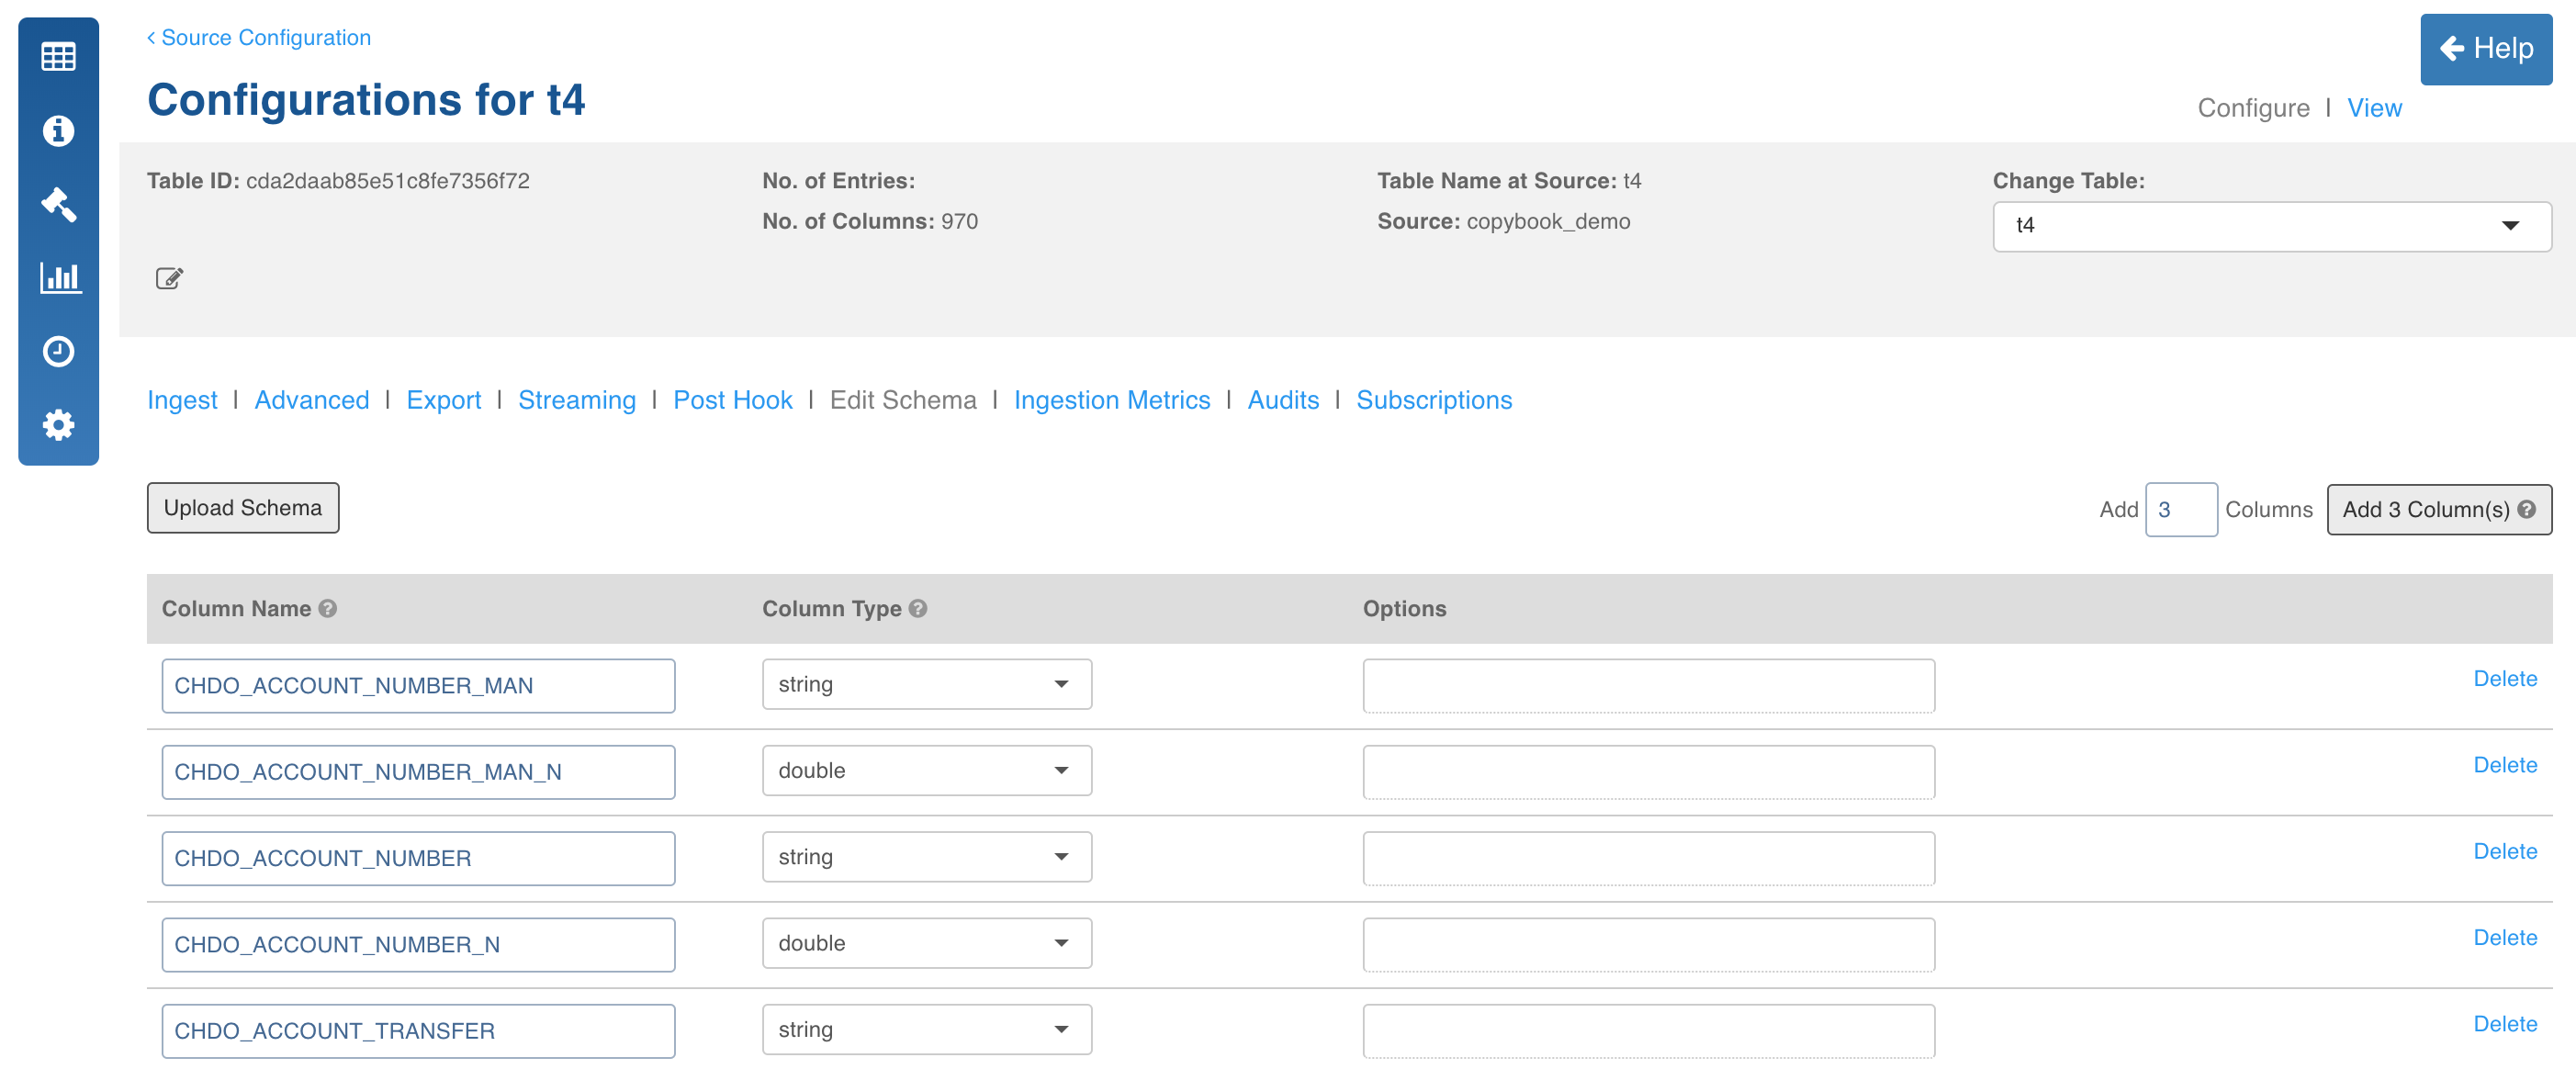
Edit the schema and click Save Schema.
Data Crawl Full Load
Following are the steps to perform a full load data crawl:
Click the Sources menu and click the copybook source file. The Tables page is displayed with the list of tables in the source.
Click the Configure button for the table that requires a full load data crawl.
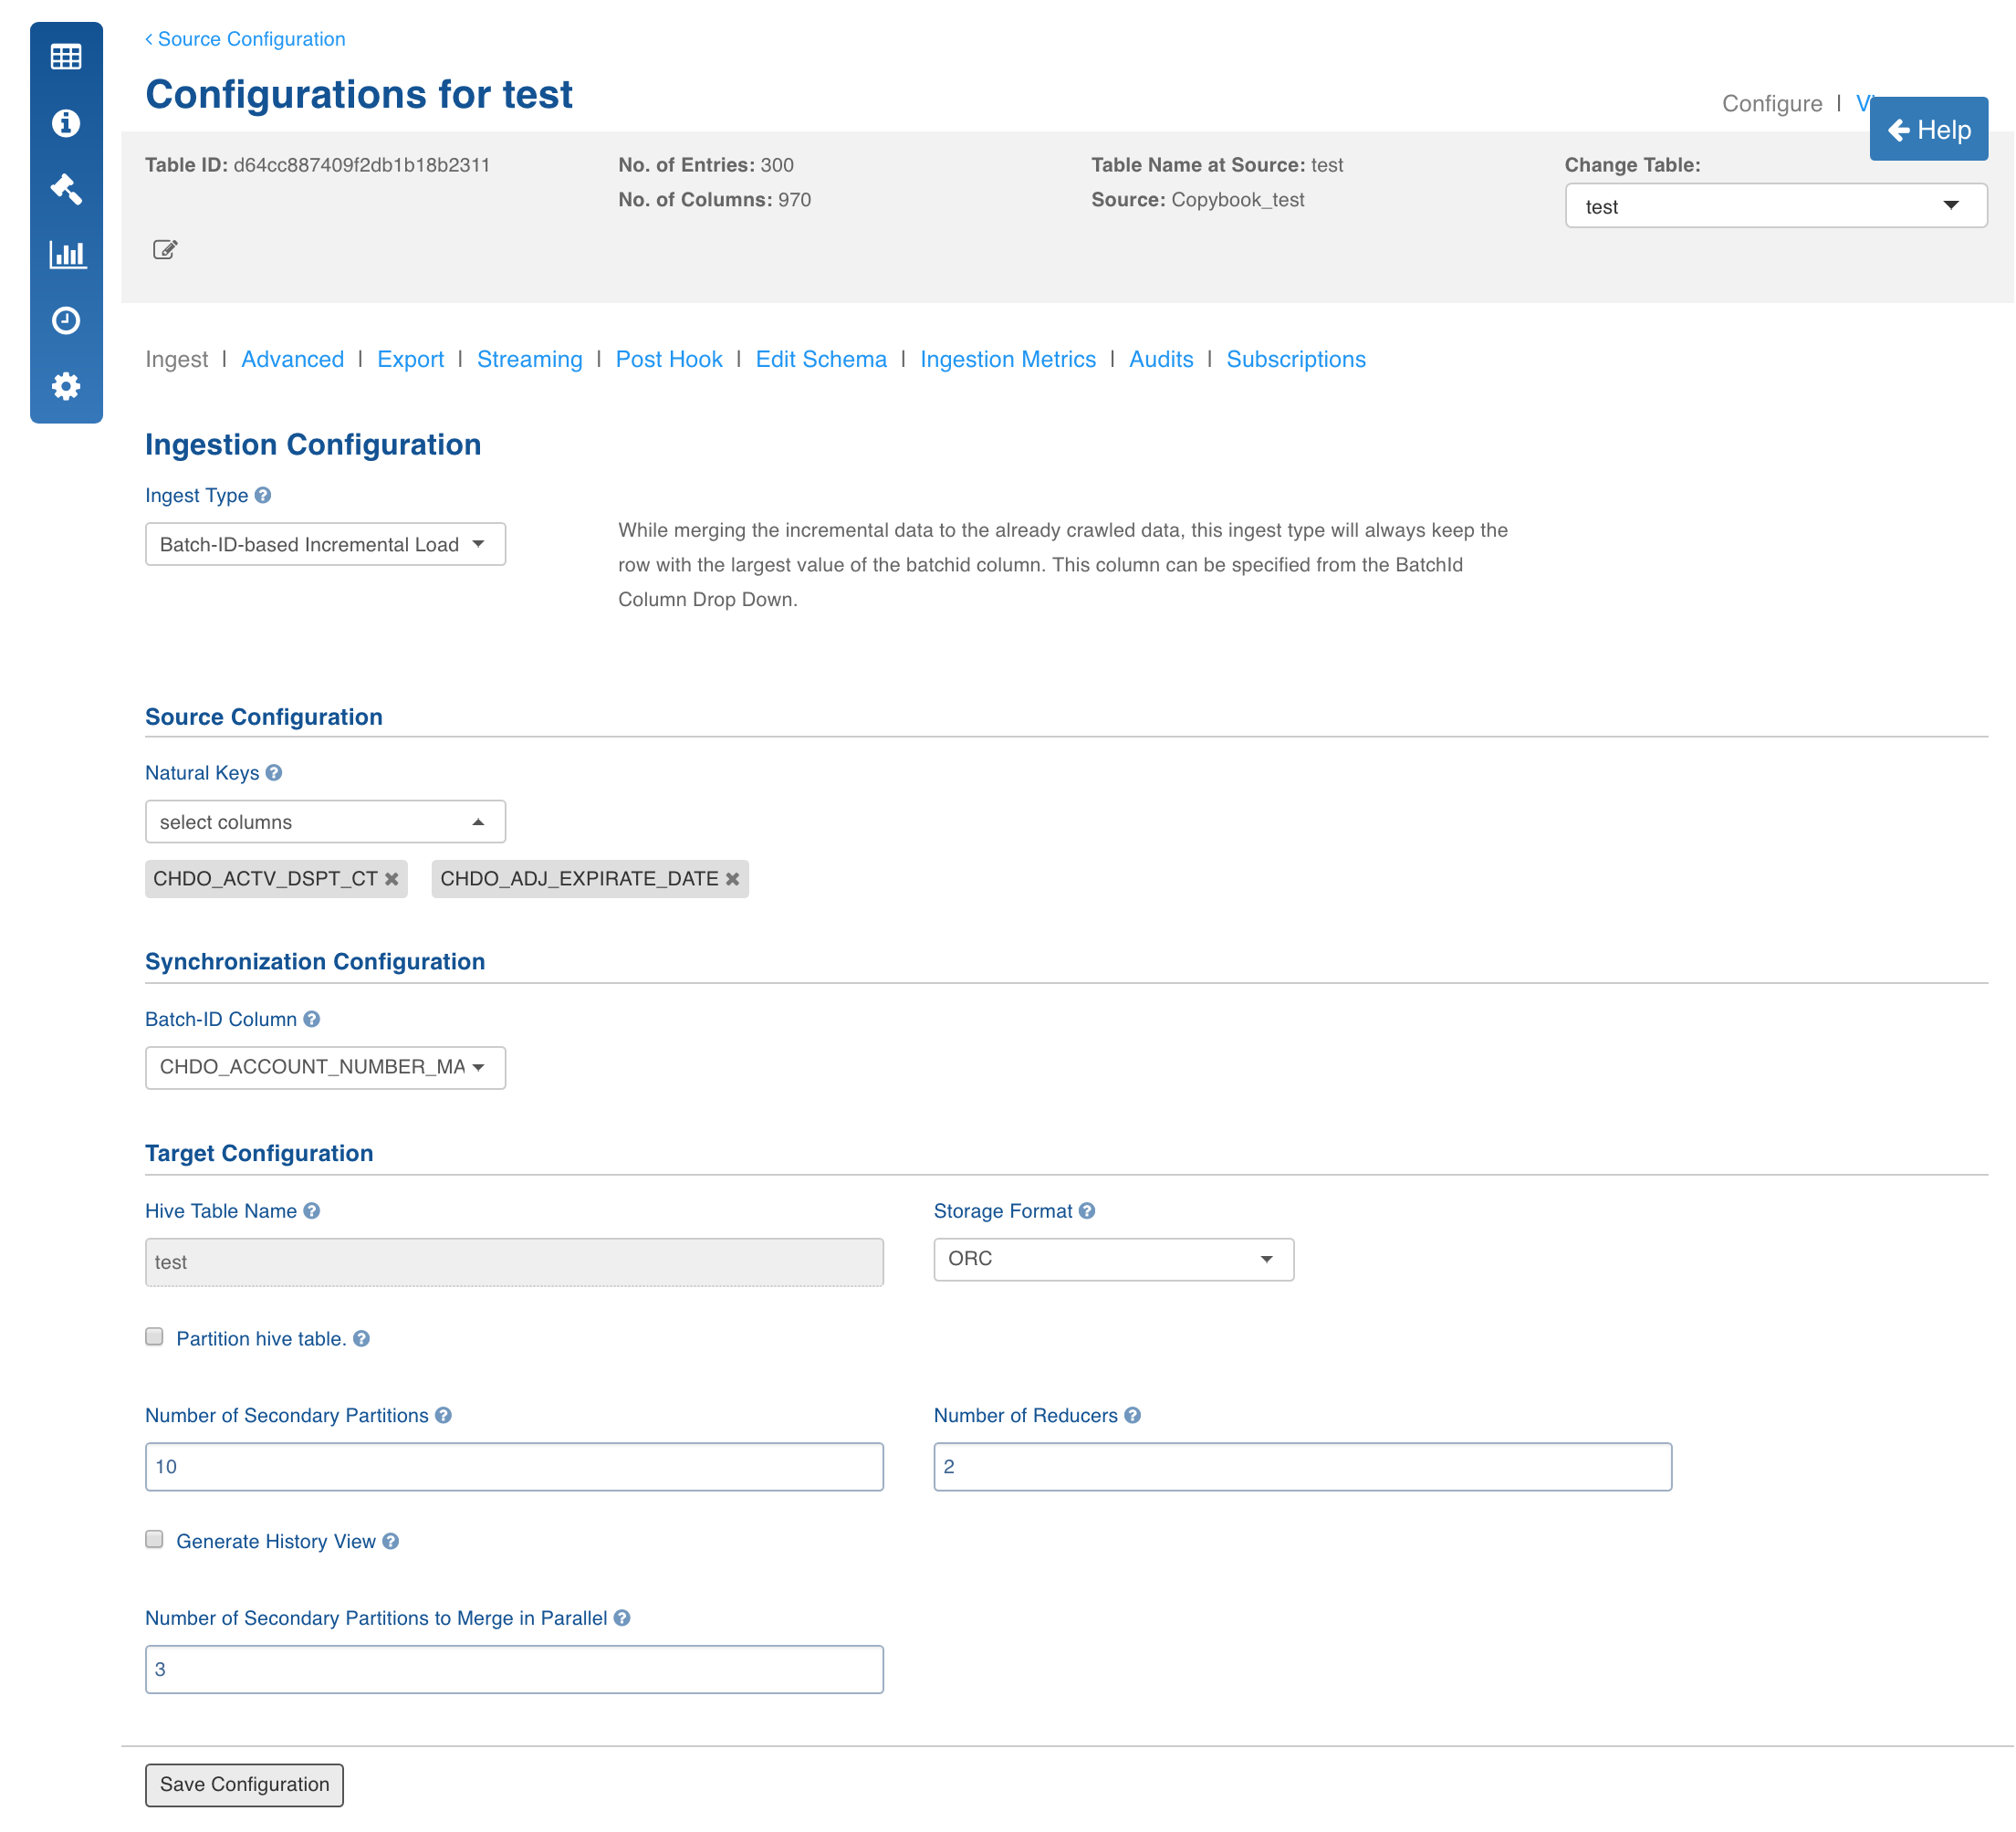
Select the Ingest Type as Full Load, enter the required values and click Save Configuration. For descriptions of fields, see the Source Table Configuration Field Descriptions section.
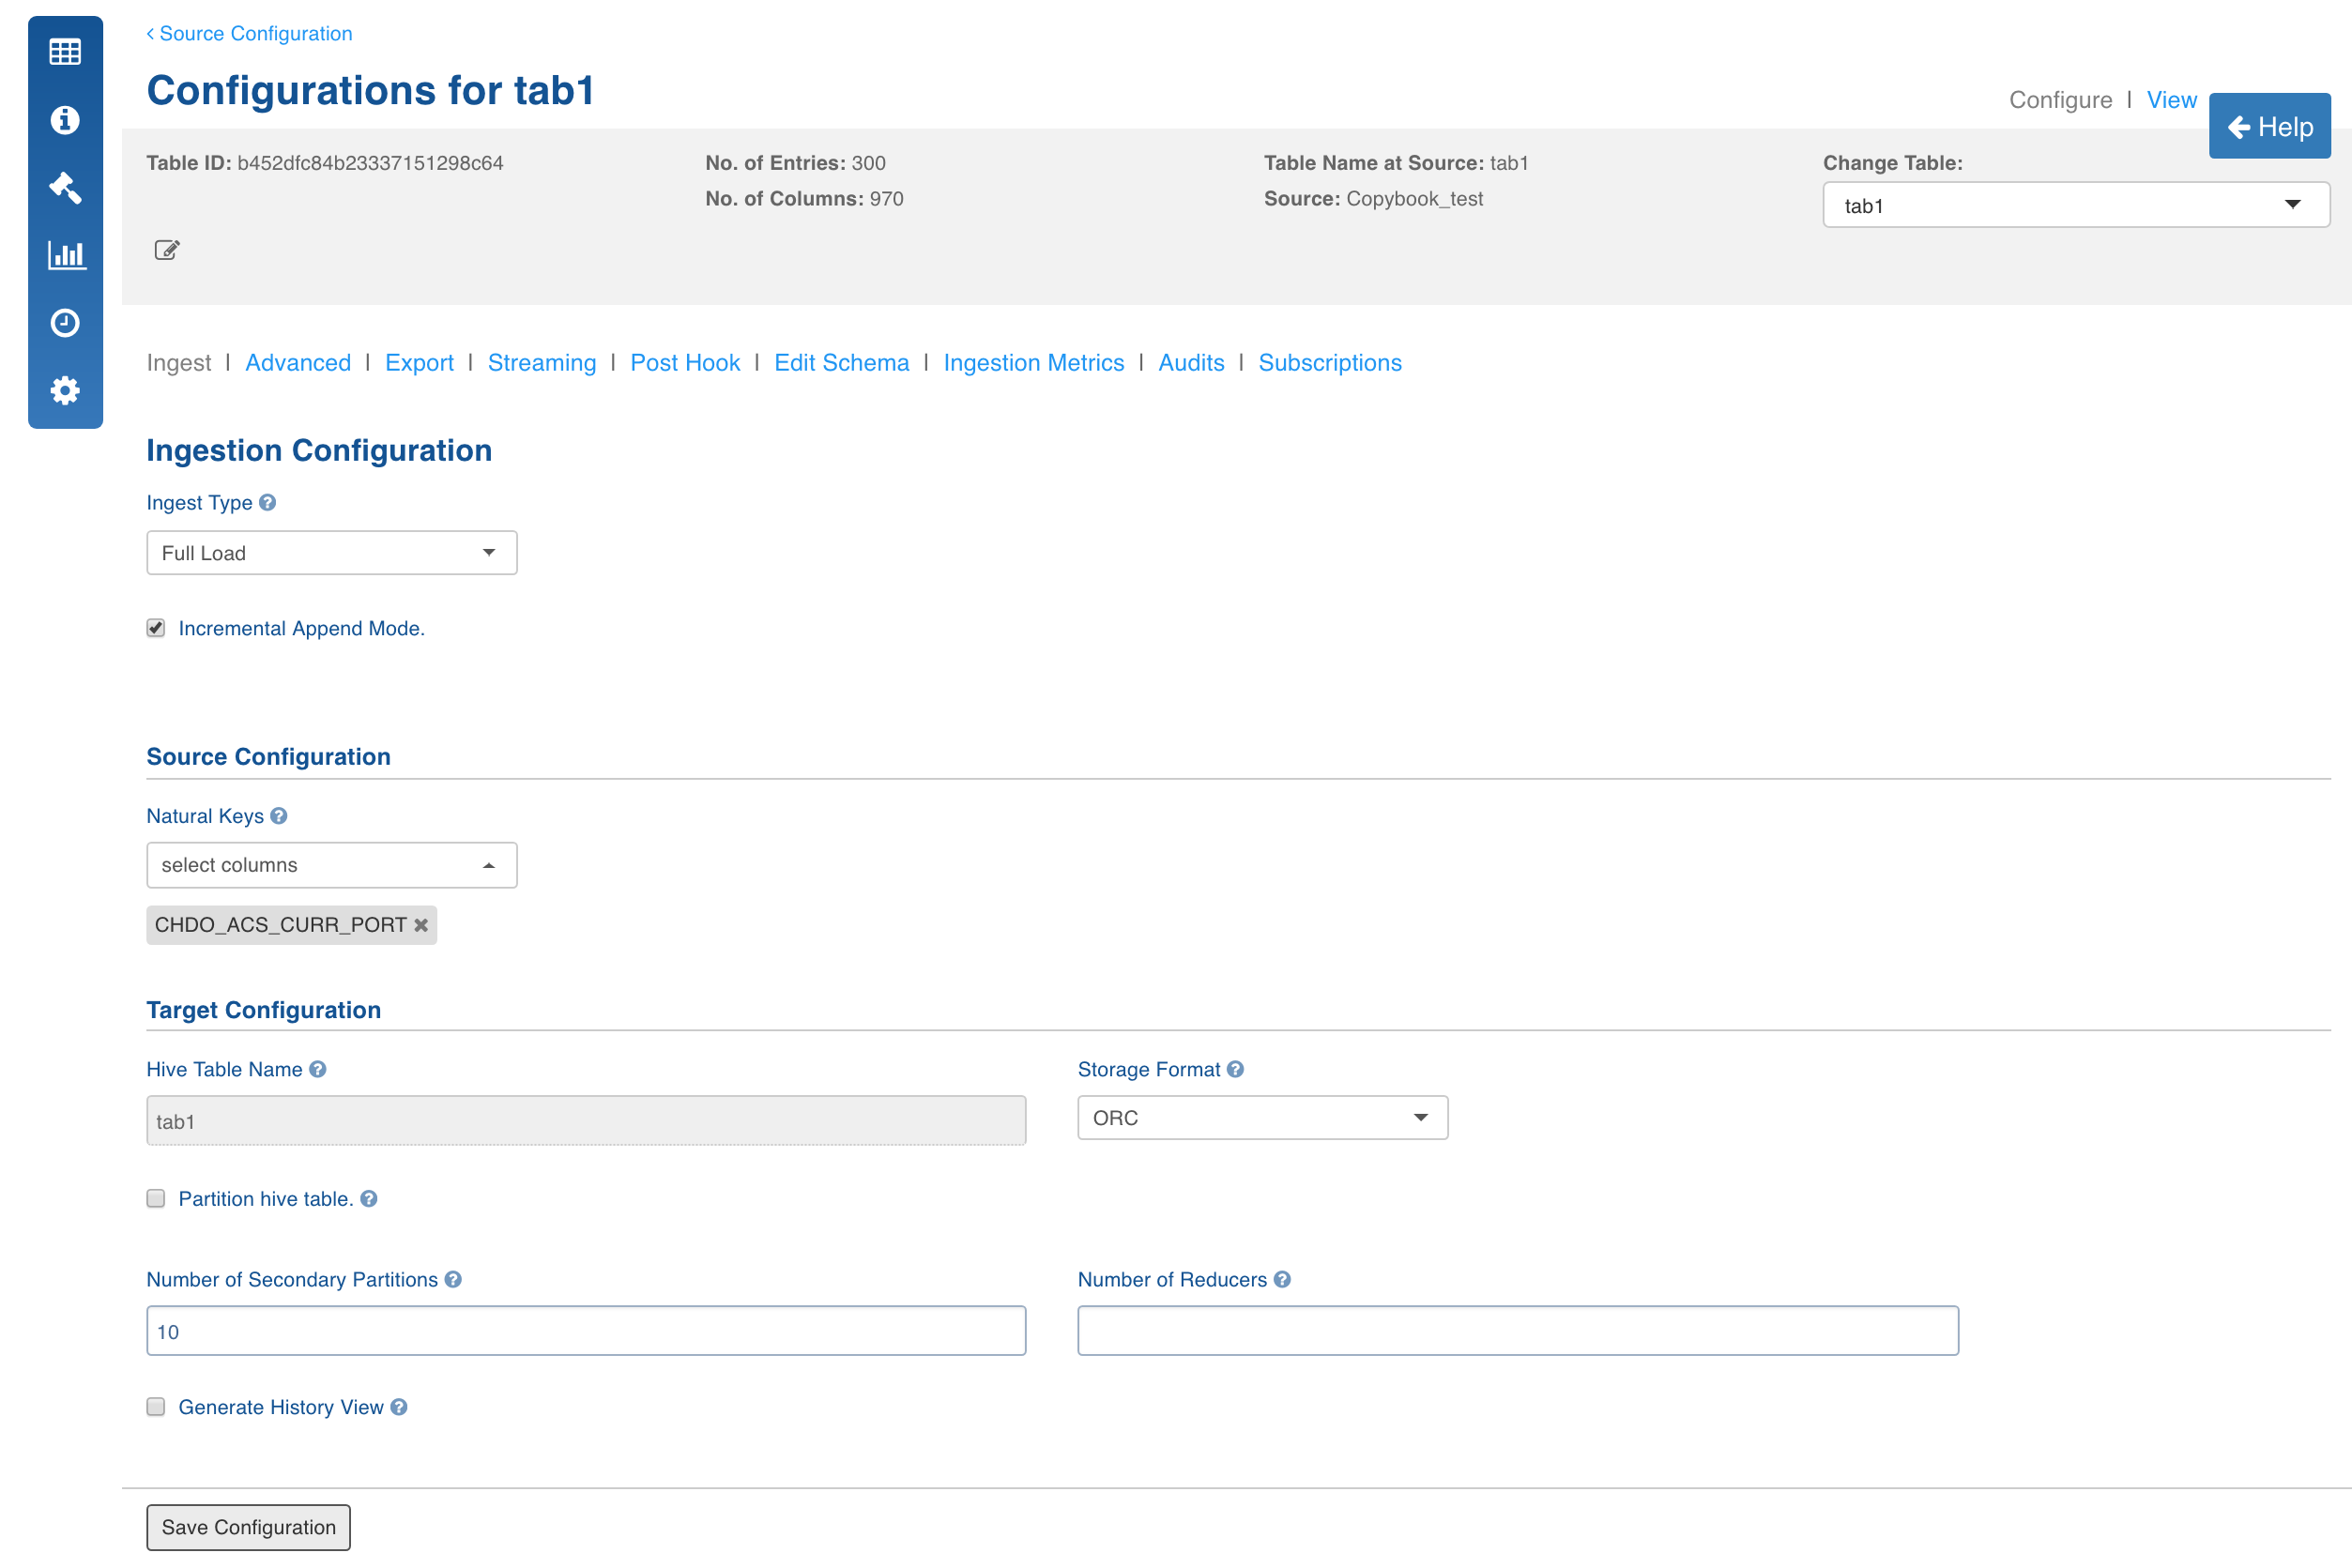
In the Table page, click the Table Group tab.
Click the View Table Group icon for the required table group.
Navigate to table group and click Initialize and Ingest Now.
For first time ingestion, and if you need a clean crawl, click Initialize and Ingest Now.
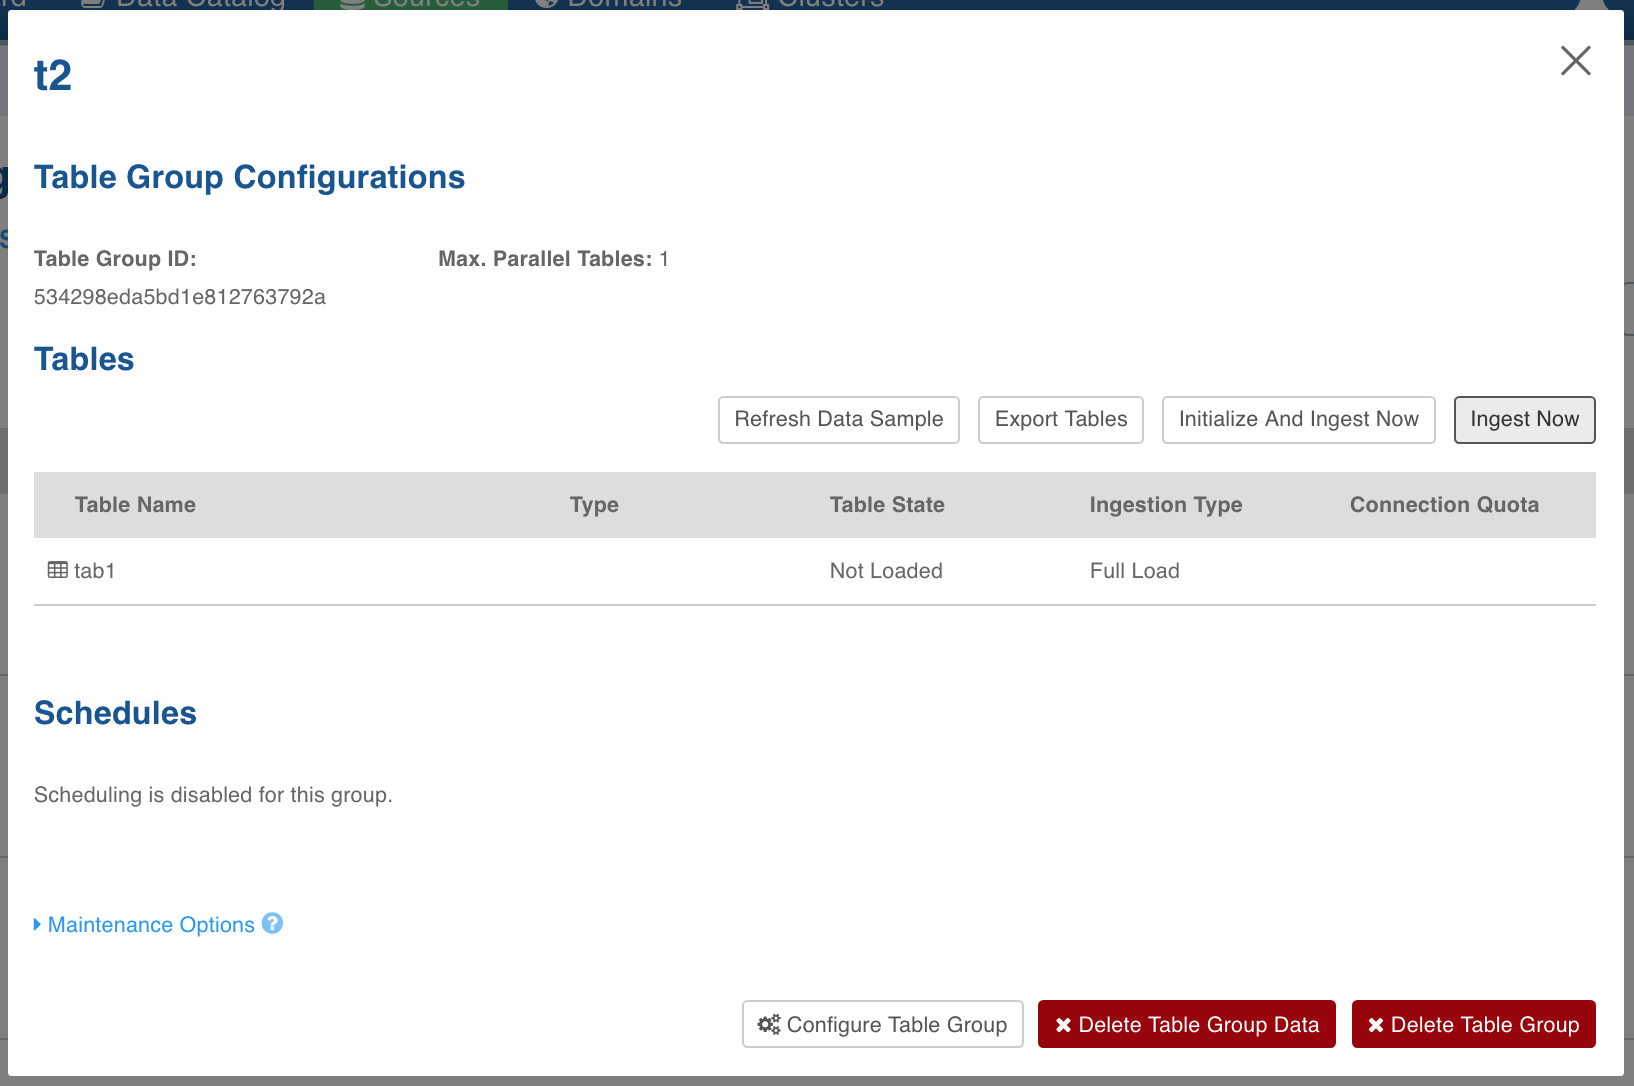
To append new data to the crawled source click Ingest Now from the second crawl onwards. The new data can be placed in the same location. Only new and changed files would be picked.
Data Crawl Incremental Load
Following are the steps to perform incremental load data crawl on the copybook files:
Click the Sources menu and click the copybook Source file. The Tables page is displayed with the list of tables in the source.
Click the Configure button for the table that requires an incremental load data crawl.
Select the required incremental load Ingest Type, enter the required values and click Save Configuration. For descriptions of fields, see the Source Table Configuration Field Descriptions section.
In the Tables page, click the Table Group tab.
Click the View Table Group icon for the required table group.
Navigate to table group and click Initialize and Ingest Now.
For first time ingestion, and if you need a clean crawl, click Initialize and Ingest Now.
NOTE: This mode should be used for cases where new inserts come in new files and there are no updates.
To get the new CDC data and merge it to the crawled source click Ingest Now from the second crawl onwards. The new data can be put in the same location. Only new and changed files would be picked.
NOTE: This mode should be used for cases where new inserts and new updates are present for every crawl.