Prerequisites
EMR Version: 5.17.0
AWS Account ID of the customer to be whitelisted for accessing the Infoworks edge node.
Infoworks provides an Amazon Machine Image (AMI) of the edge node and Infoworks server software in a private marketplace library.
To obtain access to this AMI prior to proceeding with further steps, email the AWS Account ID of the account which will be used to access the Infoworks edge node image, to the Infoworks support team.
(Your Account ID will be displayed in the Amazon console My Account section.)
Infoworks support will enable access to AMI from the provided AWS Account ID. Once this is completed, you can proceed with further steps.
Procedure
Login to AWS Console.
Search for EC2 in Find Services in the AWS Console dashboard.
NOTE: Infoworks Secured AMI works only on Kerberos and In-Transit Encryption (TLS) type EMR Cluster.
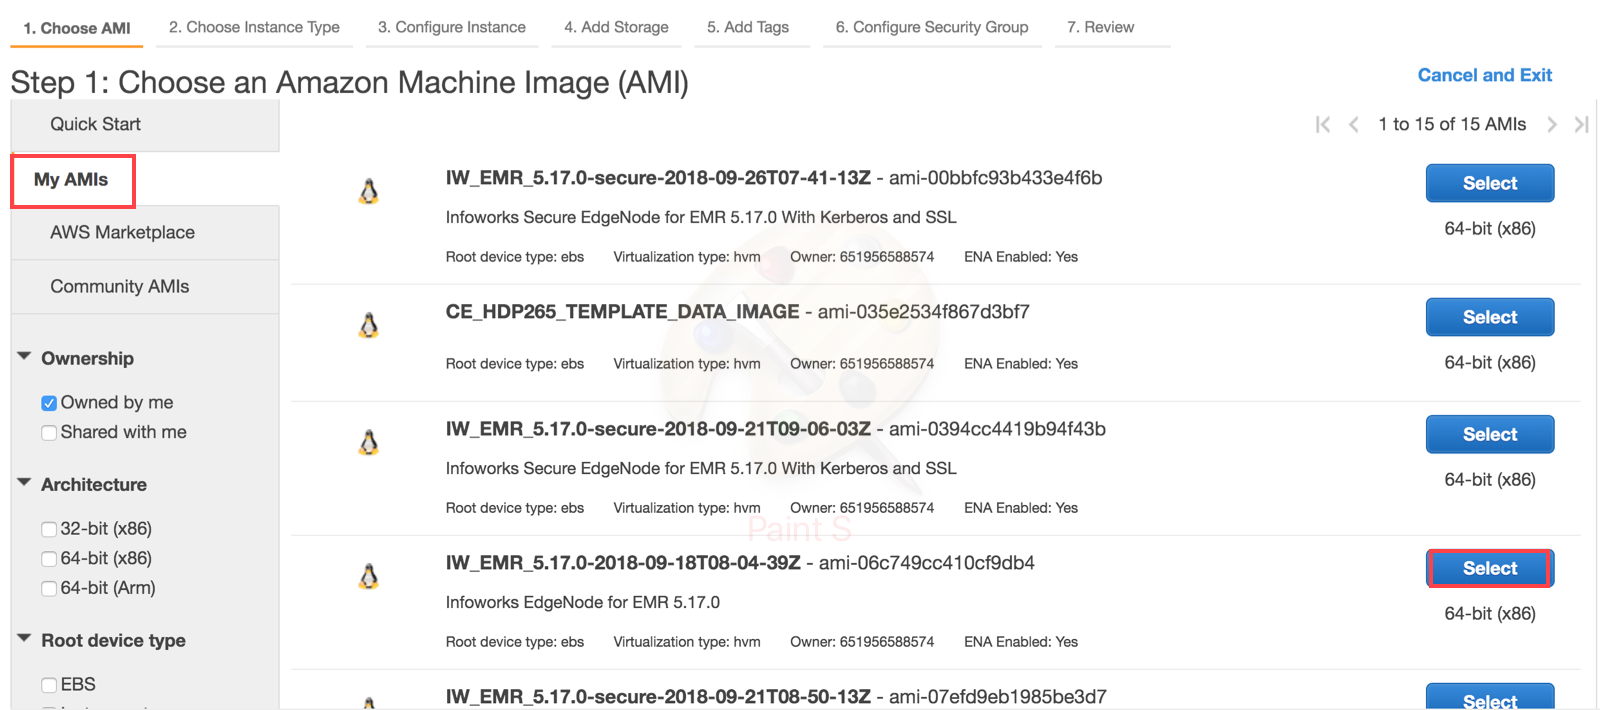
Choose AMI
Select Launch Instance from the EC2 Dashboard. Select the image from My AMI Section.
NOTE: The AMI ID might be different for secured and unsecured edgenode - Unsecured: ami-06c749cc410cf9db4, Secured: ami-00bbfc93b433e4f6b.
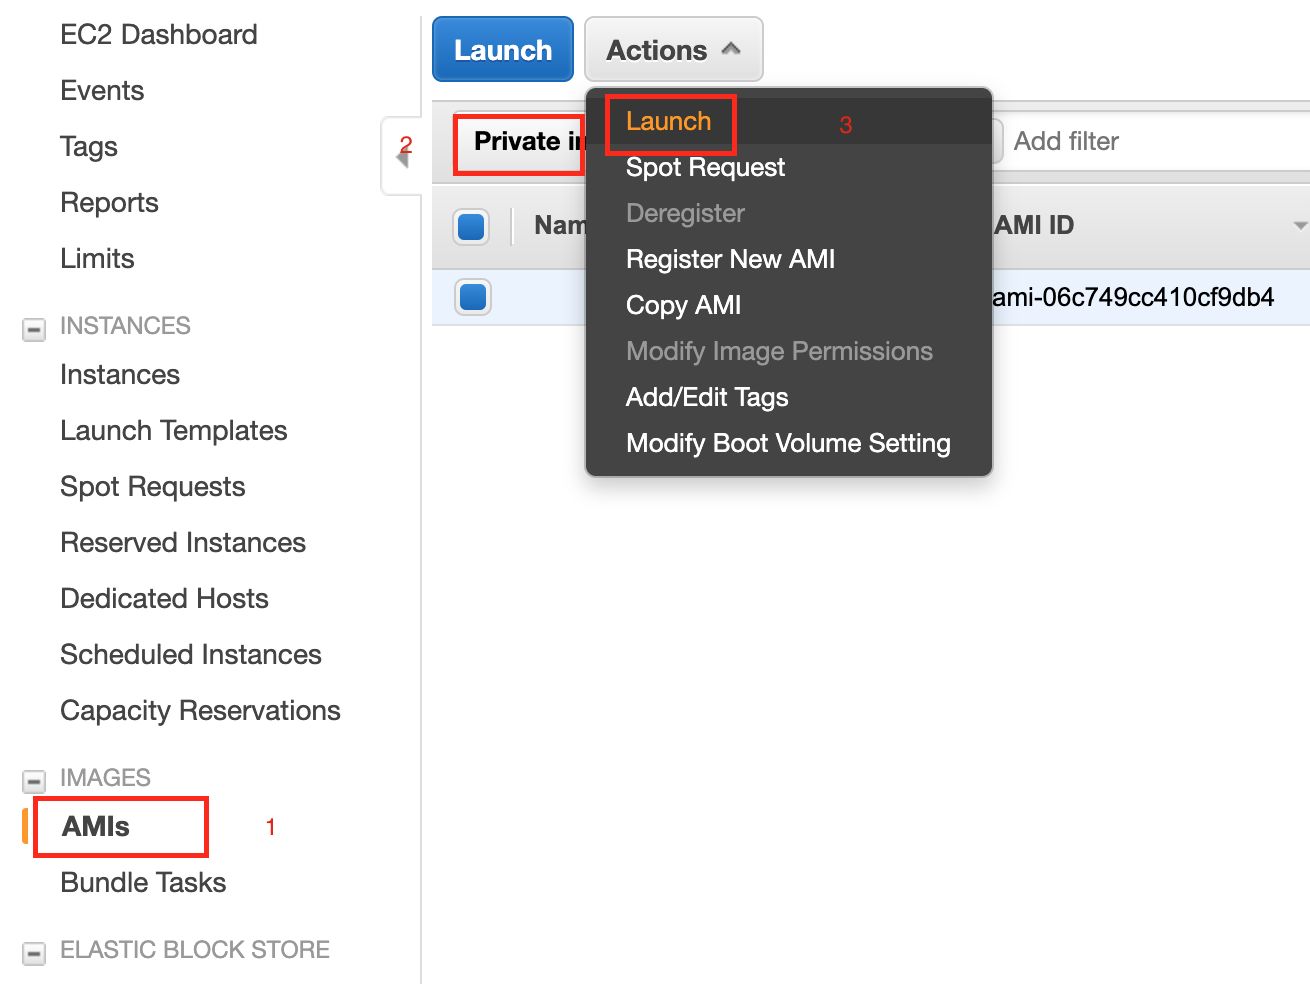
If the AMIs are not available in the above screen, following is the alternate option to launch the AMI:
Open the EC2 dashboard.
Navigate to AMIs > Private Images.
Select Infoworks EMR AMI.
Click the Actions option and select Launch.
Choose Instance Type
Select the machine type for the Infoworks Edge node. Minimum and recommended is m4.4xlarge.
Configure Instance
Number of Instance is 1.
Select the VPC and Subnet ID, similar to EMR Cluster.
Add Storage
Add Root volume Storage in GB. For example, 300 GB
Add Tags
Add naming convention or environment tags for the resource.
Configure Security Group
Create a new security group and allow IW Ports and SSH.
Review
In this section review the configurations and select existing key pair or create a new key pair and proceed with creation of Instance.
SSH to EdgeNode
The default user is ec2-user.
Now, perform the following steps:
Create the Infoworks DataFoundry user as follows:
Login to Infoworks DataFoundry edge node and switch to root user using the following command:
root@ip-XXX-XX-X-XX ec2-user]# useradd infoworks-user
Change password of the Infoworks DataFoundry user using the following command:
[root@ip-XXX-XX-X-XX ec2-user]# passwd infoworks-user
Check whether the IP address of the master node is replaced in all the required files with the required IP address/DNS.
NOTE: This step is required only if the edge node is newly launched, and the default MASTER_HOSTNAME placeholder files in the client xml files are not configured.
In the below list of files, replace ${Masternode} with your IP address.DNS (For example: ip-172-30-1-XXX.ec2.internal)
sed -i -e "s/{{MASTER_HOSTNAME}}/${Masternode}/g" /etc/hbase/conf/jaas.conf
sed -i -e "s/{{MASTER_HOSTNAME}}/${Masternode}/g" /etc/tez/conf/tez-site.xml
sed -i -e "s/{{MASTER_HOSTNAME}}/${Masternode}/g" /etc/hadoop/conf/yarn-site.xml
sed -i -e "s/{{MASTER_HOSTNAME}}/${Masternode}/g" /etc/hadoop/conf/core-site.xml
sed -i -e "s/{{MASTER_HOSTNAME}}/${Masternode}/g" /etc/hadoop/conf/hdfs-site.xml
sed -i -e "s/{{MASTER_HOSTNAME}}/${Masternode}/g" /etc/hadoop/conf/mapred-site.xml
sed -i -e "s/{{MASTER_HOSTNAME}}/${Masternode}/g" /etc/spark/conf/spark-defaults.conf
sed -i -e "s/{{MASTER_HOSTNAME}}/${Masternode}/g" /etc/spark/conf/spark-env.sh
sed -i -e "s/{{MASTER_HOSTNAME}}/${Masternode}/g" /etc/spark/conf/hive-site.xml
sed -i -e "s/{{MASTER_HOSTNAME}}/${Masternode}/g" /etc/hive/conf/hive-site.xml
sed -i -e "s/{{MASTER_HOSTNAME}}/${Masternode}/g" /etc/zookeeper/conf/server-jaas.conf
sed -i -e "s/{{MASTER_HOSTNAME}}/${Masternode}/g" /etc/zookeeper/conf/zoo.cfg
sed -i -e "s/{{MASTER_HOSTNAME}}/${Masternode}/g" /etc/krb5.conf
NOTE: Perform steps 3 and 4 only for Kerberized clusters.
Replace the MASTER_HOSTNAME place holder in DOMAIN: MASTER_HOSTNAME with DOMAIN: IP address of the master node _(_For example, DOMAIN: ip-172-30-1-XXX.ec2.internal), in the /etc/krb5.conf file.
Also, replace REALM: existing value, with REALM: your REALM value ( For example: REALM: INFOWORKS.IO ) in the same file.
Generate HDFS keytab (if not already present) as well as infoworks.keytab, and place it in the /etc folder with the 644 permission. To perform the same, run the following commands:
As root user, run the following commands:
NOTE: Ensure that the owner and group of infoworks-keytab file must be infoworks-user and infoworks-user with 400 permissions
kadmin -p "kadmin/admin@<REALM>" -w "<password>" -q "addprinc infoworks-user@<REALM>"
kadmin -p "kadmin/admin@<REALM>" -w "<password>" -q "xst -kt /etc/infoworks-user.keytab infoworks-user@<REALM>"
kadmin -p "kadmin/admin@<REALM>" -w "<password>" -q "addprinc hdfs@<REALM>"
kadmin -p "kadmin/admin@<REALM>" -w "<password>" -q "xst -kt /etc/hdfs.keytab hdfs@<REALM>"
This generates the Kerberos granting ticket (KGT) for infoworks.keytab files.
Switch to root user, and run the following command.
kinit -k -t /etc/hdfs.keytab hdfs@<REALM>
This generates keytab for HDFS.
Switch again to infoworks-user, and run the following command:
kinit -kt /etc/infoworks-user.keytabinfoworks-user@<REALM>
This generates KGT for infoworks-user.
Now, create infoworks-user in /user directory on HDFS, as HDFS or root user by running the following command:
hdfs dfs -mkdir /user/infoworks-user
Chown (change ownership) of the /user/infoworks-user directory to infoworks-user by running the following command.
hdfs dfs -chown infoworks-user:infoworks-user /user/infoworks-user
Ensure the hive connectivity for infoworks-user as described below:
For Kerberized cluster, run the following command:
beeline -u "jdbc:hive2://your_hive_server_ip:10000/default;principal=hive/_HOST@INFOWORKS.IO;"
For Non-Kerberized cluster, run the following command:
beeline -u "jdbc:hive2://your_hive_server_ip:10000/default";
Remove the following configuration in the /etc/hadoop/conf/core-site.xml file.
<property>
<name>hadoop.rpc.protection</name>
<value>privacy</value>
</property>
Move the /etc/hadoop/conf/ssl-client.xml and /etc/hadoop/conf/ssl-server.xml files out of the /etc/hadoop/conf/ folder. To perform this, run the following commands.
mv /etc/hadoop/conf/ssl-client.xml /home/infoworks-user
mv /etc/hadoop/conf/ssl-server.xml /home/infoworks-user
Now, ensure all the SSL related properties are removed from the following files: /etc/hbase/conf/hbase-site.xml, /etc/hadoop/conf/core-site.xml, /etc/tez/conf/tez-site.xml, /etc/hadoop/conf/mapred-site.xml, /etc/hadoop/conf/hdfs-site.xml, and /etc/hive/conf/hive-site.xml files.
Run the sample MapReduce job as follows:
yarn jar /usr/lib/hadoop-mapreduce/hadoop-mapreduce-examples.jar pi 10 20
Installation Procedure
The installation logs are available in <path_to_Infoworks_home>/iw-installer/logs/installer.log.
Perform the following:
Download and Extract Installer
Download the installer tar ball:
wgethttps://infoworks-setup.s3.amazonaws.com/3.1/deploy_3.1.0.tar.gzExtract the installer:
tar -xf deploy_<version_number>.tar.gzNavigate to installer directory:
cd iw-installer
Configure Installation
Run the following command:
./configure_install.sh
Enter the details for each prompt:
Hadoop distro name and installation path (If not auto-detected)
Infoworks user
Infoworks user group
Infoworks installation path
Infoworks HDFS home (path of home folder for Infoworks artifacts)
Hive schema for Infoworks sample data
IP address for accessing Infoworks UI (when in doubt use the FQDN of the Infoworks host)
HiveServer2 thrift server hostname
Hive user name
Hive user password
Run Installation
Install Infoworks:
./install.sh -v <version_number>
NOTE: For machines without certificate setup, --certificate-check parameter can be entered as false as described in the following syntax: ./install.sh -v <version_number> --certificate-check <true/false>. The default value is true. If you set it to false, this performs insecure request calls. This is not a recommended setup.
Post Installation
If the target machine is Kerberos enabled, performed the following post installation steps:
Go to
<IW_HOME>/conf/conf.propertiesEdit the Kerberos security settings as follows (ensure these settings are uncommented):
Edit the s3 temp buffer location in /etc/hadoop/conf/core-site.xml as follows:
Replace:
<property>
<name>fs.s3.buffer.dir</name>
<value>/mnt/s3,/mnt1/s3</value>
<final>true</final>
</property>
With:
<property>
<name>fs.s3.buffer.dir</name>
<value>/tmp/s3</value>
<final>true</final>
</property>
Navigate to $IW_HOME/conf/conf.properties file_._
Change the iw_jobs_classpath value as follows:
iw_jobs_classpath=/opt/infoworks/lib/extras/ingestion/*:/opt/infoworks/lib/parquet-support/*:/opt/infoworks/lib/mongodb/mongo-java-driver-3.8.0.jar:/opt/infoworks/bin/tools.jar:/opt/infoworks/lib/exec/commons-exec-1.2.jar:/opt/infoworks/lib/jackson/*:/opt/infoworks/lib/jsqlparser/*:/opt/infoworks/lib/shared/*:/opt/infoworks/lib/jwt/*:/opt/infoworks/platform/bin/notification-common.jar:/opt/infoworks/platform/bin/platform-common.jar:/opt/infoworks/lib/commons-lang3/*:/opt/infoworks/lib/ignite/*:/usr/lib/hive/conf:/usr/lib/hive-hcatalog/share/hcatalog/hive-hcatalog-streaming-2.3.3-amzn-1.jar:/usr/lib/hive/lib/hive-jdbc.jar:/usr/lib/hive/lib/libthrift-0.9.3.jar:/usr/lib/hive/lib/httpclient-4.5.5.jar:/usr/lib/hive/lib/httpcore-4.4.9.jar:/usr/lib/hive/lib/hive-cli.jar:/usr/lib/hive/lib/hive-service.jar:/usr/lib/hive/lib/libfb303-0.9.3.jar:/usr/lib/hive/lib/hive-metastore.jar:/opt/infoworks/platform/lib/notification-client/*
Change df_batch_classpath value as follows:
df_batch_classpath=/usr/lib/spark/conf/*:/opt/infoworks/df/udfs/*:/opt/infoworks/df/apache-tomcat-8.0.33/lib/*:/opt/infoworks/bin/df-commons.jar:/opt/infoworks/bin/tools.jar:/opt/infoworks/lib/extras/dt/*:/usr/lib/spark/jars/*:/opt/infoworks/df/udfs/*:/opt/infoworks/bin/df-commons.jar:/opt/infoworks/lib/df/*:/opt/infoworks/lib/mongodblogger/*:/usr/lib/spark/conf/:/usr/lib/hive/conf/:/opt/infoworks/platform/bin/notification-common.jar:/opt/infoworks/platform/bin/platform-common.jar:/opt/infoworks/platform/lib/notification-client/*
Navigate to /opt/infoworks/bin/env.sh file.
Add the following lines at the end of the file:
unset LD_LIBRARY_PATH
export pipeline_build_java_opts=' -Dhdp.version=2.6.4.0-91 '
export generate_sample_java_opts=' -Dhdp.version=2.6.4.0-91 '
export CATALINA_OPTS=' -Dhdp.version=2.6.4.0-91 '
export pipeline_interactive_java_opts=" -Dhdp.version=2.6.4.0-91 "
export pipeline_metadata_java_opts=" -Dhdp.version=2.6.4.0-91 "
export delete_entity_java_opts=" -Dhdp.version=2.6.4.0-91 "
Remove the following entries from $IW_HOME/conf/df spark_deaults.conf and /usr/lib/spark/conf/spark_deaults.conf files.
spark.network.crypto.enabled true
spark.network.crypto.keyFactoryAlgorithm PBKDF2WithHmacSHA256
spark.ssl.protocol TLSv1.2
spark.ssl.keyStorePassword TGS9Tm9XvR
spark.ssl.keyStore /usr/share/aws/emr/security/conf/keystore.jks
spark.authenticate true
spark.network.crypto.keyLength 256
spark.network.crypto.saslFallback true
spark.ssl.keyPassword km8wbHM42C
spark.ssl.enabled true
spark.ssl.enabledAlgorithms TLS_ECDHE_RSA_WITH_AES_128_GCM_SHA256,TLS_RSA_WITH_AES_256_CBC_SHA
spark.ssl.trustStore /usr/share/aws/emr/security/conf/truststore.jks
spark.ssl.trustStorePassword Lgp8Mt8gfB
For client mode:
Perform the following:
Replace:
spark.yarn.jars file:/usr/lib/spark/jars/*
With:
spark.yarn.jars file:/usr/lib/spark/jars/*,file:/opt/infoworks/lib/df/*
For spark-cluster mode:
Follow the documentation for Setting up spark pipelines. Then, comment the entry for spark cluster mode. That is, spark.yarn.jars must be commented.
Copy the contents of /usr/share/aws/emr/emrfs/conf/emrfs-site.xml file from the master node, to the edge node.
For example, the emrfs-site.xml file must resemble as follows:
<?xml version="1.0"?>
<?xml-stylesheet type="text/xsl" href="configuration.xsl"?>
<configuration>
<property>
<name>fs.s3.consistent.retryPeriodSeconds</name>
<value>10</value>
</property>
<property>
<name>fs.s3.consistent.retryCount</name>
<value>5</value>
</property>
<property>
<name>fs.s3.consistent</name>
<value>true</value>
</property>
<property>
<name>fs.s3.consistent.metadata.tableName</name>
<value>EmrFSMetadata</value>
</property>
</configuration>
Restart the Infoworks services.
NOTE: Kerberos tickets are renewed before running all the Infoworks DataFoundry jobs. Infoworks DataFoundry platform supports single Kerberos principal for a Kerberized cluster. Hence, all Infoworks DataFoundry jobs work using the same Kerberos principal, which must have access to all the artifacts in Hive, Spark, and HDFS.
Perform sanity check by running the HDFS commands and Hive shell in the edge Node.
For the link to download, contact the Infoworks support team.
IMPORTANT: Ensure that you add the EdgeNode Security Group ID to allow all inbound traffic to EMR Security Group.