Title
Create new category
Edit page index title
Edit category
Edit link
Pipeline Targets
Target
Data Transformation materializes the data as a flattened Hive table after performing all the operations like joins, aggregations, and unions on the big data sources defined by the pipeline design. The target node is used to specify the details of the table such as its schema name, table name and HDFS location.
Following are the steps to apply Target node in pipeline:
- Double-click the Target node. The Properties page is displayed.
NOTE: Any target column, apart from system generated audit columns, cannot start with "ziw".
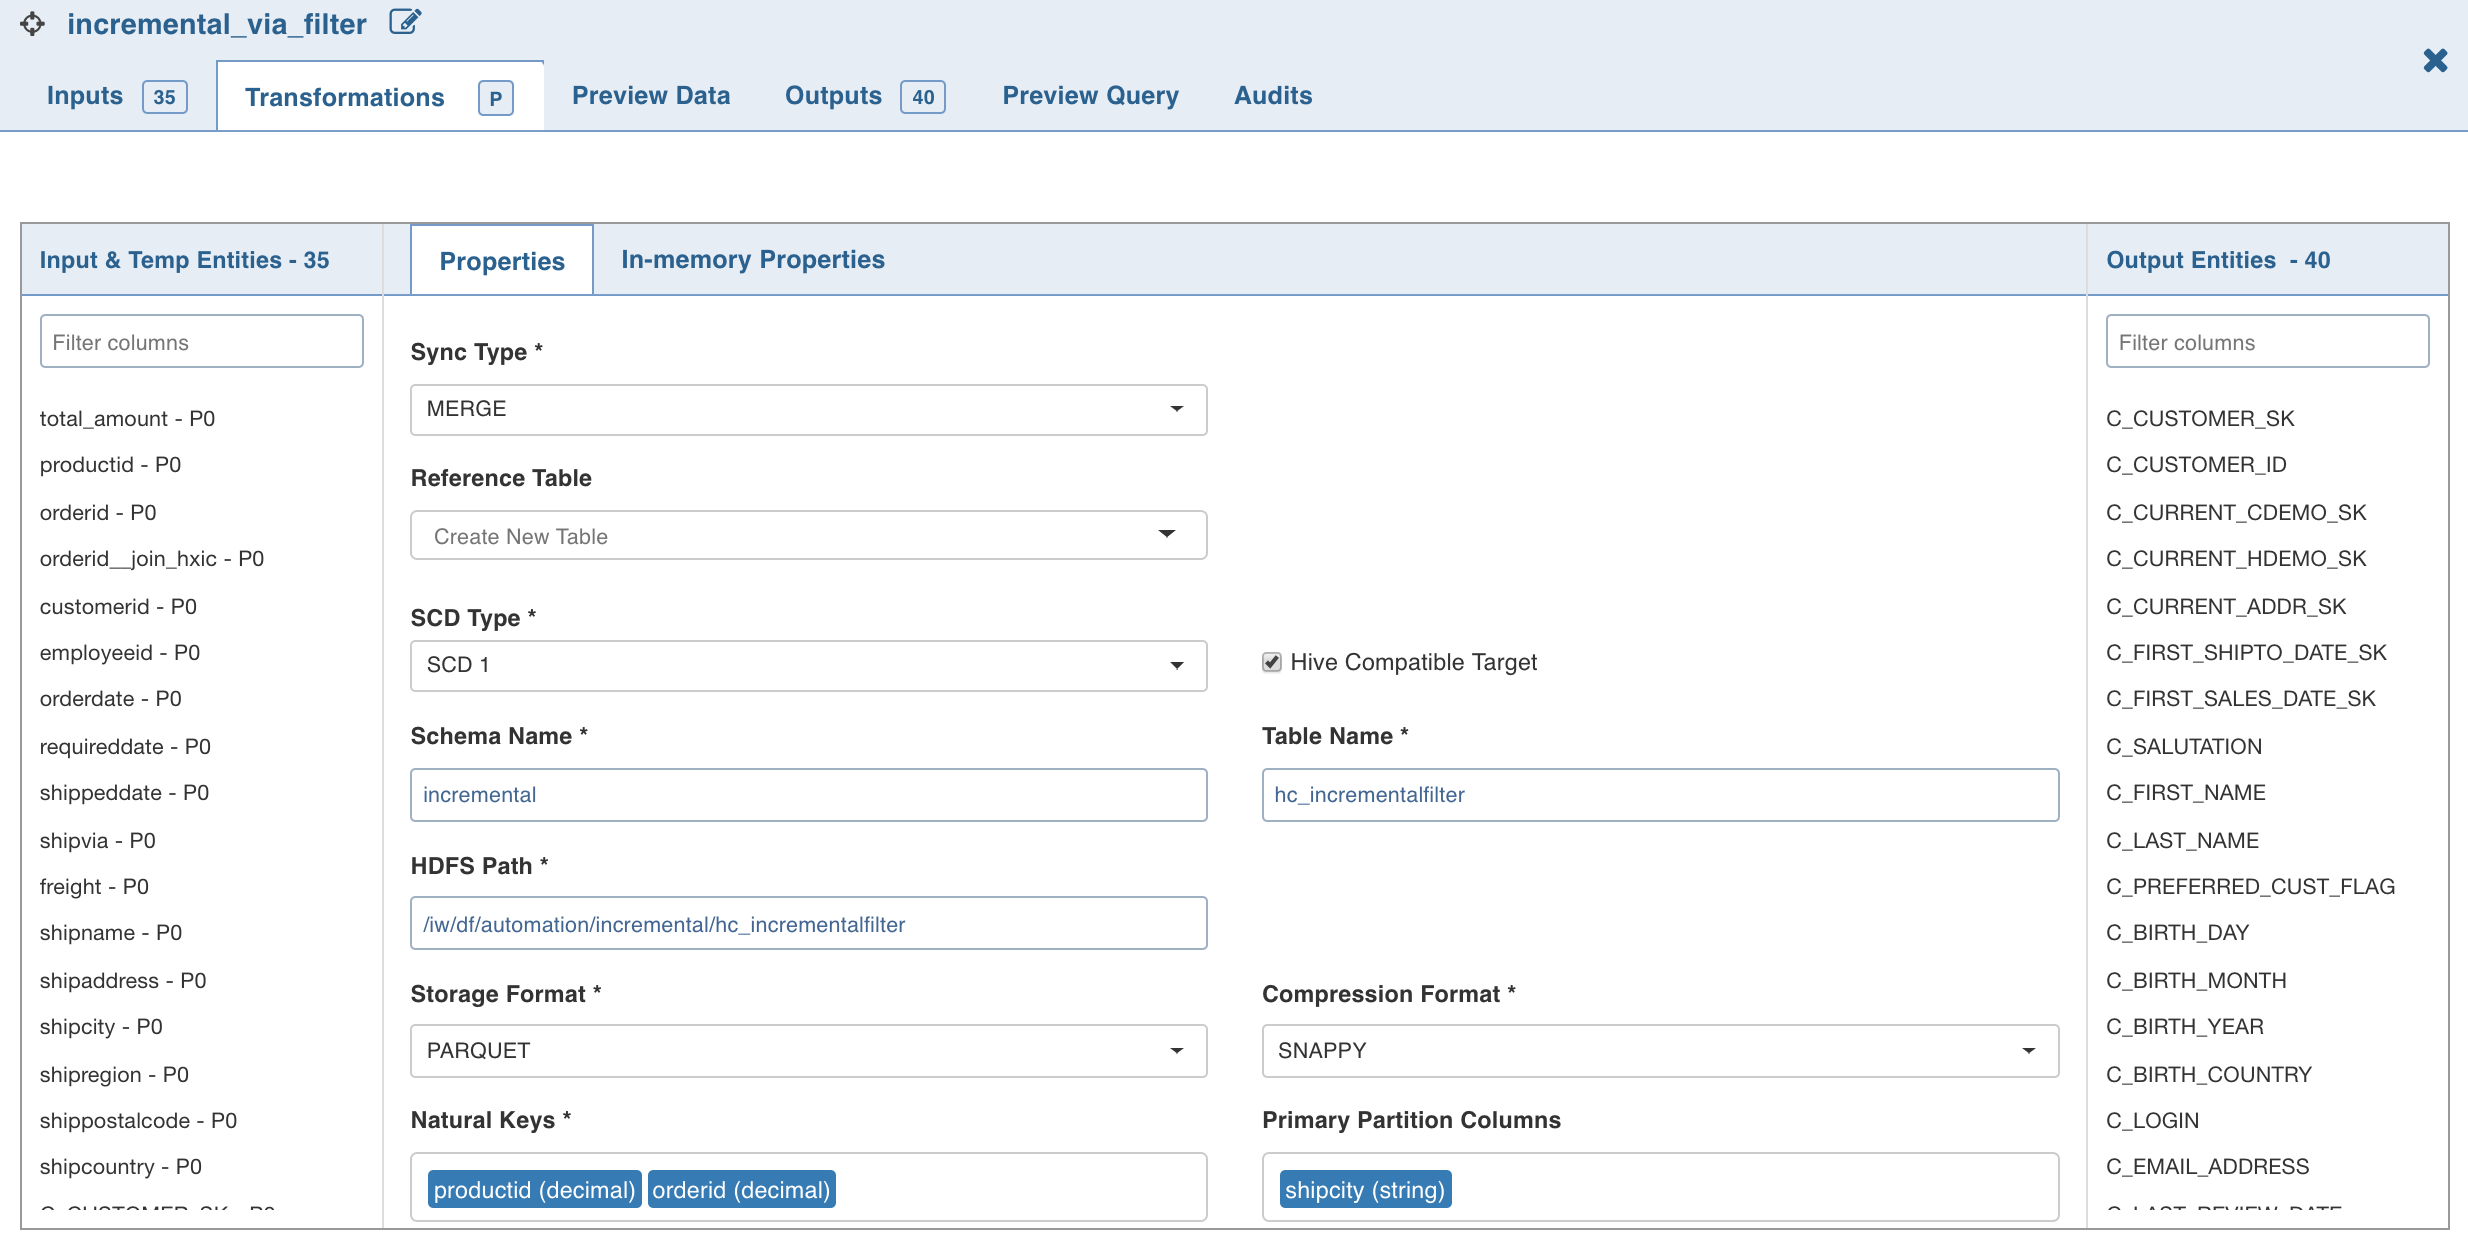
- Click Edit Configurations . The following page is displayed.
Edit the following properties and click Save:
- Sync Type determines if existing data, if any, will be overwritten or will be updated.
You can also select Append to append the data of one pipeline target to already built pipeline target. This can be achieved by giving a reference table in pipeline target.
On changing sync type to append/merge, a dropdown for reference table appears. All built pipeline tables are part of the reference table option. On reference table selection, properties such as schema name, table name, HDFS path etc, are visible. The appendable/mergeable target will by default have these properties of reference table. These properties are non-editable from the target node.
There is also a separate section for column mappings of reference table and target node. In mapping section, all columns from reference table are listed on the left-hand side while all columns from target node are listed on the right-hand side.
You can sort the order of the columns (using the edit feature) from the target node if the order of target columns does not match with the order of columns of reference table. Number of target columns needs to be greater than or equal to number of reference table columns. All unmapped columns from target table are excluded automatically on saving. All audit columns must be mapped to respective audit columns. For all other columns, data type of mapped columns must match.
If the column name in target is different than the corresponding mapped column of reference table, user gets a notification for renaming the column and on clicking OK , column name in the target node is renamed. On saving the mapping section, schema of the target table is changed appropriately to match the schema of reference table.
- SCD Type includes the following options:
SCD1/SCD2: SCD1 (Slowly Changing Dimension type-1) and SCD2 (Slowly Changing Dimension type-2) are the two models supported for merge sync type. SCD1 maintains only the most updated records (no history) in the table while SCD2 maintains history also. For mergeable target you can select reference table of type SCD1 or SCD2 depending on the requirement.
SCD2 (slowly changing dimension type 2): To maintain history, different levels of granularity are supported like, Year, Month, Day, Hour, Minute and Second.
For example, for a record if you configure SCD2 granularity as Day, the database maintains only one entry per day (most updated). If a new update is received the next day (after the period of the granularity), a history record will be maintained for that update. To maintain all history, set granularity level as Second. By default, the granularity level used is Second.
Following are the three audit columns used in SCD2:
ZIW_ACTIVE: The value is true for all active records and false for history records.
ZIW_TARGET_START_TIMESTAMP: Maintains start timestamp of a record.For example, for Day level granularity, the value is the first second of the day, and for Hour level granularity, the first second of the Hour.
ZIW_TARGET_END_TIMESTAMP: Maintains end timestamp of a record. For active records the value is an INFINITY timestamp whereas, for non-active records the value is the last second of the day/hour/month etc.
- Granularity includes options like Second/Minute/Hour/Day/Month/Year.
- Configuring SCD2 Granularity: You can also set the granularity level using pipeline configuration with the key df_scd2_granularity.
- Non SCD 2 Columns: All columns will be considered SCD2 columns by default. Select the columns to be excluded from SCD2. NOTE: These settings must be performed in the reference pipeline and not in the merge target pipeline.
- Storage Formatand Compression Format: Select the required storage format ( ORC or Parquet ). For ORC, the compression format is ZLIB . For Parquet , the compression format is SNAPPY .
NOTE: Compression logic can be selected based on compression format. You must be aware of the implication of compression mechanism used with the storage format selected. There are certain compression logics which are not performant on storage format.
- Natural Keys is a set of columns which uniquely identify a record. The user can use a derive with iwuuid() as the derive expression if none such exist.
- Number of Bucketsand Bucketing Columns : Custom Bucketing configuration is used for changing bucketing logic. By default, logic for bucketing is based on natural key columns selected. But if you are aware of the join columns used that are not same as natural keys, then you can change bucketing columns. This improves the performance. If this section is left blank, internally, Infoworks clusters data in table based on natural key columns selected. Enter the required values appropriately.
- Primary Partition Columns is an optional field. A column which has a low cardinality whose values do not get updated is a good candidate for primary partitions. It can help speed up a query which uses this column as a filter or joining condition.
- Index Columnsis a set of columns that enable improved query processing time. Indexing uses bloom filters in ORC files to index any column type. When a target is created in ORC format, the system passes columns in index columns to create index in ORC file.
WARNING: Some data type degrades performance of queries on the indexed columns.
- Sort By Columns are the columns by which the columns are sorted in each cluster.
- Delete Records Column is a column that represents a value true for records that are considered as deleted. The column selected in the Delete Records Column drop-down list will be automatically mapped to ZIW_IS_DELETED audit column.
NOTE: The ZIW_IS_DELETED audit column will be available in the target output only if a column is selected in the Delete Records Column drop-down list.
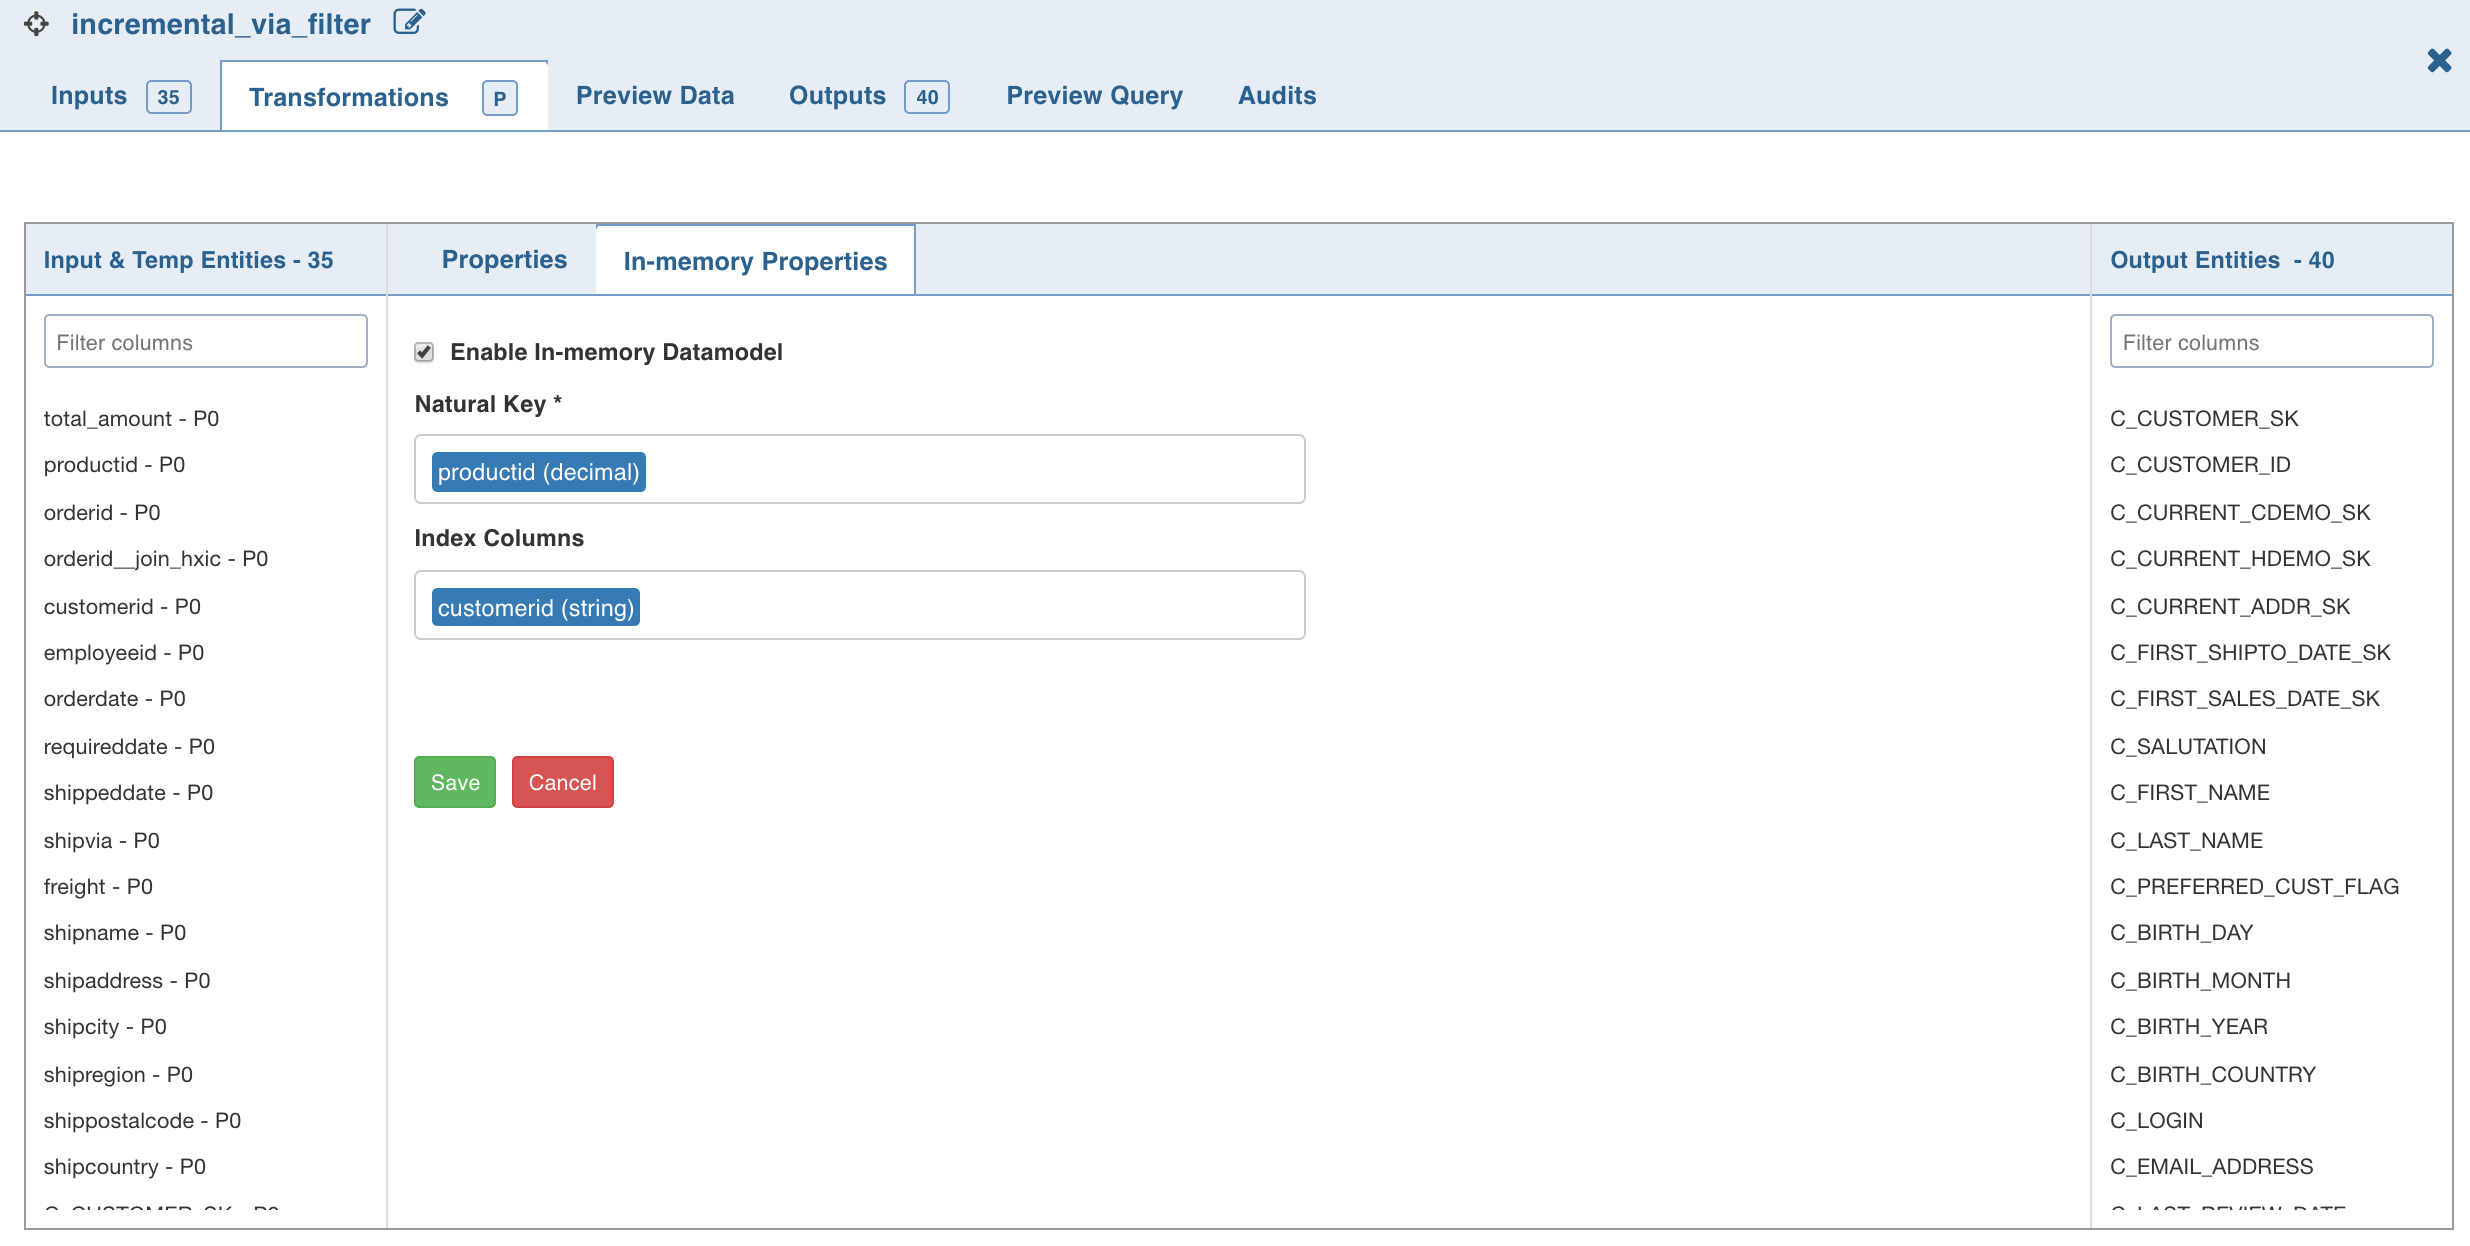
- Click the In-Memory Properties tab and click Edit Cache Properties.
NOTE: Ensure that Ignite is installed on a cluster to use this feature.
The in-memory model allows query acceleration. In this model, the table data is stored on a distributed memory and hence the queries on the data are faster.
Edit the following in-memory properties:
- Enable In-Memory Model: to enable or disable job submission.
- Natural Key: the valid primary key columns.
- Index Columns: the list of columns to be indexed.
- Click Save.
- You can click the Clear Cache button to clear the memory for the target table.
NOTE: If two or more existing artifacts share the same target HDFS path, the build will fail unless you change the target configuration.
During Pipeline build, existing target tables are available for external tools.
In case of using any pipeline targets in APPEND mode, the set detect_duplicates_in_data_fetch to true advanced configuration must be set at source level before running CDC.
Limitations
- Changing the values of Primary Partition Columns and Bucketing Columns for records is not supported. Any change in primary partition or bucketing or natural key will result in insertion of new record in Merge mode for SCD1/SCD2.
- Spark does not provide APIs to handle Compression Formats. It only supports SNAPPY.
- SCD2 target does not support complex datatypes like map, array union, etc.
Spark Hive Compatibility
Spark bucketing semantics are different from Hive bucketing semantics. This behaviour can be controlled by the Hive Compatible Target check box.
Infoworks Data Transformation handles these differences using the following methods:
Hive Compatible Targets
- No bucketing will be applied. Bucket columns will be used as secondary partition columns.
- ZIW_SEC_P column will be automatically created.
- ZIW_SEC_P value is calculated as hashcode(bucketcolumns)%noofbuckets
NOTE: Hive compatible target has a limitation in handling partition values with space in Merge Mode.
Non-Hive Compatible Targets
Spark bucketing will be applied. These targets will not be readable by Hive.
Spark SQL and Hive SQL expressions are compatible for majority of cases. However there are some differences. Some of the known issues are captured here:
- Hive supports MONTH on decimal type and date type, however, spark supports only on date type.
- Hive variance function aliases to var_pop while spark aliases to var_samp.
- Hive union vs spark union has different behaviour.
For example select col1 from tab1 union all select col1 from tab2. If tab1.col1 is decimal(7,2)and tab2.col1 is decimal(38,0),
- Hive target col is decimal(38,0) (rounds off any decimal value to nearest integer).
- Spark target col is decimal(38,2) (no round-off).
- iw_rowid function returns different rowid for spark vs Hive when decimal values are present in natural keys.
- Spark CAST as timestamp expects epochSeconds while Hive cast expects milliseconds.
See the Spark SQL documentation for any issues.
Compatibility Matrix
| Field | Targets created by Spark execution engine | Targets created by Hive Execution Engine | Ingestion Sources |
|---|---|---|---|
| Spark Engine Read? | Yes | Yes | Yes |
| Spark Engine Write? | Yes | No | NA |
| Hive Engine Read? | Yes (if Hive compatible target) | Yes | Yes |
| Hive Engine Write? | No | Yes | NA |
Additive Schema Handling
If only new columns have been added to a source table or pipeline, additive schema handling alters the table to add these columns at the end of the table. Additive schema handling is supported only in the Merge mode.
The additive schema changes are displayed in build log summary of pipeline.
Limitations
- The rows for which the new column values are not defined will be assigned as null.
- Data type of additive columns can only be primitive.
- Additive columns cannot be part of target properties like natural keys, primary partition columns, etc.
- Build time of additive schema handling in merge mode is comparatively higher.
- Additive schema handling will be executed only when no Reference Table is set for Merge Mode in the Target Properties window.
- Additive schema is currently not supported for MapR-DB targets.
MapR-DB Target
Building a MapR-DB target writes data to the MapR-DB which improves the overall performance in terms of build time as compared to export job.
NOTE: This node is compatible only with Hive execution engine.
- Double-click the MapR-DB Target node. The Properties page is displayed.
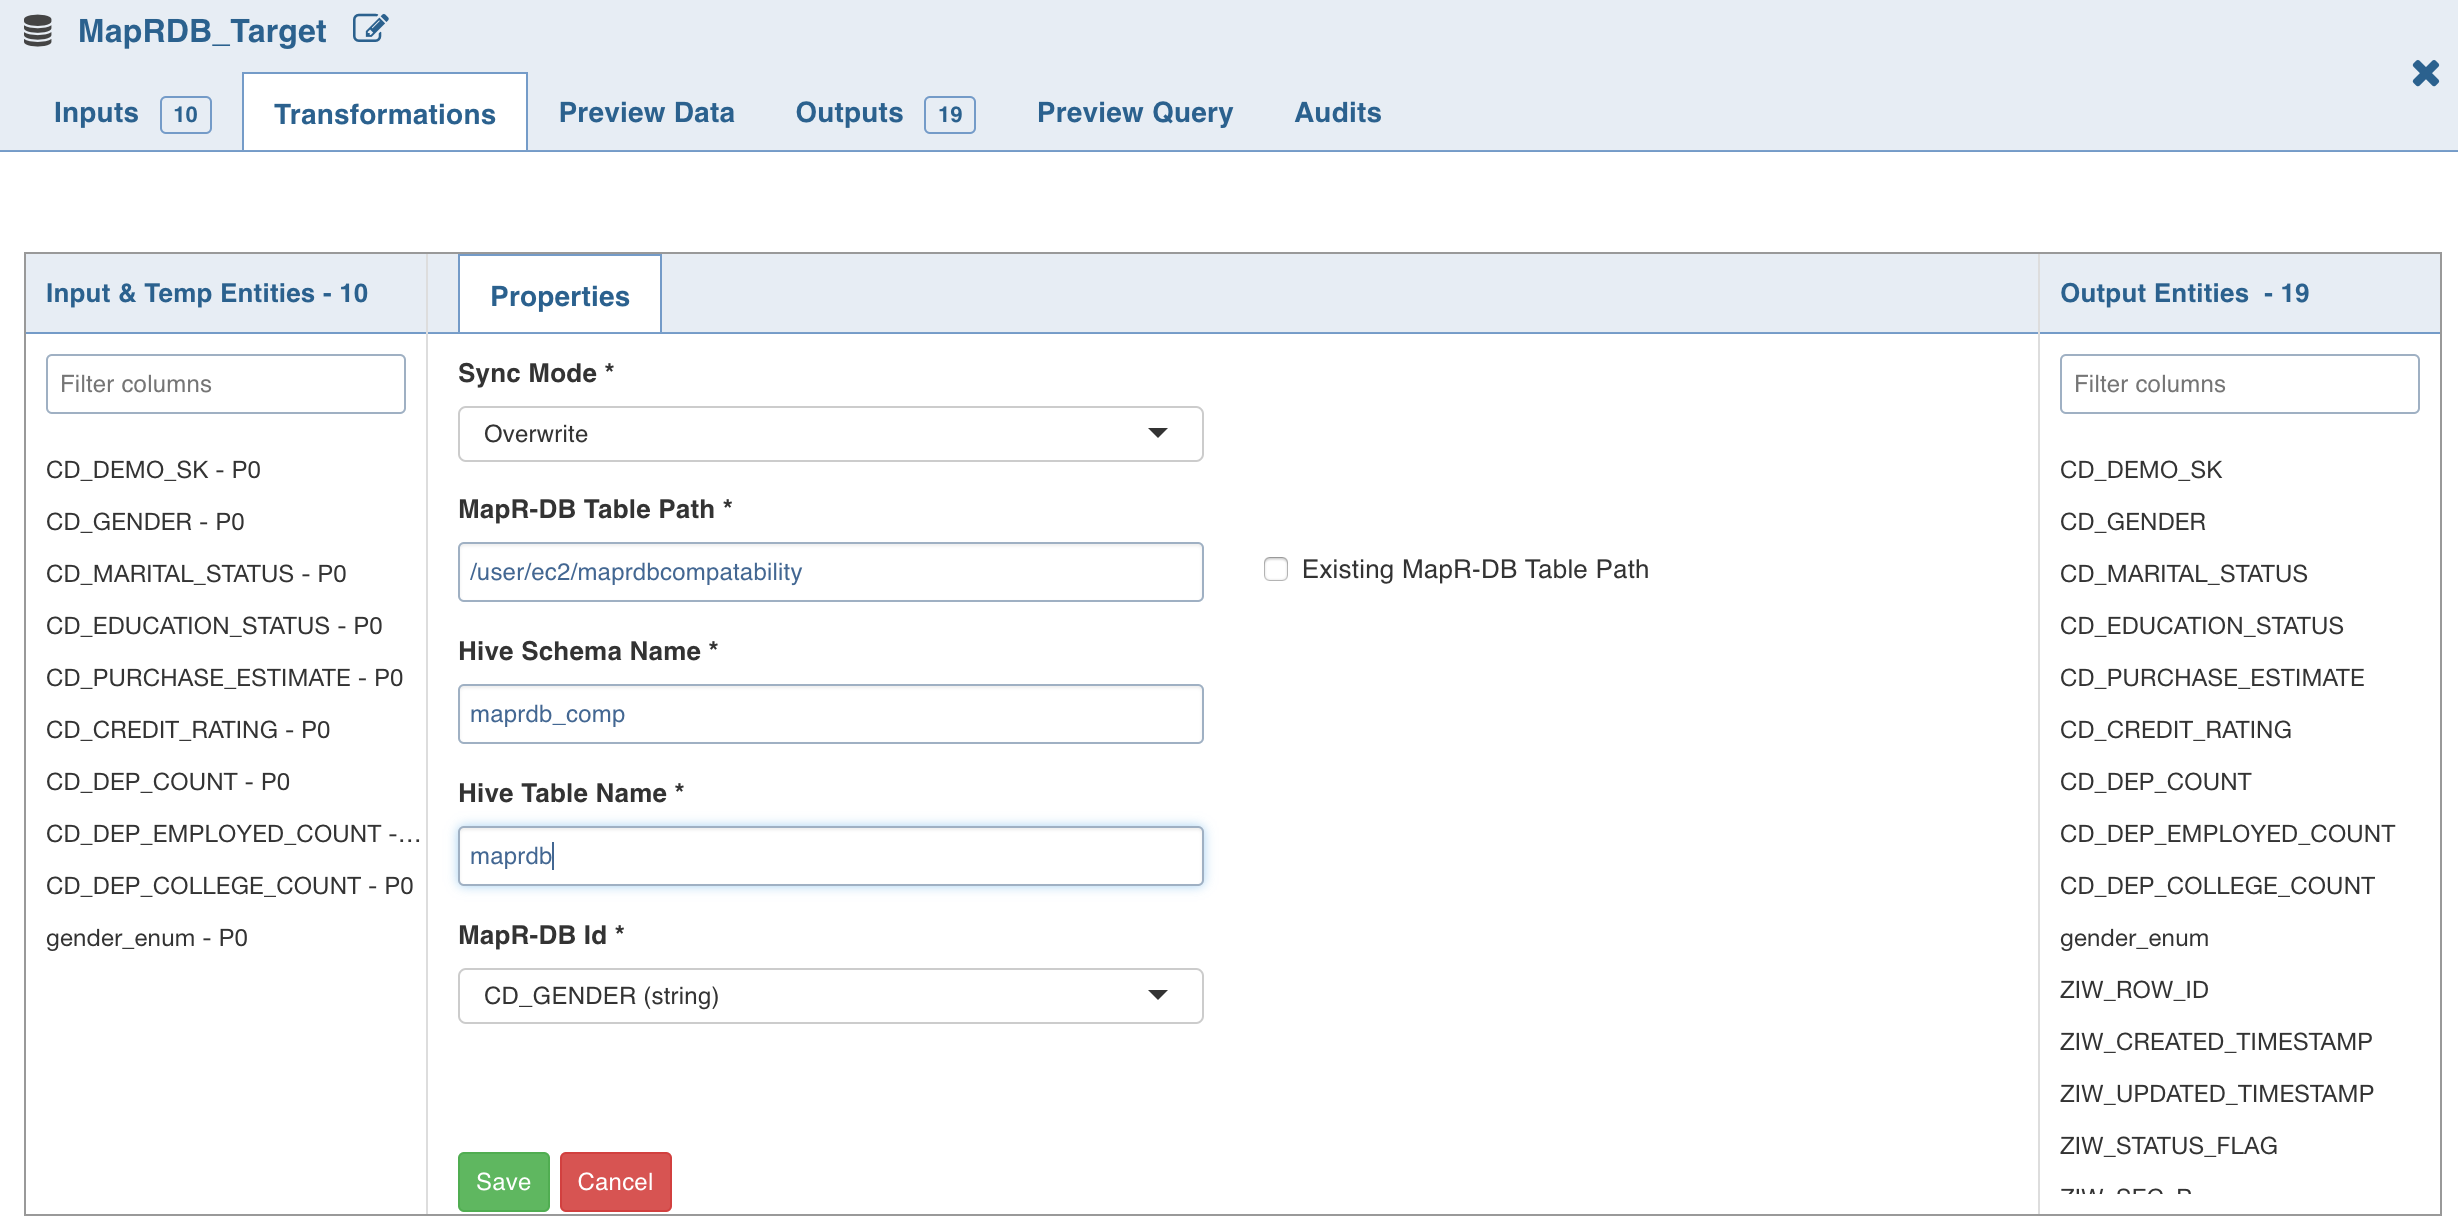
- Click Edit Configurations .
Following are the steps to apply MapR-DB Target node in pipeline:
Enter the following details:
- Sync Mode: It includes the following options:
- Merge: Inserts into MapR-DB based on the ID column values. If ID value already exists, MapR-DB updates existing values with new values.
- Overwrite: Truncates and reloads data if the MapR-DB table is created by the Infoworks DF, else only Hive metadata layer is redefined. This is achieved through Hive by using managed/external Hive table.
- MapR-DB Table Path: MapR-DB table name.
- Existing MapR-DB Table Path: If this field is enabled, the MapR-DB will not be deleted. Else, if the MapR-DB table is created by the Infoworks DF, the table will get deleted and created again in Overwrite mode.
- Hive Schema Name: Schema in which the Hive table is present.
- Hive Table Name: Projection over MapR-DB table.
- MapR-DB Id: The ID value present in source or derived by the user.
NOTE: The data type must be a string.
- Click Save.
For details on data types supported, see the MapR-DB Ingestion section.
Limitations
- Additive schema is currently not supported for MapR-DB targets.
- Decimal datatype is not supported, it must be changed to double.
- Hard delete is not supported.
Custom Target
Custom Target allows customization of code to support various types of targets other than Hive. This node is similar to similar to the Custom Transformation node.
Prerequisite
Perform the following:
- Navigate to the IW_HOME/opt/infoworks/conf/conf.properties file.
- Set the extension path in the user_extensions_base_path configuration. For example, user_extensions_base_path=/opt/infoworks/extensions/.
- Ensure that the Infoworks user has write access to the folder.
- Restart the UI and Data Transformation services.
Registering Custom Target
Registering Custom Target is same as registering Custom Transformation except that you must select the Extension Type as Custom Target. For details see the Registering Custom Transformation section.
Adding Custom Target to Domain
Adding Custom Target to domain is same as adding Custom Transformation to domain. For details see the Adding Custom Transformation to Domain section.
Infoworks already provides snowflake as a custom target. For details, see Pipeline Targets.
Following are the steps to apply Custom Target node in pipeline:
- Double-click the Custom Target node. The properties page is displayed.
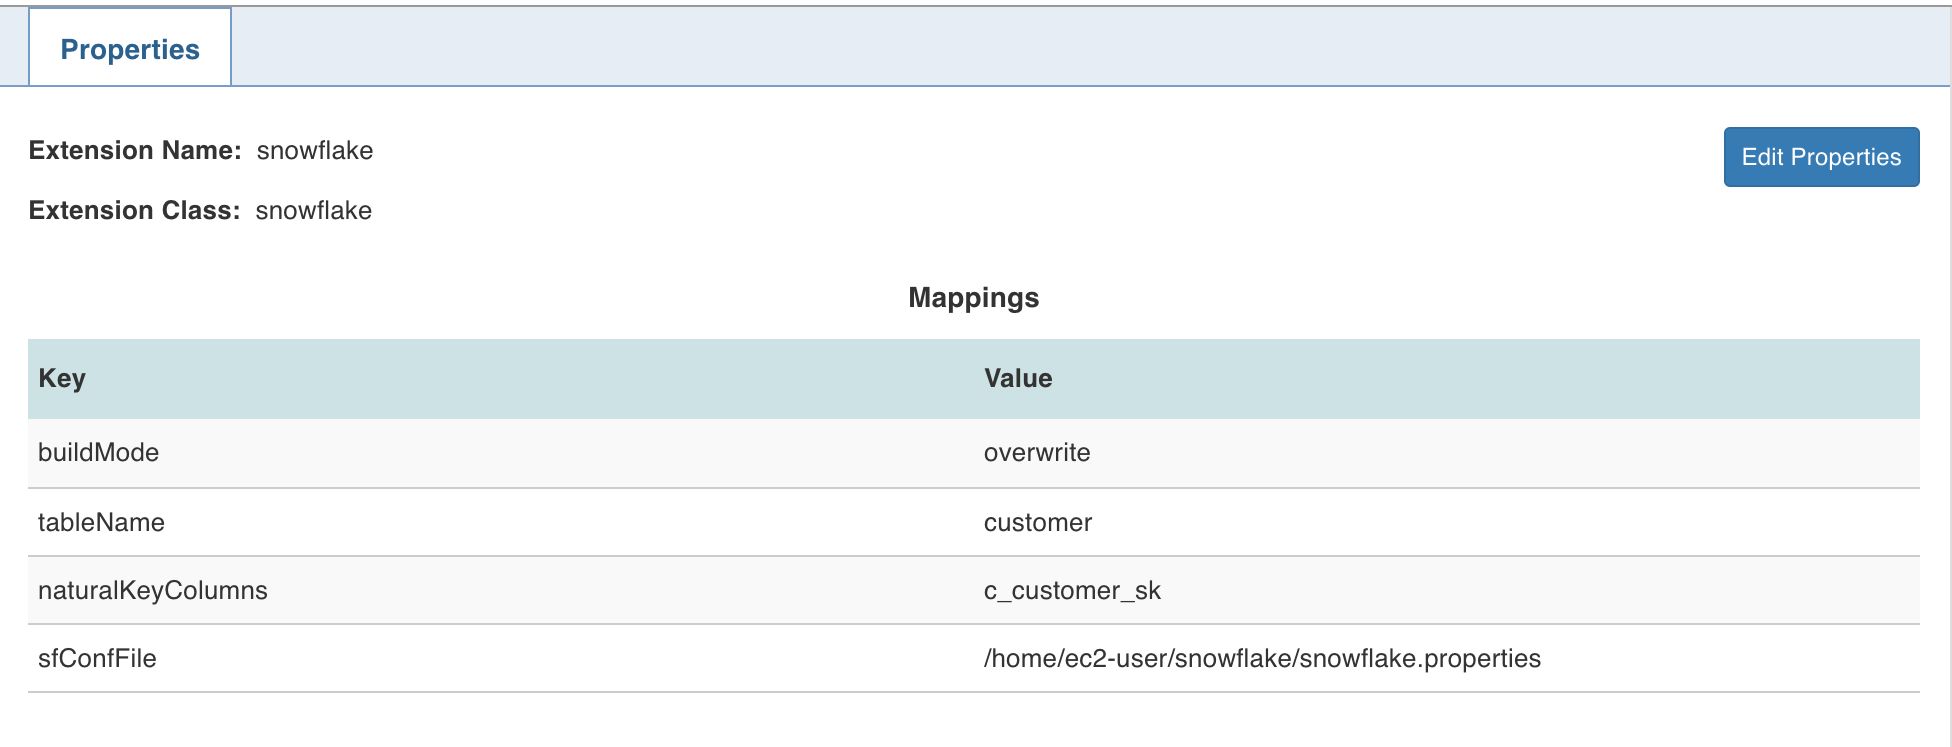
- Click Edit Properties, select the Extension Name as snowflake.
- Set the following keys:
- buildMode: overwrite or merge
- tableName: table name of the snowflake target
- naturalKeyColumns: comma-separated natural keys
- sfConfFile: the configuration property file in the edge node which includes the connection details of snowflake.
- Click Save.
NOTE: For any File System other than HDFS, include the scheme in the iw_df_ext_prefix configuration in the conf.properties file. For example, for Azure Data Lake, set the following configuration in the conf.properties file: iw_df_ext_prefix=wasb://
Python Custom Target
Data Transformation supports writing Custom Target logic in Python. Infoworks provides Python APIs which must be implemented to write a custom logic.
Creating Python Custom Target
- Install python package in IW_HOME/df/python_scripts/api-1.0.egg using the following command:
python -m easy_install <path_for_api-1.0.egg> - Write custom target logic by implementing the Python API CustomTarget. To import, add the following statement to your python custom logic:
from api.custom_target import CustomTarget - Example for custom target is available at IW_HOME/examples/pipeline-extensions/custom_target_example.py
- Create .egg extension file for the python project.
NOTE: Use the Java APIs to apply transformation on the input datasets. Internally, py4j is used to communicate to Python custom logic. And, all the provided input data frames are in Java Object form.
Registering Python Custom Target
- In the Infoworks DF, navigate to Admin > External Scripts > Pipeline Extensions.
- Click Add An Extension.
In the Add Pipeline Extension page, enter the following details:
- Extension Type: Select Custom Transformation.
- Execution Type: Select Python.
- Name: A user-friendly name for the group of transformations under one project. For example, SampleExtension.
- Folder Path: The path to the folder where the .egg file for the python project is saved. For example, /home/transformation/cust.egg.
- Classes: The classes implementing the SparkCustomTransformation API which must be available as transformations within Infoworks.
- Alias: A user-friendly alias name for the transformations. For example, Sample.
- ClassName: A fully qualified class name in the
<python_package>.<python_module>.<class_name>format. For example, io.infoworks.awb.extensions.sample.SparkCustomTfmSample. - You can click Add to add multiple pairs of Alias and Class Names.
NOTES:
- Py4j and Pyspark packages must be installed on Python.
- Custom transformation with Python runtime is only supported from Python v2.7 onwards.
Configurations
- Add df_scoket_port_range configuration in the pipeline advanced configuration to provide available port range (which will be internally used for socket communication). For example, 25810 : 25890. The default range is 25400 to 25500.
- Add df_socket_max_tries in pipeline advanced configuration to set the maximum number of tries to establish the socket communication. For example, 8. The default value is 10.
- Set the Python path by adding following configuration to the IW_HOME/conf/conf.properties file
python_custom_executable_path=<python_executable_path>
NOTE: If the above configuration is set, the path will be used for Python custom logic. If not set, the default Python version installed on that node will be used.
Snowflake Table
Infoworks supports Snowflake as a target for data transformation pipeline.
NOTE: This node is compatible only with Spark execution engine.
Prerequisites
Ensure the snowflake target data connection is configured. For the steps to configure data connection, see Target Data Connections.
NOTE: The snowflake configuration file is not supported from this release. User must now create a target connection for the Snowflake targets already configured.
Setting Snowflake Table Properties
Following are the steps to use snowflake target in pipeline:
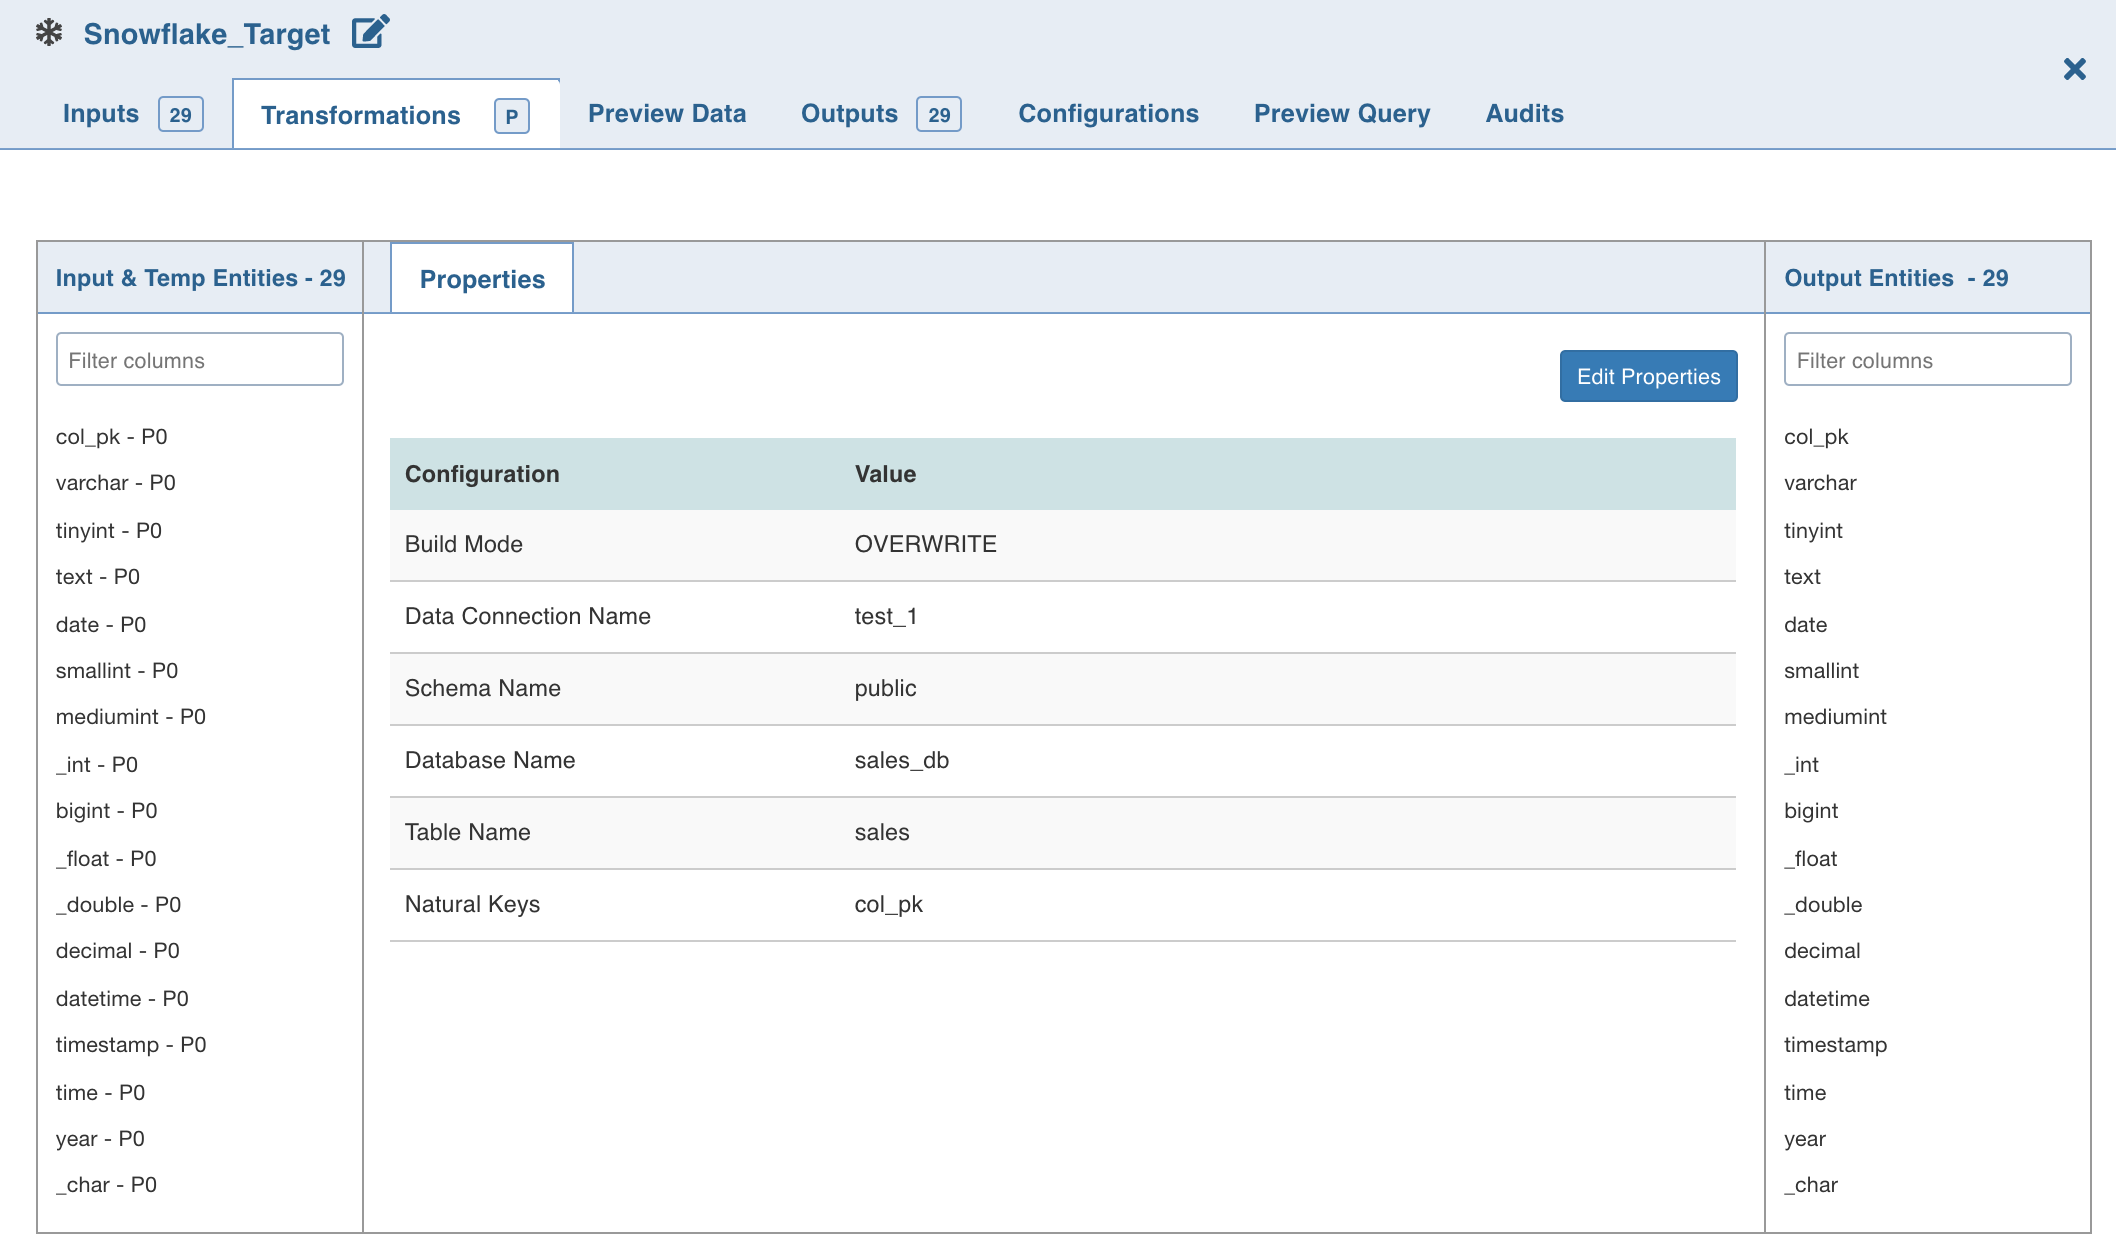
- Double-click the Snowflake Target node. The properties page is displayed.
- Click Edit Properties, and set the following fields:
- Build Mode: The options include overwrite, append or merge
Overwrite: Drops and recreates the snowflake target.
Append: Appends data to the existing snowflake target.
Merge: Merges data to the existing table based on the natural key.
- Data Connection Name: Data connection to be used by the snowflake target
- Schema Name: Schema name of the snowflake target
- Database Name: Database name of the snowflake target
- Table Name: Table name of the snowflake target
- Natural Keys: The required natural keys for the snowflake target
- Click Save.
Limitation
- DOUBLE, FLOAT, DOUBLE PRECISION, and REAL columns are displayed as FLOAT, but stored as DOUBLE. This is a known issue in Snowflake.
Best Practices
For best practices, see Data Transformation Target Configurations.
Reference Video
The demo video of Snowflake Target is available here.
Cosmos DB Target
Data transformation pipelines can create and incrementally synchronize data models and tables to Azure CosmosDB. Azure CosmosDB is Microsoft’s globally-distributed, multi-model database service for managing data at planet-scale.
Following are the steps to apply Cosmos DB Target node in pipeline:
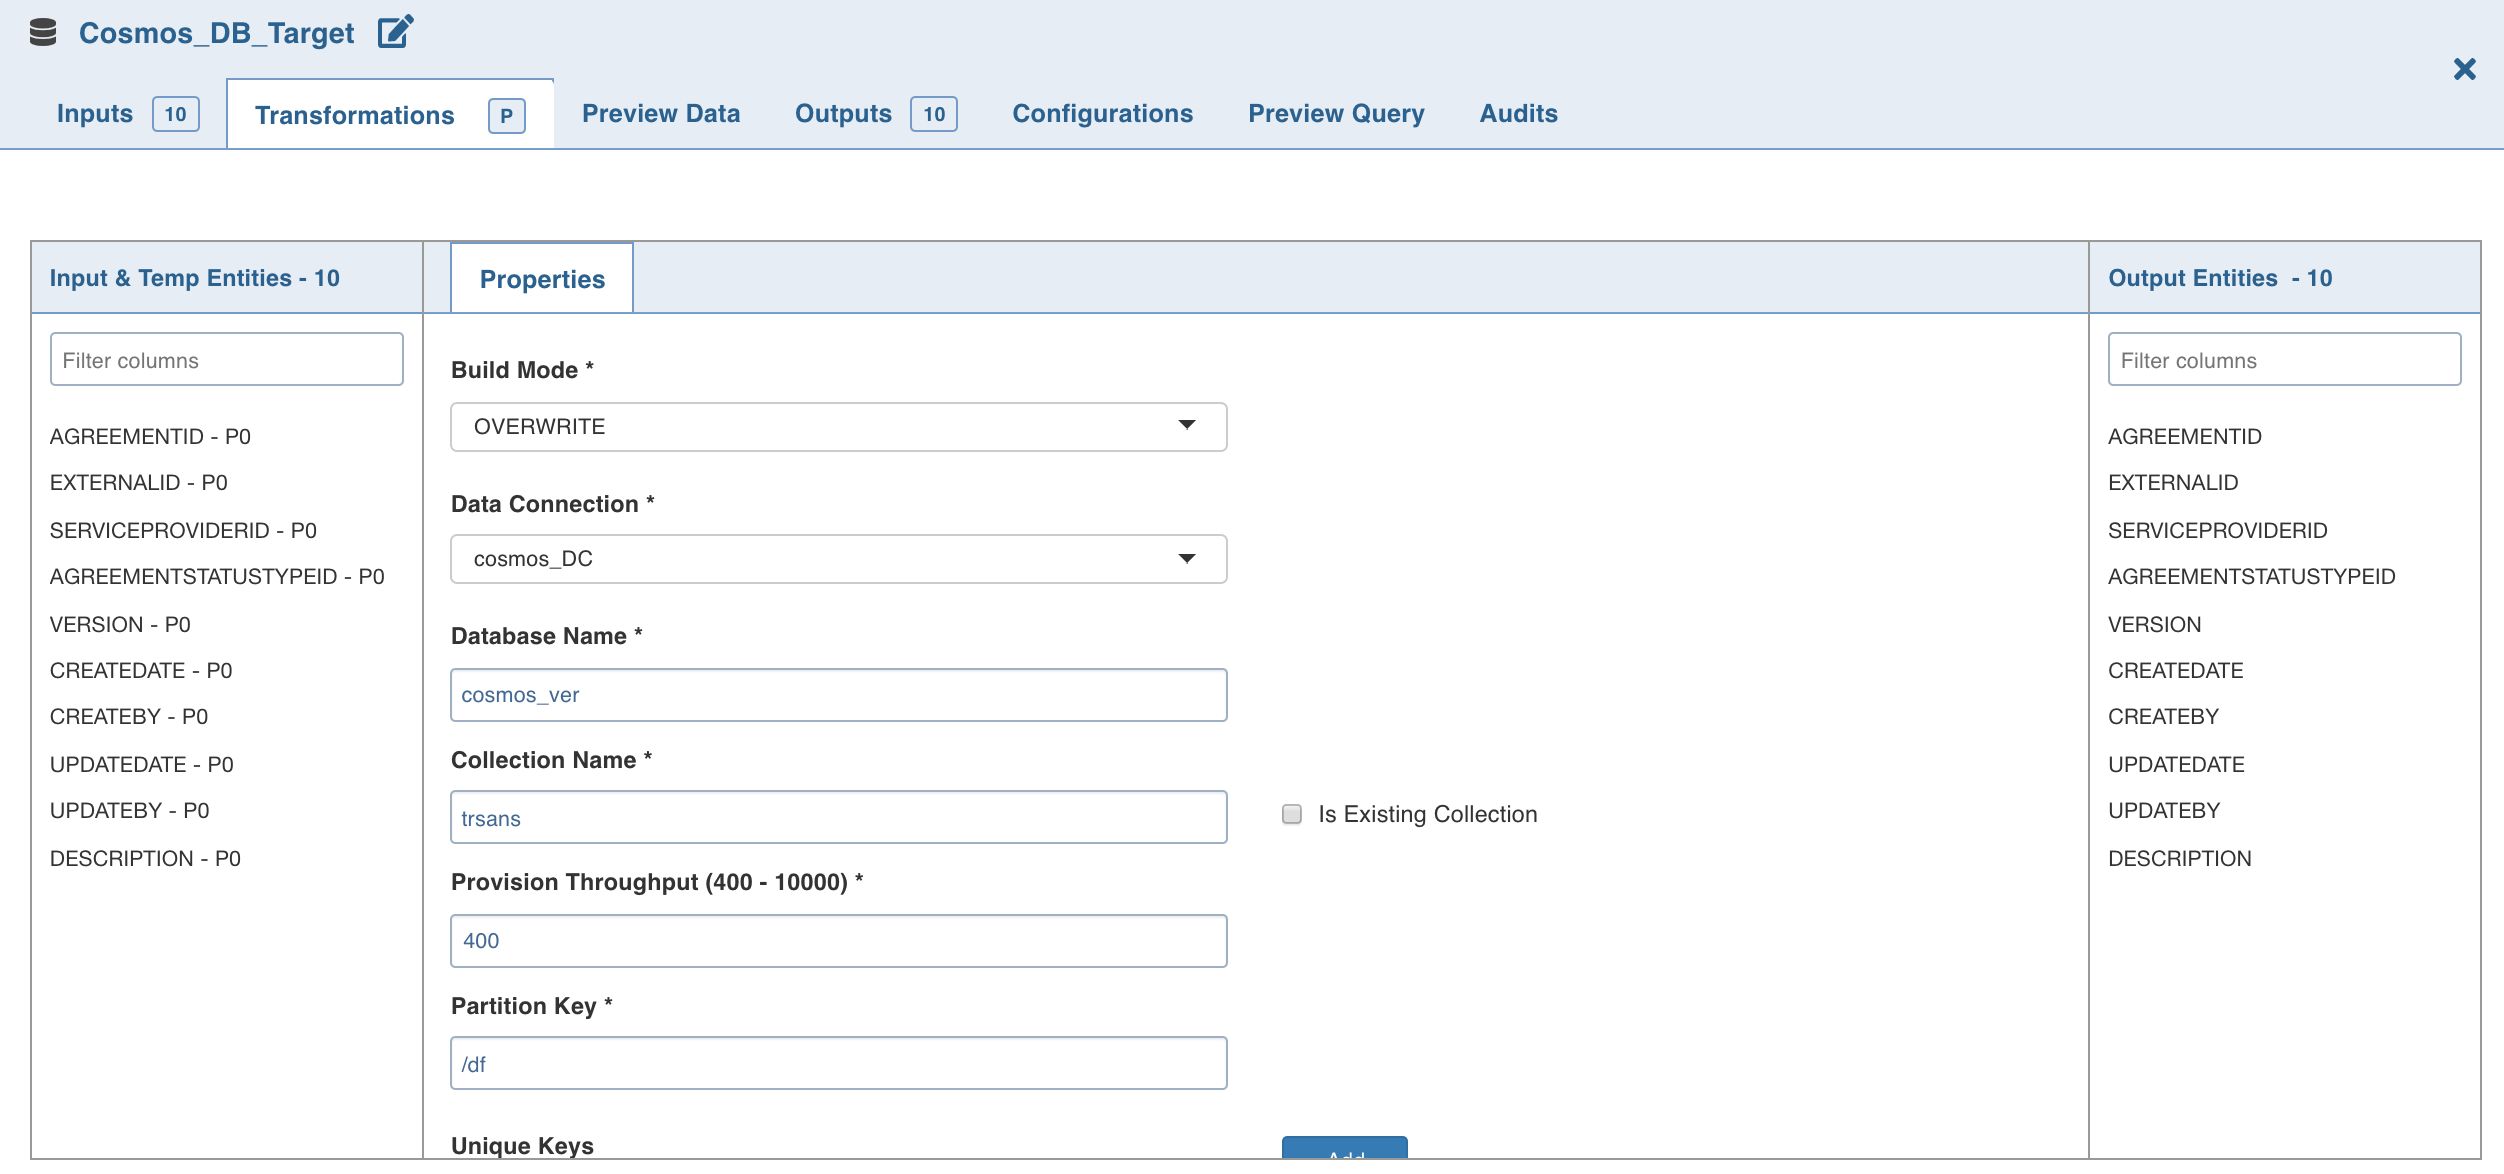
- Double-click the Cosmos DB Target node. The Properties page is displayed.
- Click Edit Properties.
Properties
- Build Mode: The options include overwrite, append and merge.
Overwrite: Drops and recreates the Cosmos DB collection.
Append: Appends data to the existing Cosmos DB collection.
Merge: Merges data to the existing Cosmos DB collection.
- Data Connection: Data connection to be used by the Cosmos DB target.
- Database Name: Database name of the Cosmos DB target.
- Collection Name: Collection to which the documents must to be written.
- Is Existing Collection: Enable this option if the documents must be appended/merged to the existing/provided collection. If unchecked, a new collection will be created.
- Provision Throughput (400 - 10000): Provision throughput for the container created. The default value is 400.
- Partition Key: The partition key on the Cosmos DB collection to be created. Partition key must be in path format for the JSON document which is to be written to Cosmos DB, for example, /employee/employee_age.
- Unique Keys: A unique key policy is created when an Azure Cosmos container is created. Unique keys ensure that one or more values within a logical partition is unique. Unique key must be in the path format for the JSON document which is to be written to the Cosmos DB, for example, /employee/employee_age.
NOTES:
- ID column is mandatory for merge mode.
- ID column must only be string.
- ID column must not be present for append mode.
- Partition keys and unique keys must always be lowercase, for example, /city.
Following are the datatypes supported for Cosmos DB (same as JSON datatypes):
- String: Double-quoted Unicode with backslash escaping.
- Number: Double-precision floating-point format in JavaScript. Exponential notation and integers are supported. Floating point numbers, decimal datatype in Hive, and numbers as strings are not supported.
- Boolean: True or false.
- Array: Ordered sequence of values.
- Value: This can be a string, a number, true or false, null, etc.
- Object: Unordered collection of key- value pairs (Example: Struct in hive)
- Null: Empty value
- Date time in Cosmos: Azure Cosmos DB does not support localization of dates. So, DateTimes must be stored as strings. The recommended format for DateTime strings in Azure Cosmos DB is
YYYY-MM-DDThh:mm:ss.sssZwhich follows the ISO 8601 UTC standard. - Hive Timestamp and Date is written as Unix Timestamp in Cosmos DB.
For more details, refer to our Knowledge Base and Best Practices!
For help, contact our support team!
(C) 2015-2022 Infoworks.io, Inc. and Confidential